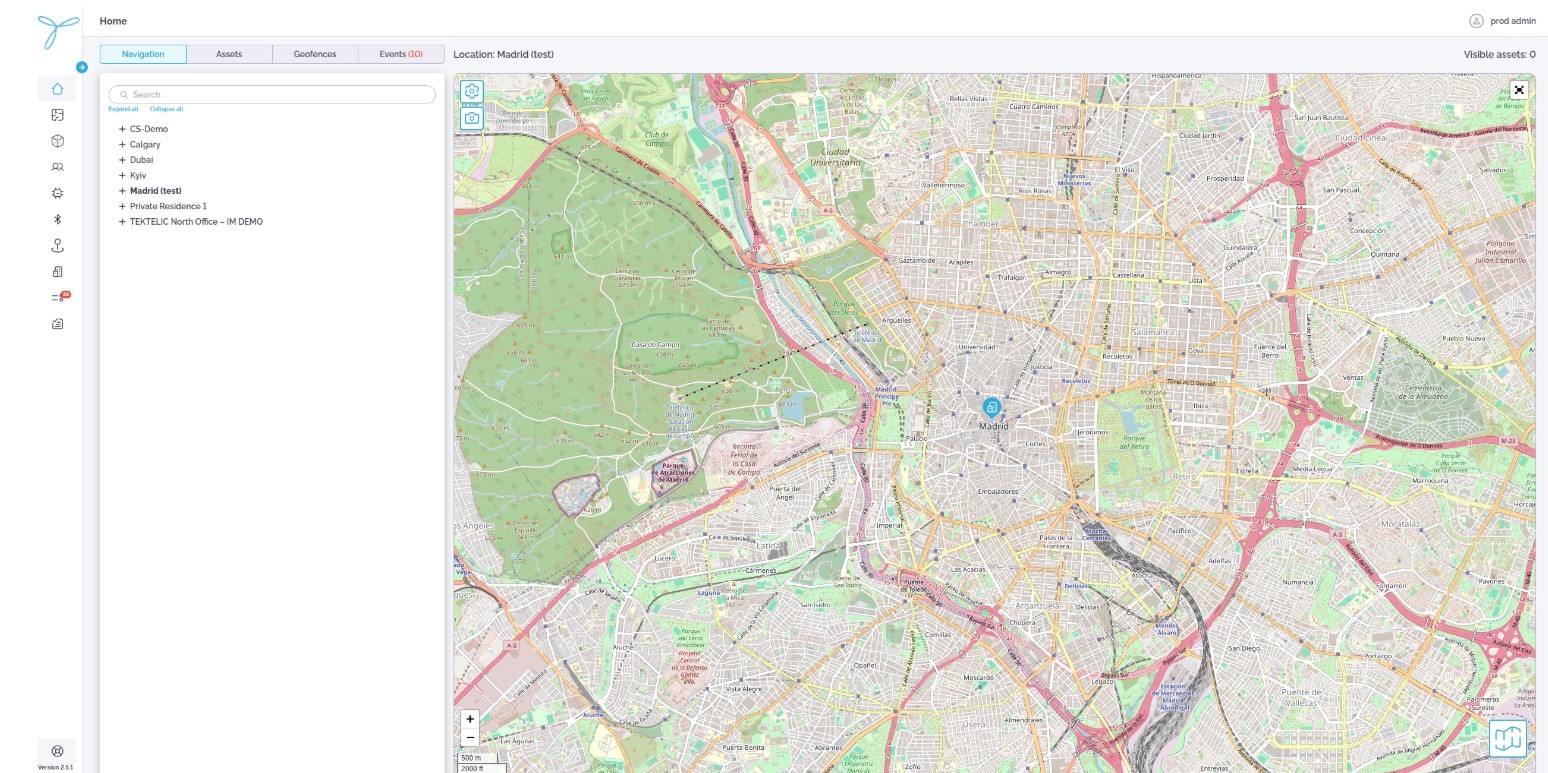
Home page
-
Left Panel (Top to Bottom):
- Home: Jump back to the main view anytime.
- Floor Plans: Access indoor layouts for precise indoor tracking.
- Assets: View and manage all your tracked items.
- Users: Manage account access for your team.
- Devices: Monitor TEKTELIC trackers and their status.
- Beacons: View and manage all your beacon devices.
- Sites: Select or edit your locations.
- Buildings: Organize structures within your sites.
- Events: See triggered events across your system.
- Event Rules: Set up custom alerts for your assets.
-
Tabs Under “Home” (Site-Specific):
-
These attributes apply only to the selected site, shown alongside the map on the right:
- Navigation: Displays a hierarchy tree (Sites > Buildings > Floor Plans) to navigate your setup.
- Assets: Shows outdoor assets currently visible on the map.
- Geofences: Lists all geofences added to the selected site.
- Events: Displays all triggered events within the chosen site.
-
-
Interactive Map:
- Shows outdoor locations with real-time updates, tied to the selected site.
- Visibility Preferences: Toggle the display of assets and geofences on or off.
- Export Button: Capture a screenshot of the map for your records.
- Full Screen Mode: Expand the map for a bigger view.
- Map Type: Switch between standard or satellite views.
- Zoom In/Zoom Out: Adjust the map scale with easy buttons.
Overview
Purpose: The Floor Plans page lets you manage indoor layouts for precise asset tracking within buildings. You can add, edit, or delete floor plans to organize your tracking setup.
Access: Reach this page by selecting Floor Plans from the left navigation panel on the Home page.
Permissions: Admins and users with permission to manage sites and buildings can access and use this page.
List View
-
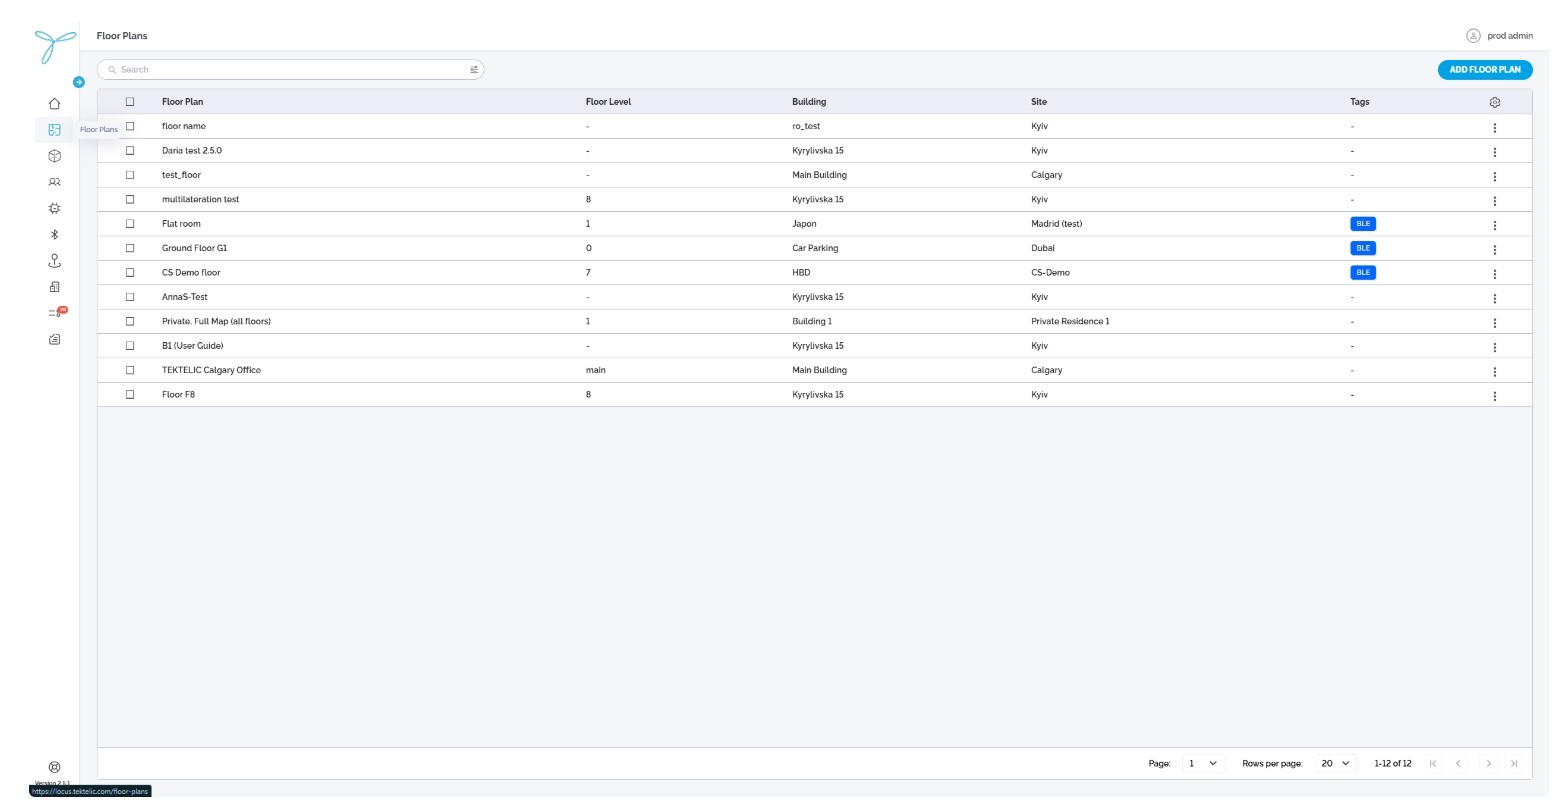
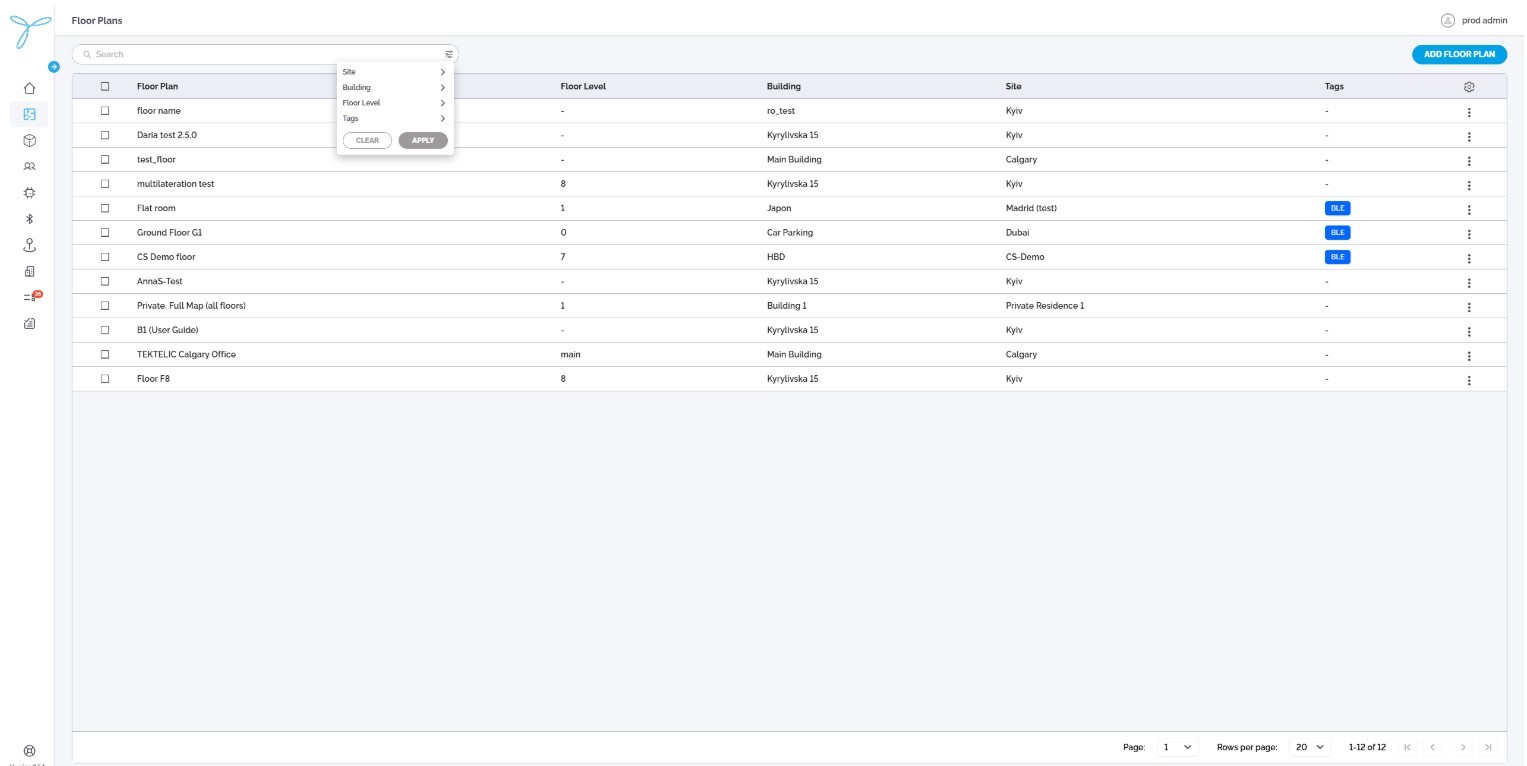
The table displays all floor plans you have access to, with default columns: Floor Plan, Floor Level, Building, Home Site, and Tags.
-
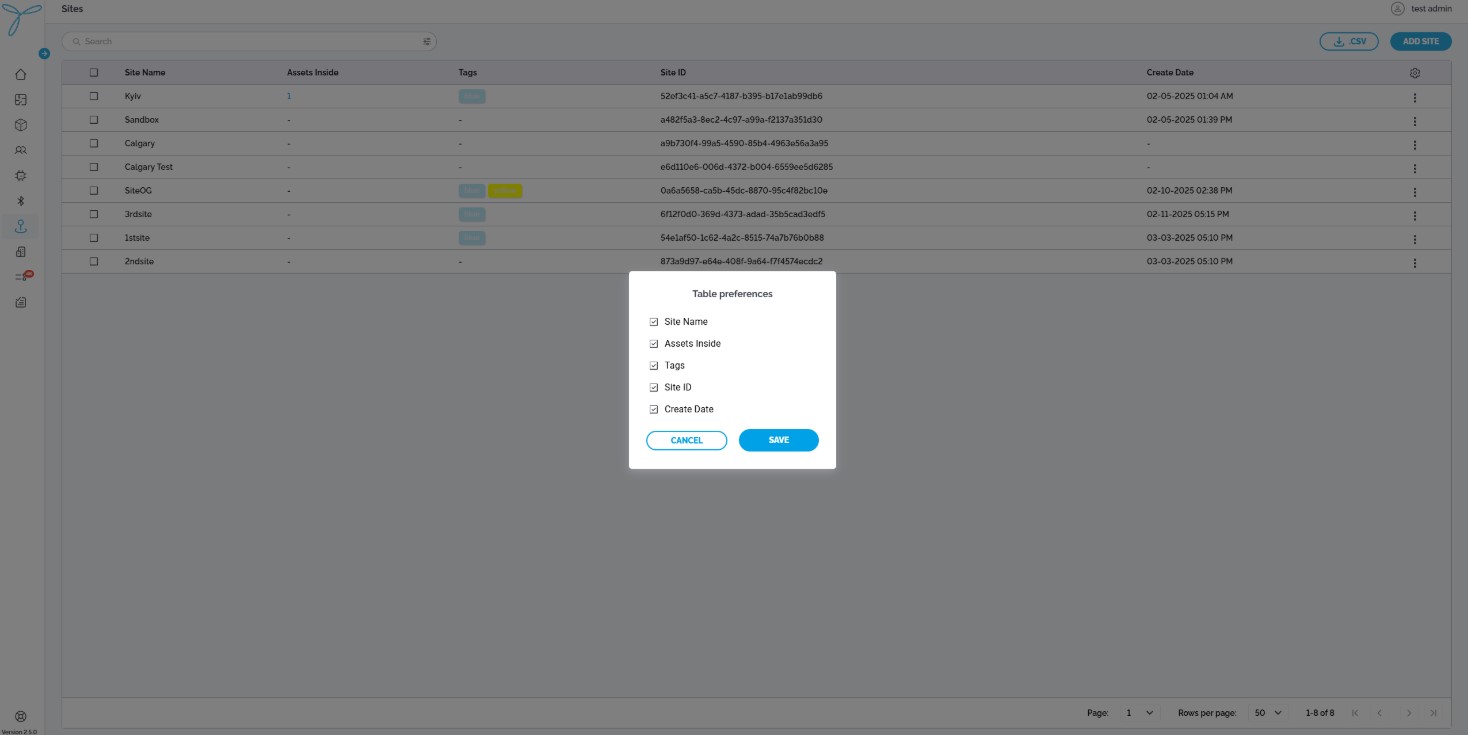
Column Configuration: Click the gear icon to open Table Preferences. You can manage which columns to show or hide from available options (e.g., Floor Plan, Floor Level, Tags). Columns can be rearranged by dragging and hidden by deselecting, but resizing is not supported.
-
Search, Filter, Sort: Use the search bar to find floor plans by name, apply filters (e.g., by Home Site or Building) via the filter icon, and sort columns like Floor Level in ascending or descending order.
-
Actions (Based on Permissions):
- Admins: Add, edit, or delete floor plans.
- Standard Users: View floor plans; edit or delete if granted explicit permissions.
Detailed View
-
Open the detailed view by clicking a floor plan in the table (e.g., “South-West Wing”).
-
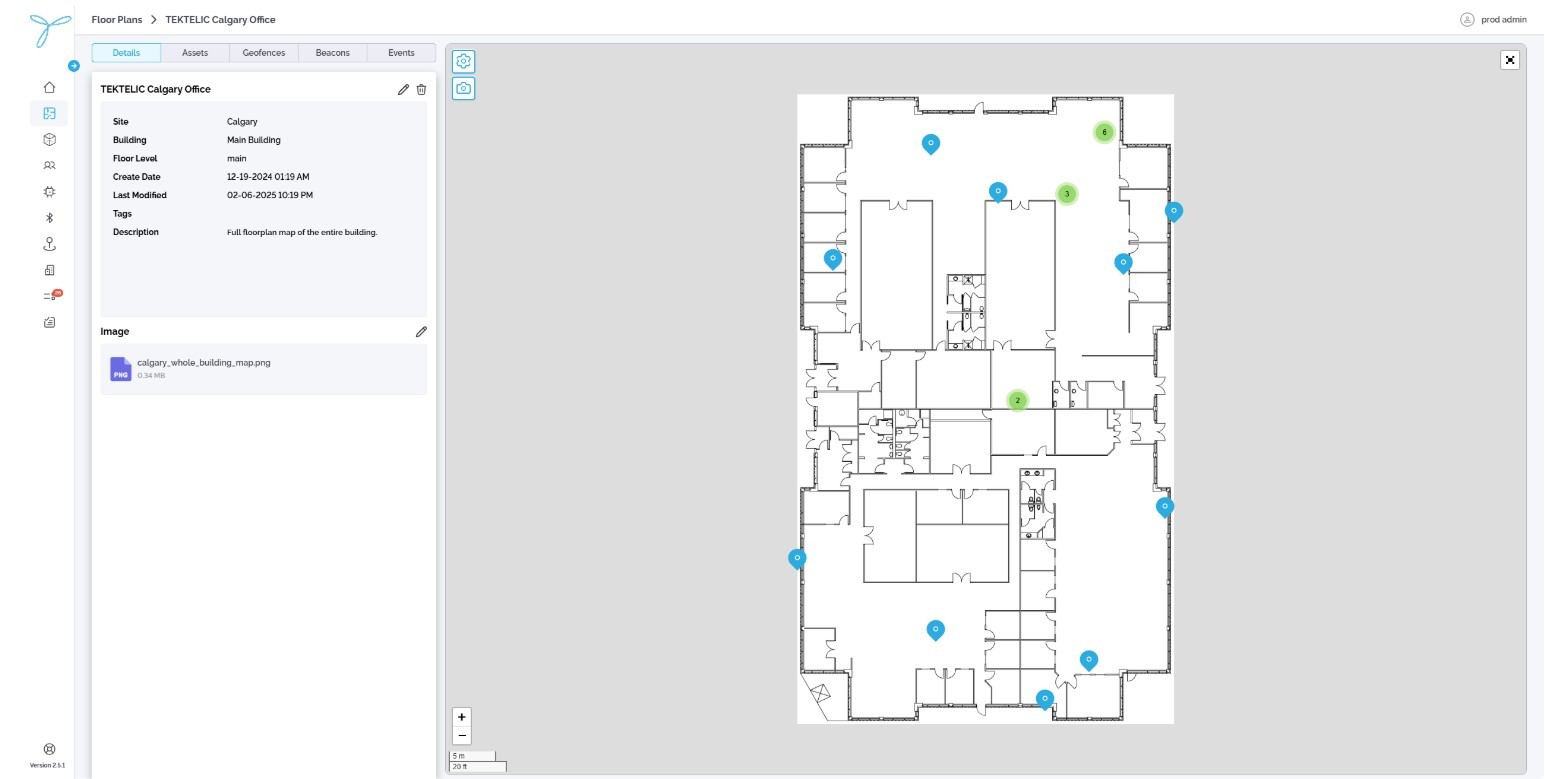
The detailed view shows the floor plan’s details:
- Site: The associated site (e.g., Calgary Office).
- Building: The building is tied to the floor plan (e.g., TEKTELIC office).
- Floor Level: The level of the floor (e.g., main).
- Create Date: When the floor plan was added (e.g., 12-19-2024 01:19 AM).
- Last Modified: The last update timestamp (e.g., 02-06-2025 10:19 PM).
- Tags: Assigned tags for organization (e.g., grey, green, navy).
- Description: A brief note about the floor plan (e.g., “Full floorplan map of the entire building”).
- Image: The uploaded map file details (e.g., “calgary_whole_building_map.png”, 0.34 MB).
- Map View: Displays the floor plan layout with placed beacons (marked as green or blue dots) for indoor tracking.
-
Tabs (Sections):
- Details: Shows the floor plan’s core information (as listed above).
- Assets: Lists assets assigned to this floor plan, showing their current positions if devices are linked.
- Geofences: Displays geofences defined within this floor plan, including their boundaries and associated rules.
- Beacons: Shows all beacons placed on the map, with options to adjust their positions or add new ones.
- Events: Provides a log of events triggered on this floor plan (e.g., asset entering a geofence), with timestamps and details.
-
Visibility Preferences: Access this option to toggle the display of assets and geofences on the map view (e.g., show only beacons or hide all overlays).
-
**Actions (Based on Permissions): **
- Admins: Edit or delete the floor plan, place or adjust beacons, manage geofences, and view/edit assets or events.
- Standard Users: View details; edit, delete, adjust beacons, or manage geofences/assets/events if permitted.
-
Conditions: You need admin permissions or explicit rights to add floor plans. A site and building must already exist in LOCUS.
Steps:
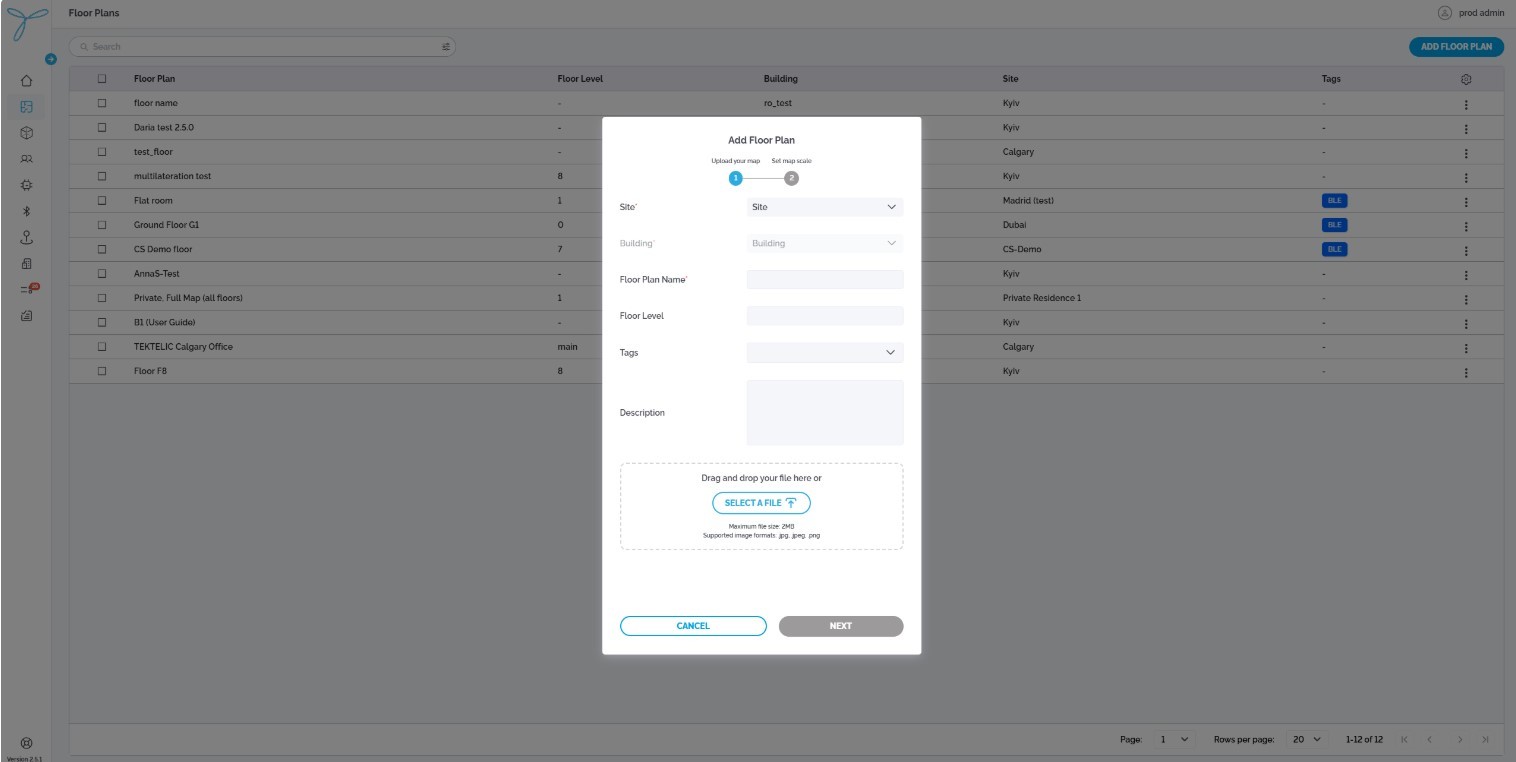
- From the Floor Plans page, click Add Floor Plan.
- Fill in the required fields and upload a map file.
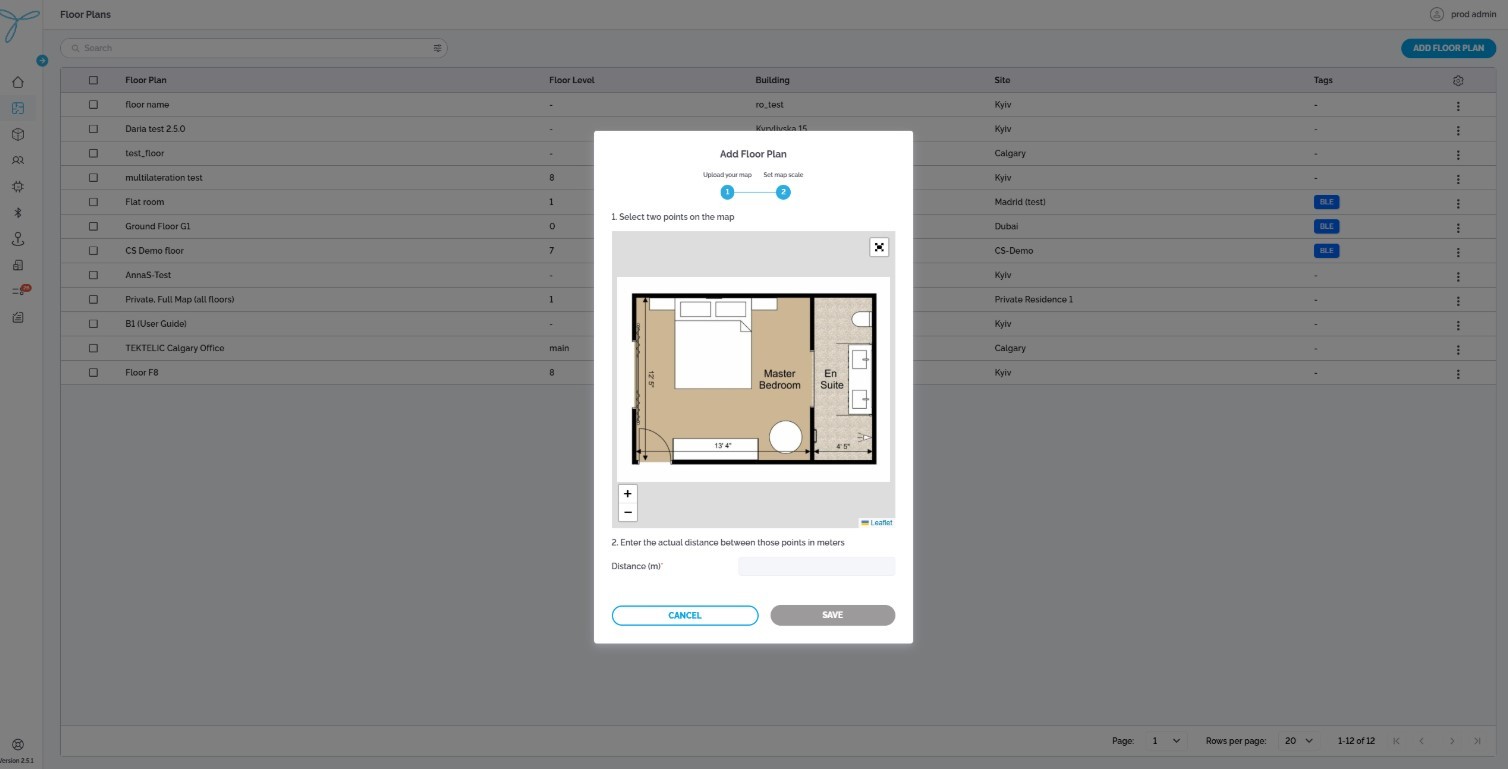
- Click Next to proceed to map setup (Step 2).
- Adjust the map scale as needed and confirm.
- Click Save to create the floor plan.
Fields:
- Site (Required): Select the site (e.g., Kyiv).
- Building (Required): Choose the building within the site (e.g., Building2).
- Floor Plan Name (Required): Enter a unique name (e.g., “South-West Wing”).
- Floor Level (Optional): Specify the level (e.g., “1”).
- Tags (Optional): Add tags for organization (e.g., “red”, “green”).
- Description (Optional): Include a brief note about the floor plan.
- Map File (Required): Upload an image file (supported formats: jpg, png; max size: 2MB).
Expectations: The new floor plan is now available in the list and can be used to place devices and beacons for indoor tracking.
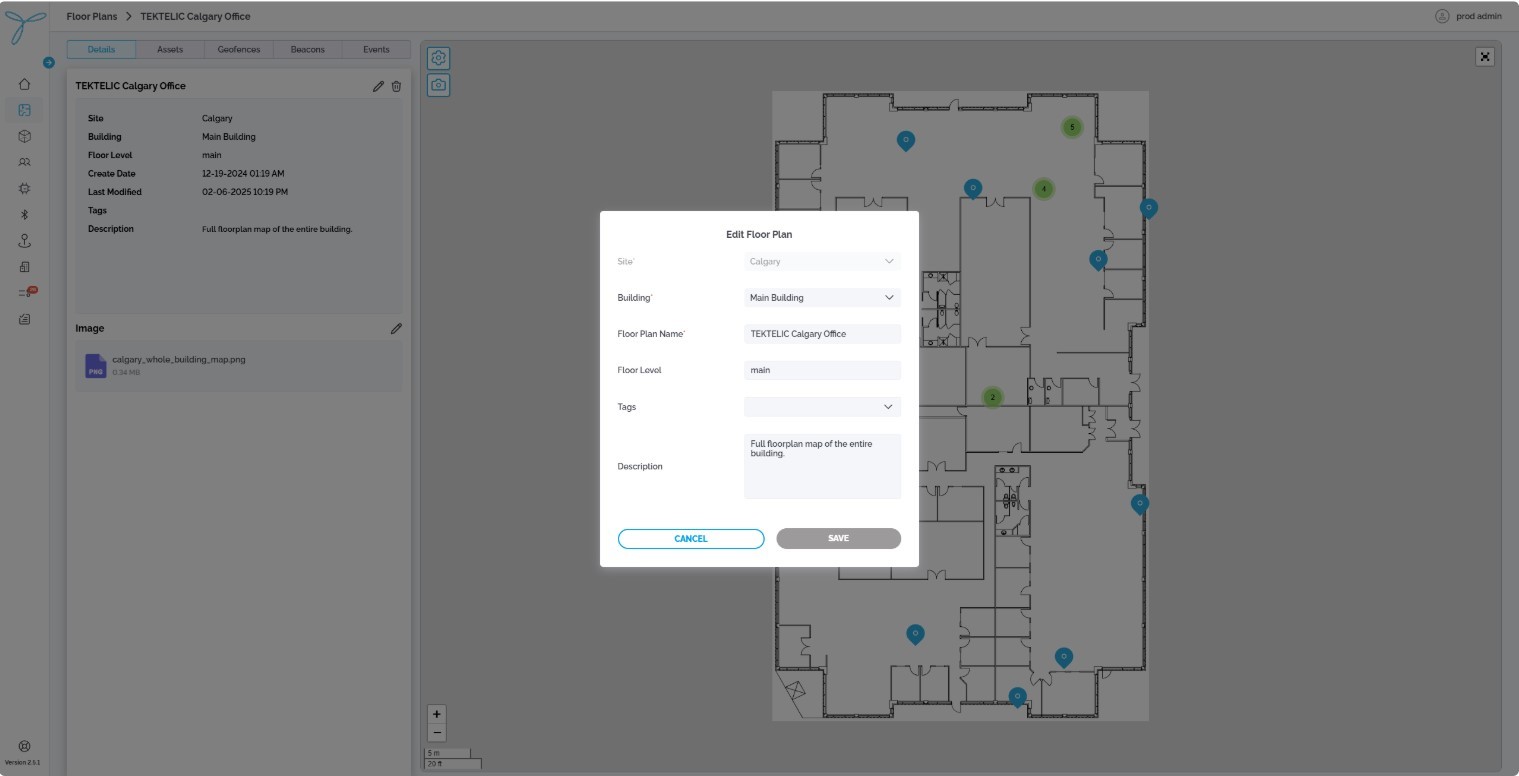
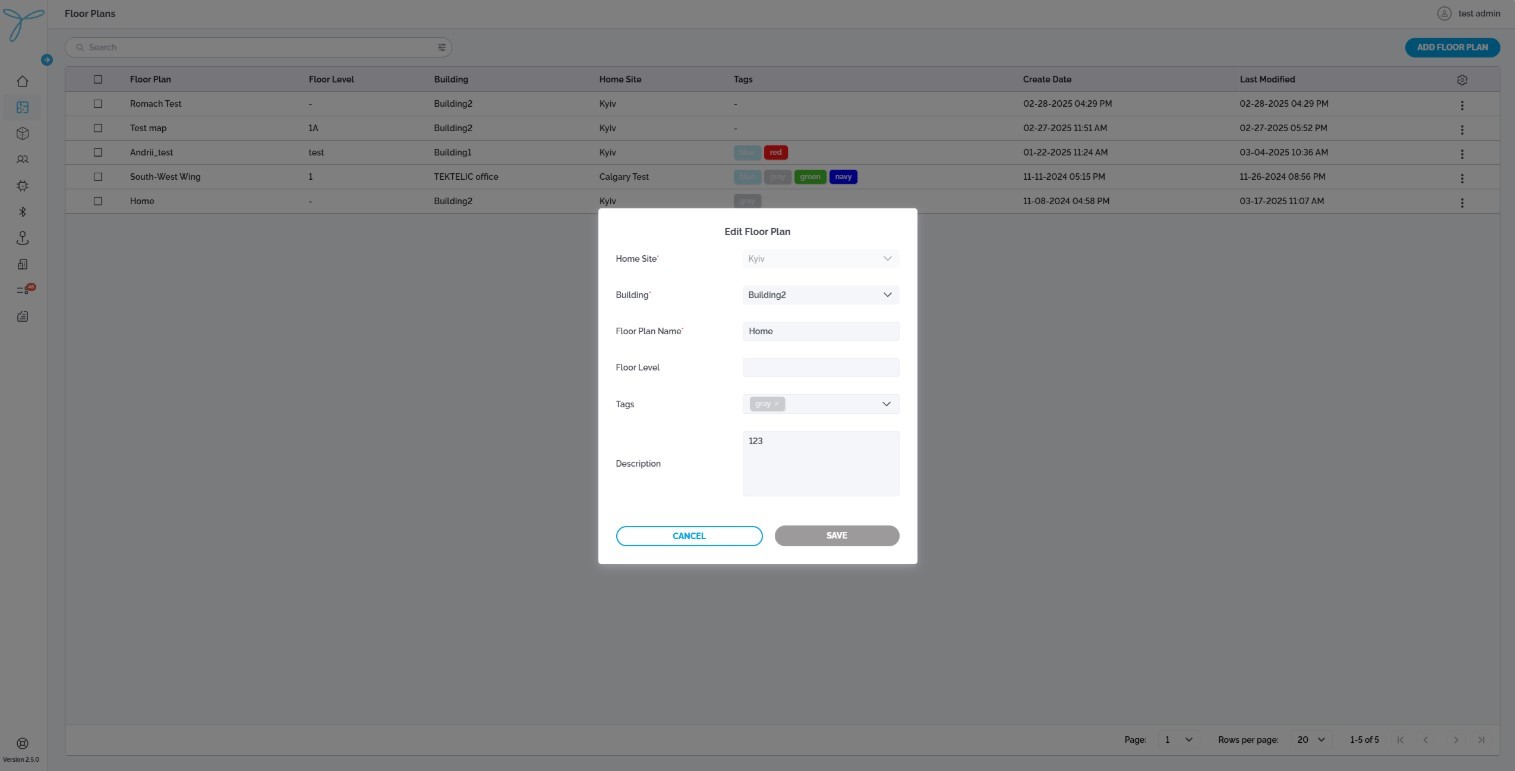
Conditions: You need admin permissions or explicit rights to edit floor plans. The floor plan must already exist.
Steps:
- From the Floor Plans page, click a floor plan in the table (e.g., “TEKTELIC Calgary Office”).
- In the detailed view, select Edit Floor Plan.
- Update the fields as needed.
- Click Save to confirm changes.
Fields:
- Site: Cannot be edited; tied to the original selection.
- Building: Cannot be edited; tied to the original site.
- Floor Plan Name (Editable): Change the name (must remain unique).
- Floor Level (Editable): Update the level (e.g., from “1” to “2”).
- Tags (Editable): Add or remove tags.
- Description (Editable): Modify the description.
- Map File: Can be edited in the Floor plan`s detailed view. Section “Image”.
Expectations: The updated floor plan reflects your changes in the list and can continue to be used for indoor tracking.
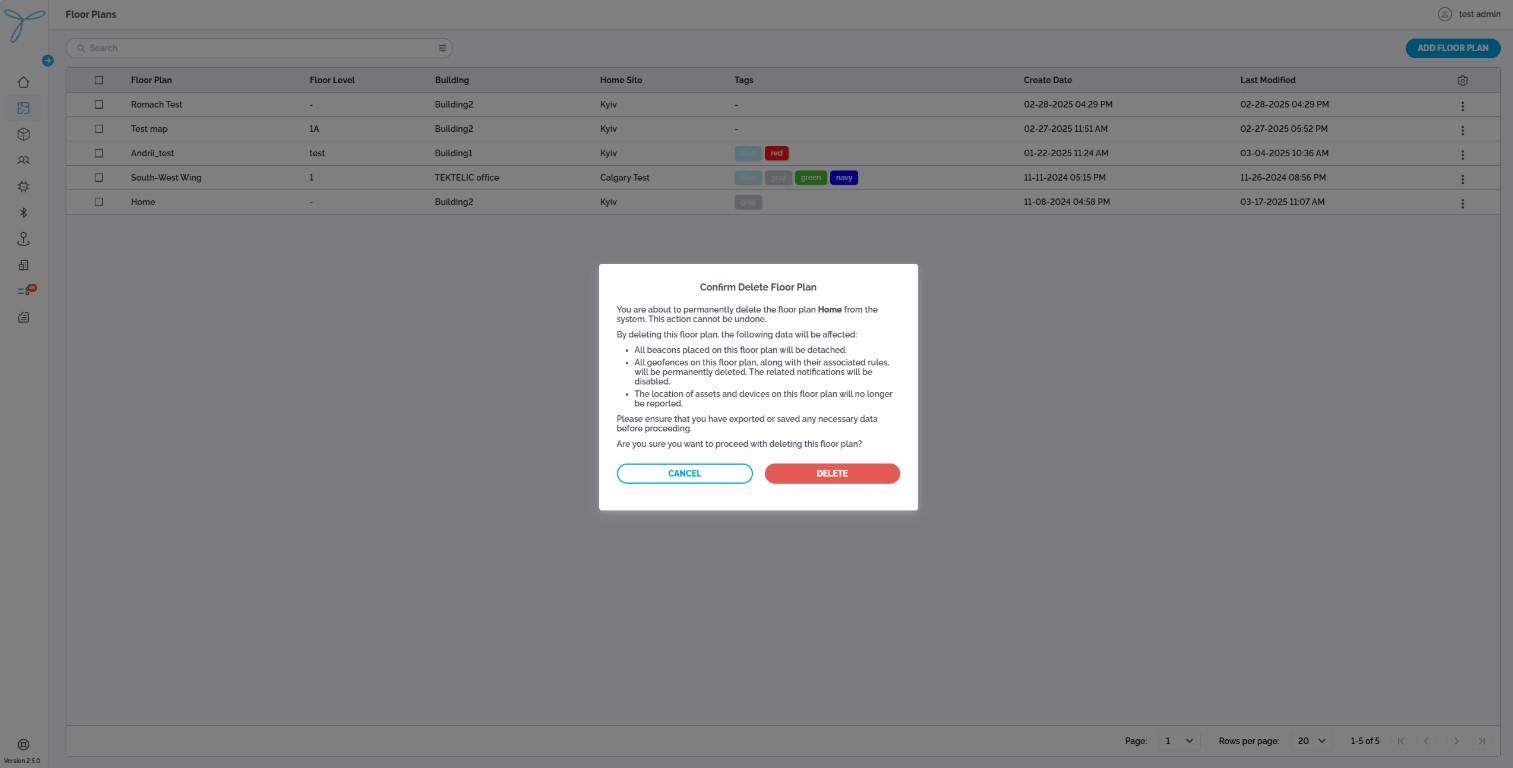
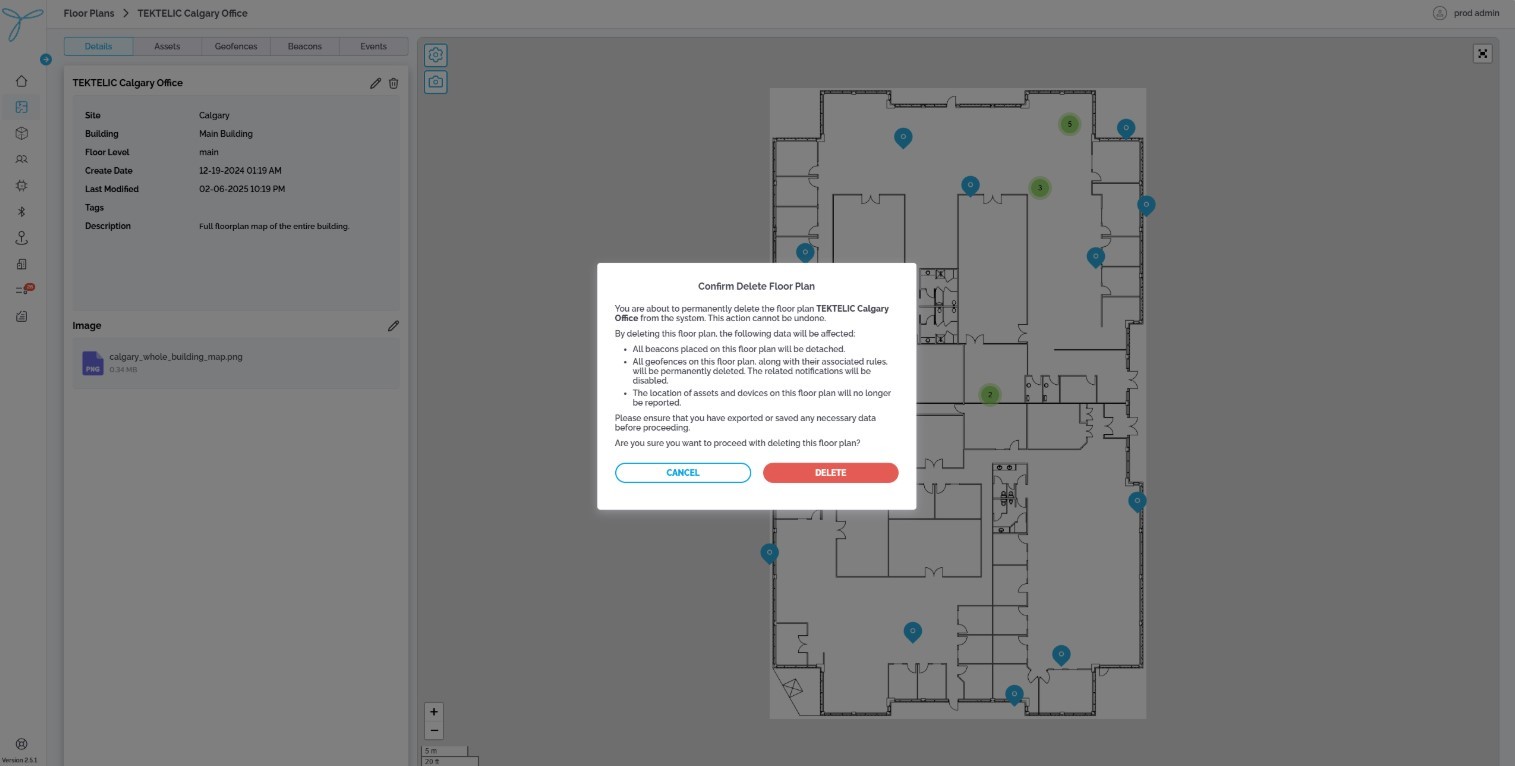
Conditions: You need admin permissions or explicit rights to delete floor plans. The floor plan must not have active devices or beacons assigned.
Consequences: Deleting a floor plan removes its layout and any associated settings. This may affect indoor tracking if devices or beacons were linked to it.
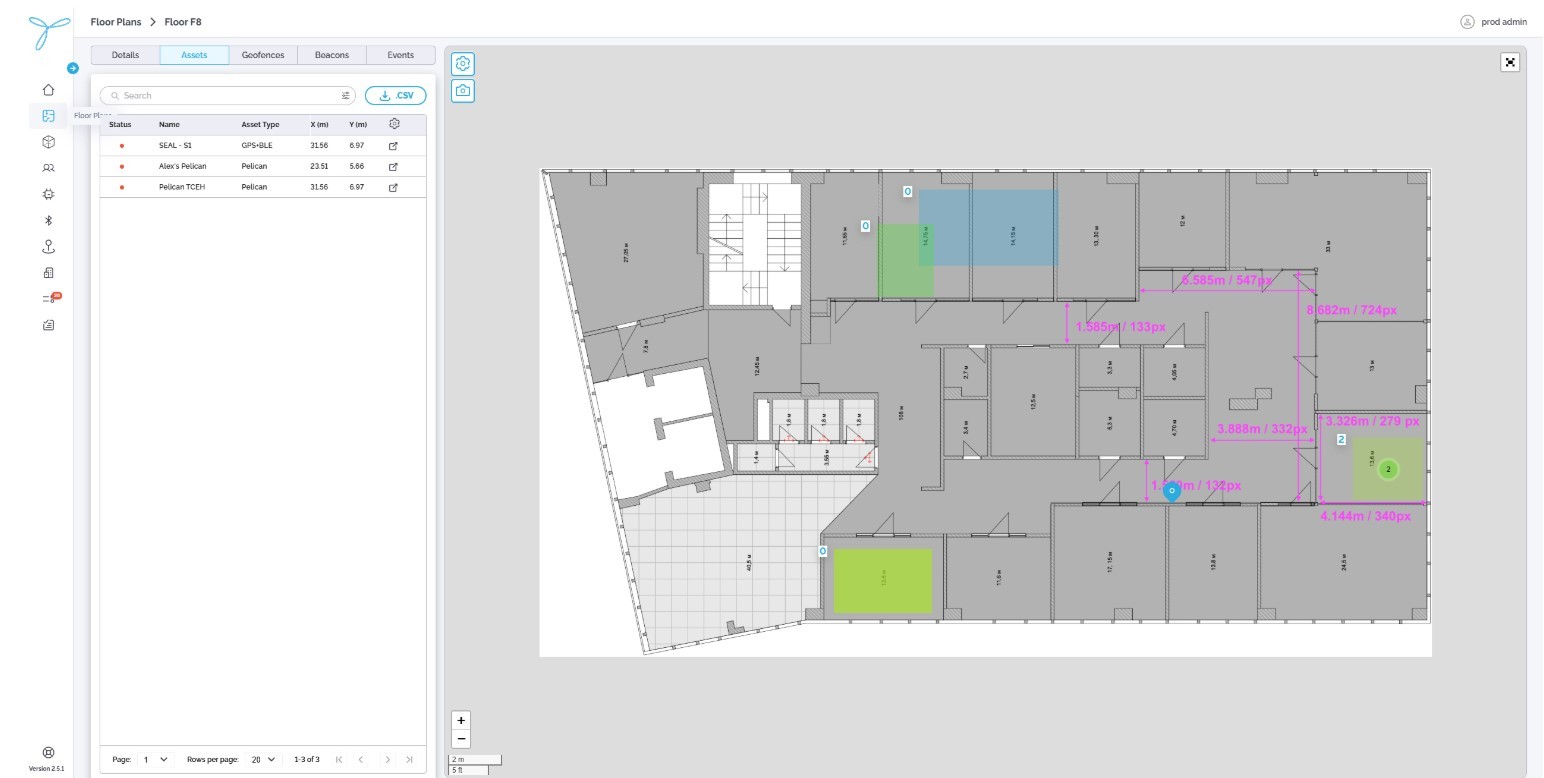
List View
- The table displays assets that have determined their position on the selected floor plan, with default columns: Status, Name, Asset Type, X(m), and Y(m).
- Column Configuration: Click the gear icon to open Table Preferences. You can select which columns to show or hide from available options (e.g., Status, Name, Asset Type, X(m), Y(m)). Columns can be rearranged by dragging, hidden by deselecting, but resizing is not supported.
- Search and Sort: Use the search bar to find assets by name and sort columns like X(m) or Y(m) in ascending or descending order. Filtering is not available.
- Actions (Based on Permissions):
-
Admins: View asset details; edit asset assignments if permitted.
-
Standard Users: View asset details; edit assignments if granted explicit permissions.
-
Detailed View
-
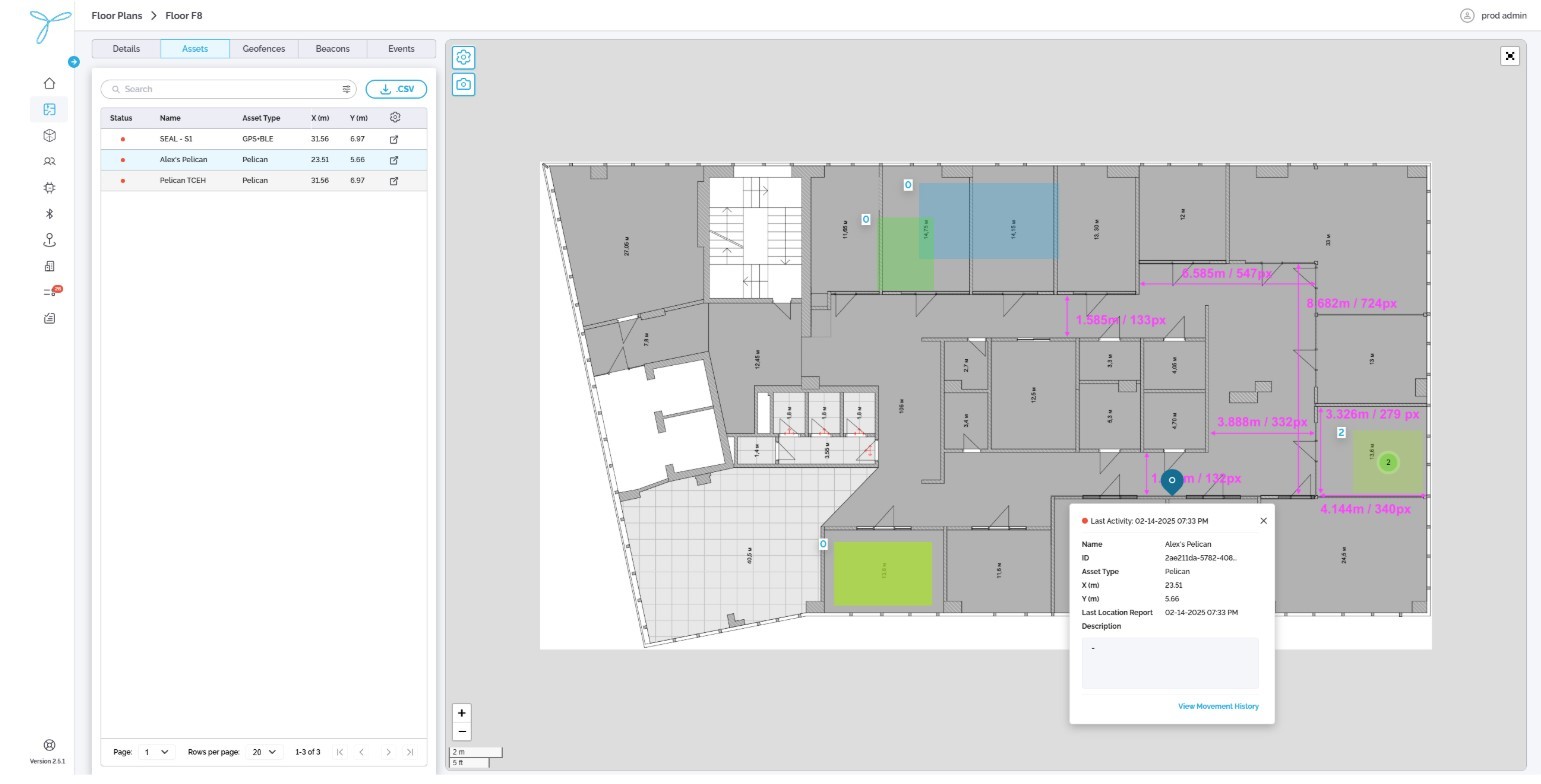
Open the detailed view by clicking an asset on the map (e.g., the marker labeled “Alex’s Pelican”).
-
The detailed view opens a modal with the asset’s details:
- Last Activity: The last recorded activity timestamp (e.g., 02-14-2025 03:33 PM).
- ID: A unique identifier (e.g., 2aa211d5-5784-40b8…).
- Asset Type: The type of asset (e.g., Pelican).
- X(m): The X-coordinate on the floor plan (e.g., 23.51).
- Y(m): The Y-coordinate on the floor plan (e.g., 6.67).
- Last Location Report: The timestamp of the last position update (e.g., 02-14-2025 03:33 PM).
- Description: A brief note about the asset (optional; e.g., none in this case).
-
Map View: Displays the asset’s position on the floor plan map (marked as a dot), along with geofences and beacons.
-
Map Controls:
- Visibility Preferences: Toggle the display of geofences and assets on the map.
- Export: Capture a screenshot of the map.
-
Additional Options:
- View Movement History: Access the asset’s historical location data.
-
Actions (Based on Permissions):
-
Admins: View movement history; edit asset details or assignments if permitted.
-
Standard Users: View details; edit or view history if permitted.
-
Fields:
- Last Activity: Cannot be edited; updates automatically.
- ID: Cannot be edited; system-generated.
- Asset Type: Cannot be edited on this page; must be changed in the Assets section.
- X(m): Cannot be edited; determined by the device’s position.
- Y(m): Cannot be edited; determined by the device’s position.
- Last Location Report: Cannot be edited; updates automatically.
- Description (Editable): Add or modify the description (must be edited in the Assets section).
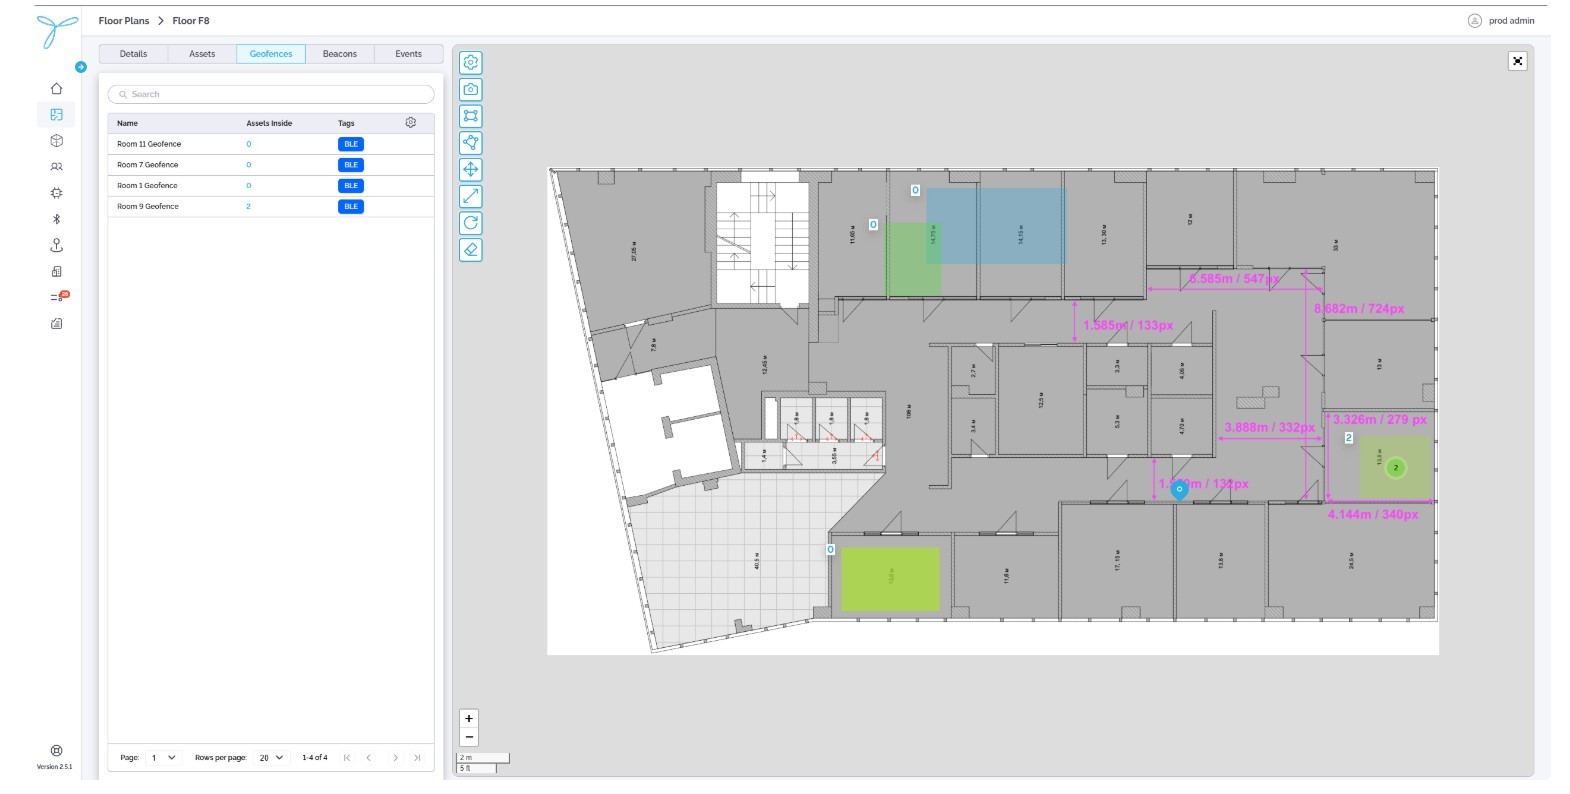
List View
-
The table displays all geofences associated with the selected floor plan, with default columns: Name, Assets Inside, and Tags.
-
Column Configuration: Click the gear icon to open Table Preferences. You can select which columns to show or hide from available options (e.g., Name, Assets Inside, Tags). Columns can be rearranged by dragging, hidden by deselecting, but resizing is not supported.
-
Search: Use the search bar to find geofences by name and sort columns like Assets Inside in ascending or descending order. Filtering is not available.
-
Actions (Based on Permissions):
-
Admins: Add, edit, or delete geofences.
-
Standard Users: View geofences; edit or delete if granted explicit permissions.
-
Detailed View
-
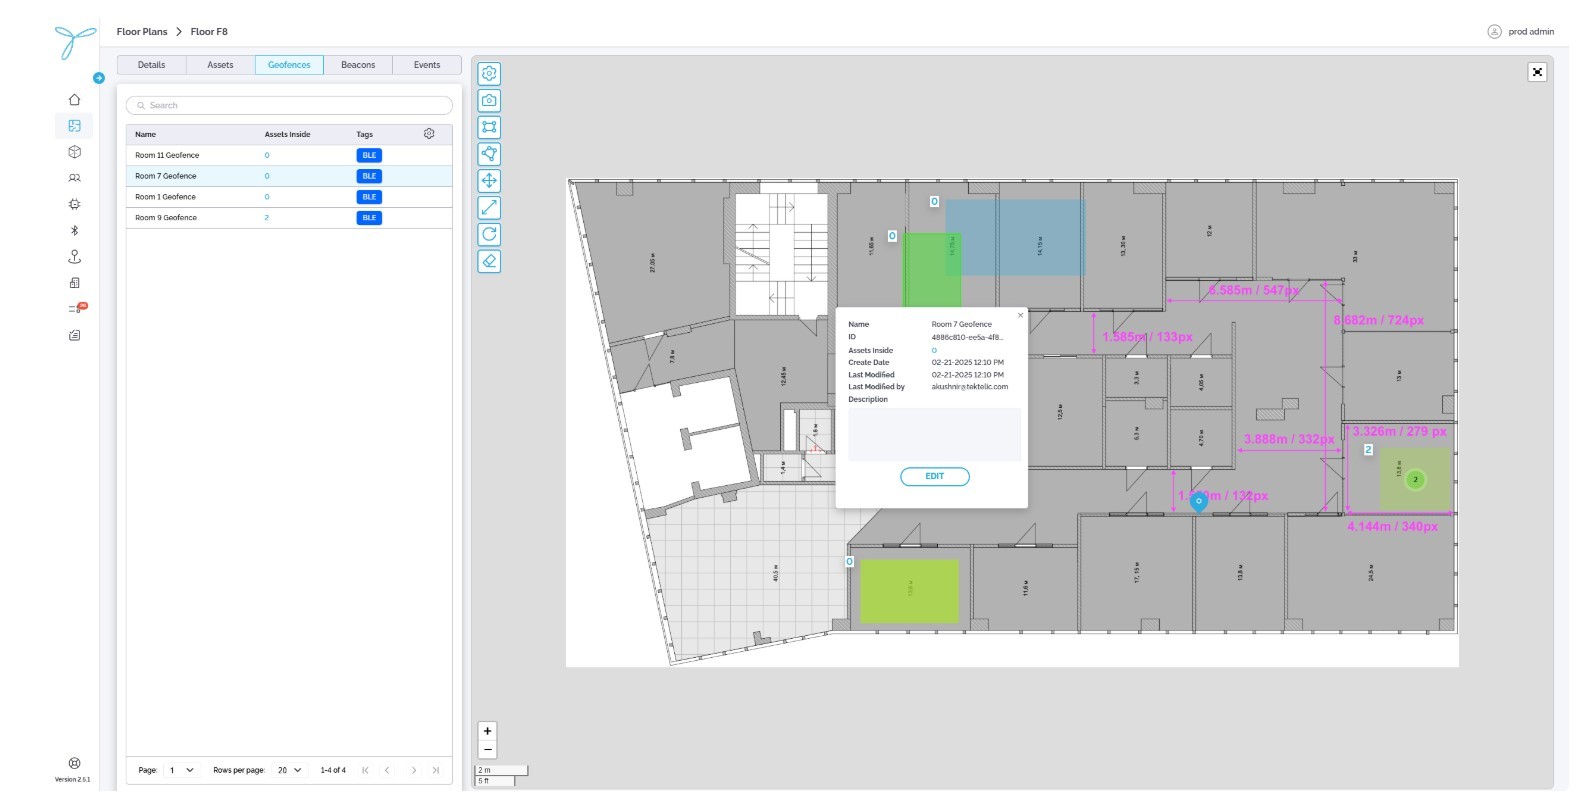
Open the detailed view by clicking a geofence on the map (e.g., the green zone labeled “Room 9 Geofence”).
-
The detailed view opens a modal with the geofence’s details:
- **ID:v A unique identifier (e.g., 4886B10-6EF4-4E8B).
- Assets Inside: The number of assets currently within the geofence (e.g., “2”).
- Create Date: When the geofence was added (e.g., 02-21-2025 12:10 PM).
- Last Modified: The last update timestamp (e.g., 02-21-2025 12:10 PM).
- Last Modified By: The user who last edited the geofence (e.g., atlas.user@tektelic.com).
- Name (Editable): The geofence’s identifier (e.g., “Room 9 Geofence”).
- Description (Editable): A brief note about the geofence (e.g., add a note like “Monitors conference room”).
- Color and Transparency (Editable): Adjust the geofence’s color (e.g., green) and transparency for visibility on the map.
- Map View: Displays the geofence boundaries (e.g., green or blue zones) on the floor plan map, with dimensions and positions.
-
Map Controls:
- Visibility Preferences: Toggle the display of geofences and assets on the map.
- Export: Capture a screenshot of the map.
- Draw Rectangle: Create a new rectangular geofence.
- Draw Polygon: Create a new polygon-shaped geofence.
- Drag: Move an existing geofence to a new position on the map.
- Resize: Adjust the size of a geofence.
- Rotate: Rotate a geofence on the map.
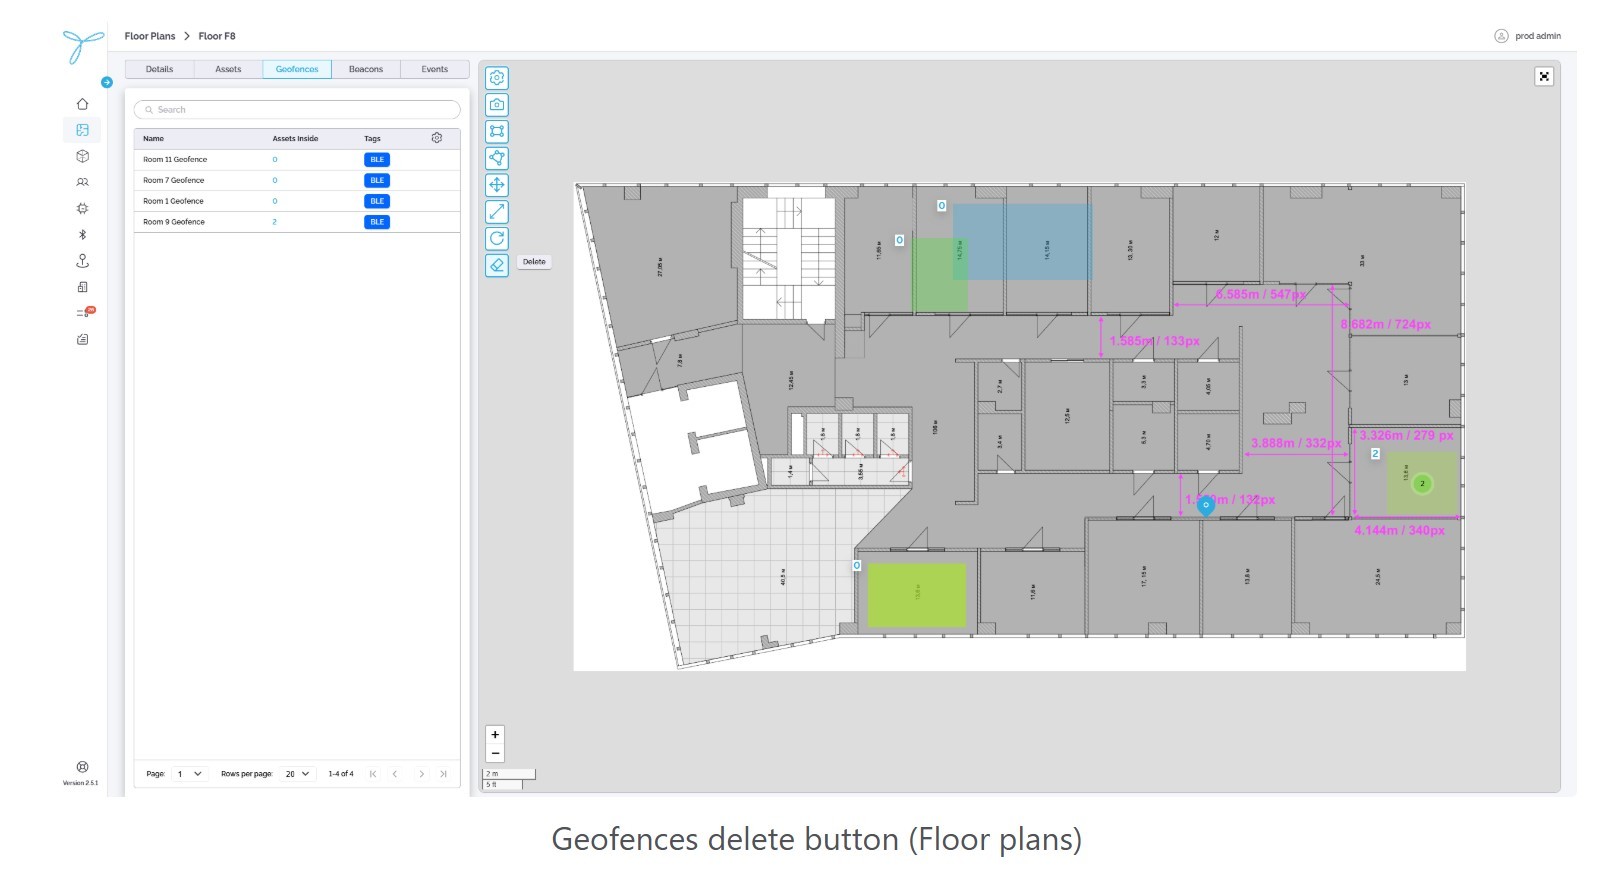
- Delete: Remove a selected geofence from the map.
-
Actions (Based on Permissions):
-
Admins: Edit geofence details (name, description, color, transparency), adjust its shape or position, or delete it.
-
Standard Users: View details; edit or delete if permitted.
-
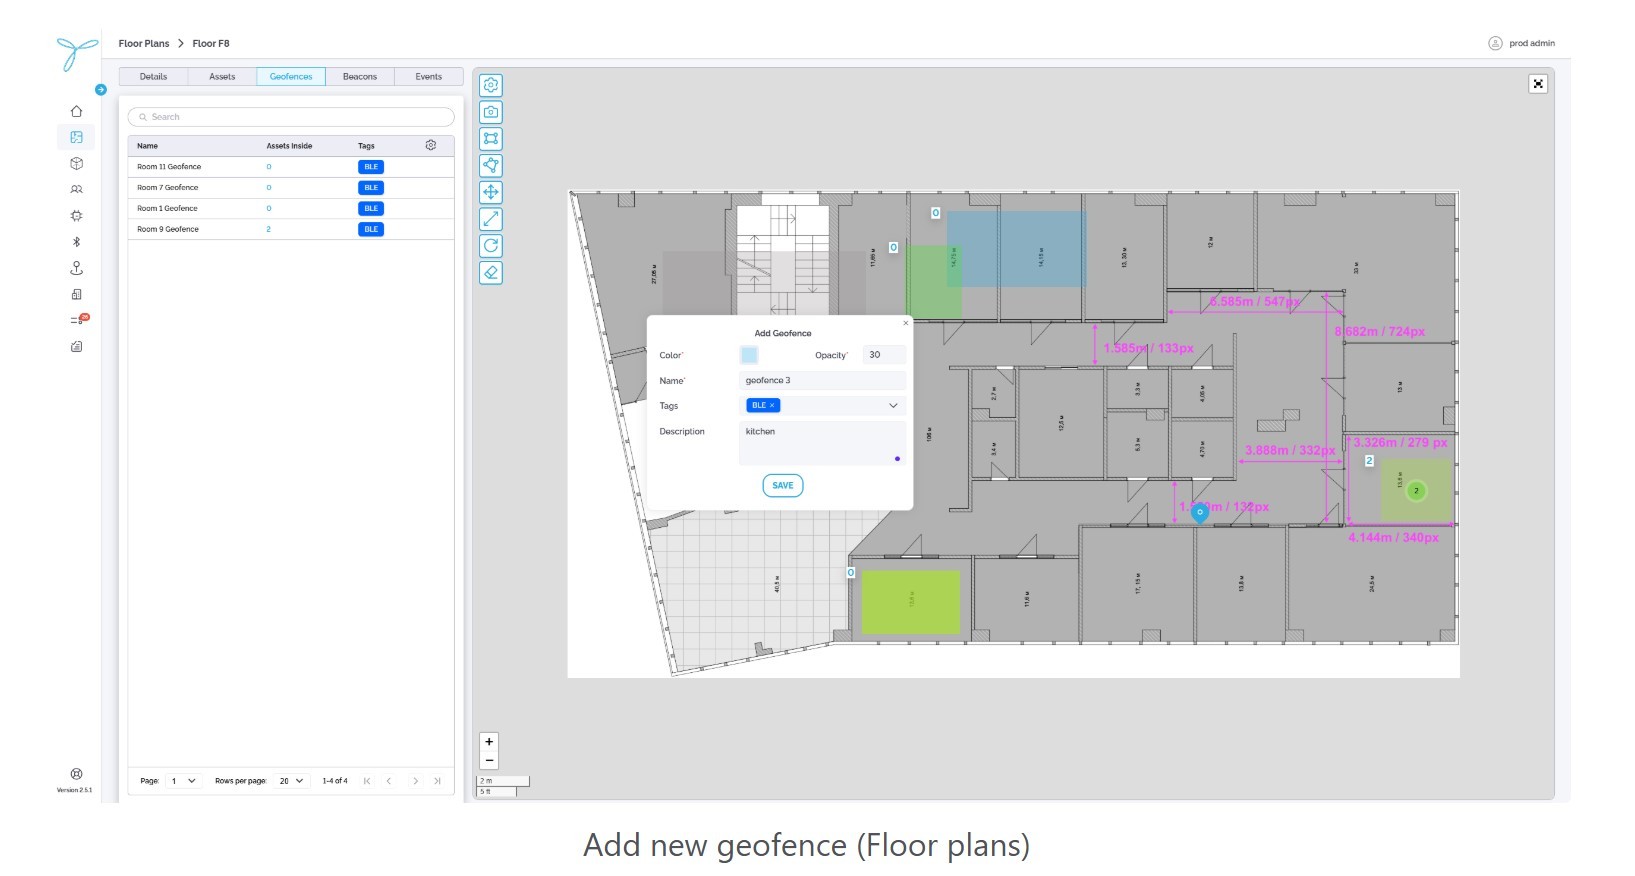
Conditions: You need admin permissions or explicit rights to add geofences. The floor plan must already exist, and a map file must be uploaded.
Steps:
- From the Floor Plan Geofences page, select the map view.
- Click Draw Rectangle or Draw Polygon to create a new geofence shape.
- Define the geofence by clicking and dragging to set its boundaries.
- Enter a name, optional description, tags, color, and transparency in the prompted fields.
- Click Save to create the geofence.
Fields:
- Name (Required): Enter a unique name (e.g., “Room 9 Geofence”).
- Assets Inside (Auto-filled): Displays the number of assets within the geofence.
- Create Date (Auto-filled): Set automatically upon creation.
- Last Modified (Auto-filled): Updated automatically when edited.
- Last Modified By (Auto-filled): Records the user who made the change.
- Description (Optional): Add a note (e.g., “Monitors conference room”).
- Tags (Optional): Add tags for organization (e.g., “BLE”).
- Color and Transparency (Optional): Choose the geofence’s color (e.g., green) and transparency.
- Shape and Position (Required): Define the geofence area using Draw Rectangle or Draw Polygon tools.
Expectations: The new geofence is added to the list and can be used to trigger event rules when assets enter or exit.
Conditions: You need admin permissions or explicit rights to edit geofences. The geofence must already exist.
Steps:
- From the Floor Plan Geofences page, click a geofence on the map (e.g., “Room 9 Geofence”).
- In the detailed view modal, click Edit.
- Update the name, description, color, or transparency as needed.
- Use Drag, Resize, or Rotate to adjust the geofence’s position or shape on the map.
- Click Save to confirm changes.
Fields:
- ID: Cannot be edited; system-generated.
- Assets Inside: Cannot be edited; updates automatically based on asset positions.
- Create Date: Cannot be edited; set at creation.
- Last Modified: Cannot be edited; updates automatically.
- Last Modified By: Cannot be edited; updates automatically.
- Name (Editable): Change the name (must remain unique).
- Description (Editable): Add or modify the description. Tags (Editable): Add or remove tags.
- Color and Transparency (Editable): Adjust the geofence’s appearance.
- Shape and Position: Editable using Drag, Resize, or Rotate; cannot change the type (rectangle/polygon) once set.
Conditions: You need admin permissions or explicit rights to delete geofences. The geofence must not be linked to active event rules.
Consequences: Deleting a geofence removes its boundaries and stops monitoring assets within it. This may affect associated event rules or reports.
Steps:
- From the Floor Plan Geofences page, click the Delete button (eraser icon) on the map controls.
- Click the geofence you want to delete on the map (e.g., “Room 9 Geofence”).
- Click the Delete button again to confirm the deletion.
Expectations: The geofence is permanently removed from the list and cannot be restored. You’ll need to recreate it if needed.
List View
The table displays all beacons associated with the selected floor plan, with default columns: Name, MAC Address, Localization Mode, X (m), Y (m).
- Name: The identifier of the beacon (e.g., “AC23F58ECEB”).
- MAC Address: The unique MAC address of the beacon (e.g., “AC:23:F5:8E:CE:B”).
- Localization Mode: The mode in which the beacon operates (e.g., “Nearest” or “Regular”).
- X (m): The X-coordinate of the beacon on the floor plan (e.g., “12.30”).
- Y (m): The Y-coordinate of the beacon on the floor plan (e.g., “6.53”).
Column Configuration (Table Preferences):
- Click the gear icon to open the Table Preferences modal.
- Select which columns to show or hide from available options (e.g., Name, MAC Address, Localization Mode, X (m), Y (m)).
- Columns can be rearranged by dragging, hidden by deselecting, but resizing is not supported.
- Click Save to apply changes; Cancel to discard.
Search: Use the search bar to find beacons by name or MAC address. Filtering and sorting are not available in this view.
Actions (Based on Permissions):
- Admins: Add, edit, or delete beacons; adjust their positions on the map.
- Standard Users: View beacons; edit, delete, or adjust positions if granted explicit permissions.
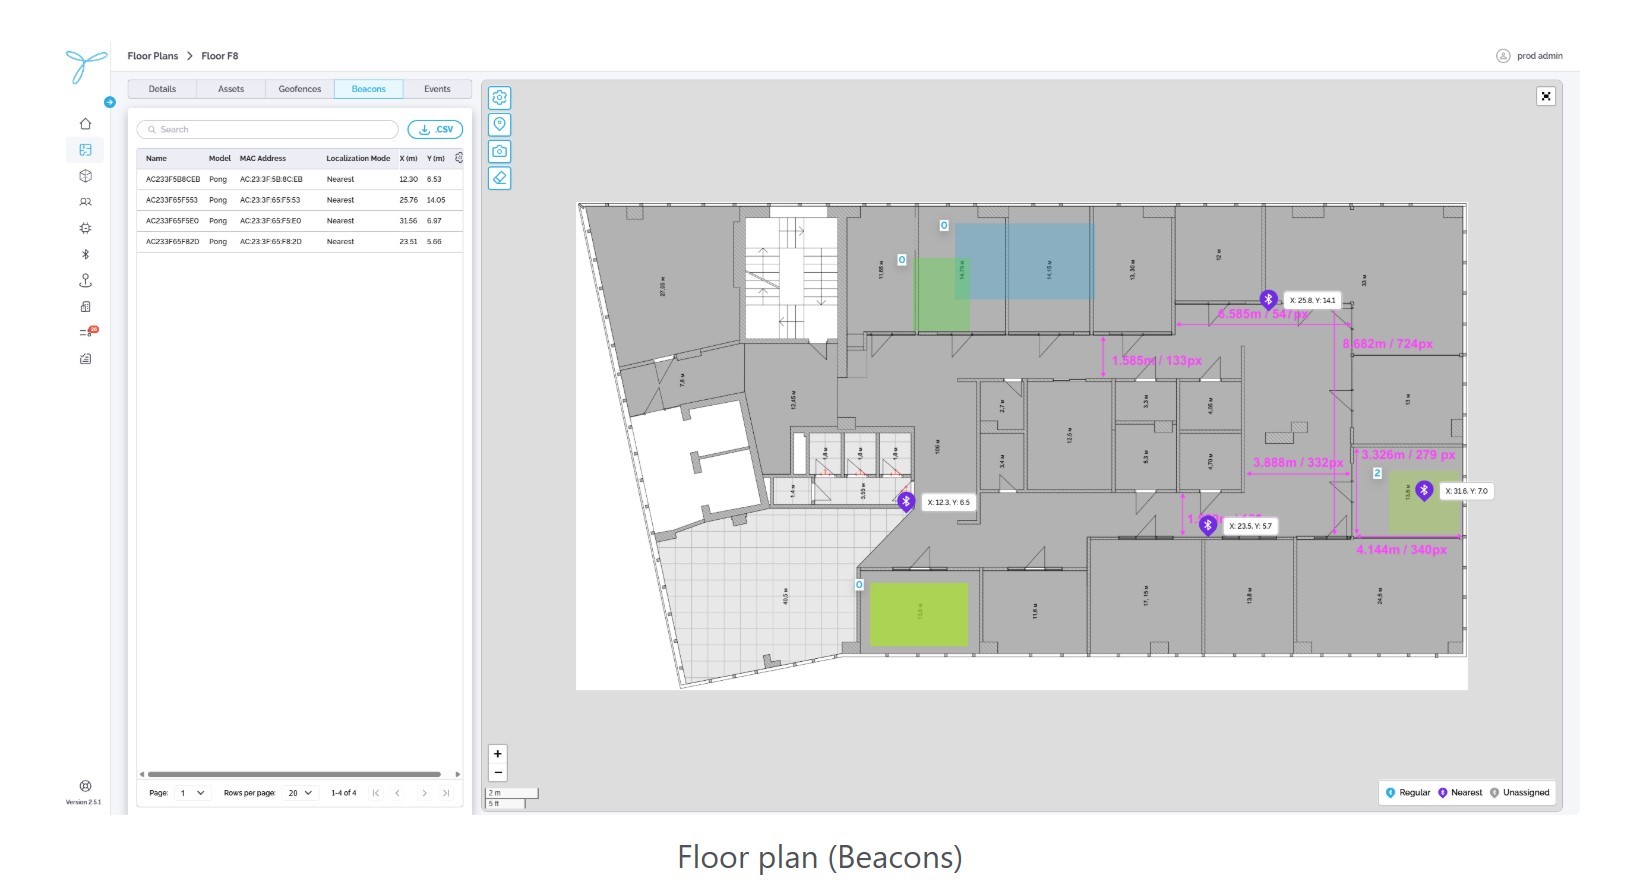
Map View
The map view displays the floor plan layout with placed beacons, marked as colored dots (e.g., purple for “Nearest”, blue for “Regular”, grey for “Unassigned”). The map includes room dimensions (e.g., “3.328m / 478 px”) and labeled areas (e.g., “1”, “2”).
- Beacons are shown with their coordinates (e.g., “X: 123 Y: 65” for a beacon labeled “AC23F58ECEB”).
- Colored geofences (e.g., green, blue) are visible if toggled on via Visibility Preferences.
Map Controls:
- Zoom In/Out: Use the “+” and “–” controls to adjust the map scale.
- Export: Capture a screenshot of the map using the camera icon.
- Visibility Preferences: Toggle the display of geofences, assets, and beacons on the map.
- Drag: Move a beacon to a new position on the map by clicking and dragging.
Detailed View
Open the detailed view by clicking a beacon on the map (e.g., the purple dot labeled “X: 123 Y: 65”).
The detailed view opens a modal with the beacon’s details:
- ID: A unique identifier (e.g., “647FDA000001F136”).
- Name: The beacon’s identifier (e.g., “AC23F58ECEB”).
- MAC Address: The beacon’s MAC address (e.g., “AC:23:F5:8E:CE:B”).
- Localization Mode: The current mode (e.g., “Nearest”).
- Discovery Timeout (min): The timeout setting (e.g., “120”).
- X (m): The X-coordinate on the floor plan (e.g., “123”).
- Y (m): The Y-coordinate on the floor plan (e.g., “65”).
- Create Date: When the beacon was added (e.g., “02-21-2025 12:10 PM”).
- Last Modified: The last update timestamp (e.g., “02-21-2025 12:10 PM”).
- Last Modified By: The user who last edited the beacon (e.g., “admin@tektelic.com”).
- Description: A brief note about the beacon (optional, e.g., “Placed in conference room”).
Actions (Based on Permissions):
-
Admins: Edit beacon details (name, localization mode, discovery timeout, description), adjust its position, or delete it.
-
Standard Users: View details; edit or delete if permitted.
