Assets
List View (Main Table)
-
The table displays all assets with the following default columns: Status, Name, Asset Type, Site, Building, Floor Plan, X(m), Y(m), Latitude, Longitude, ID, Device EUI, Device Type, Last Activity, Battery, RSSI/dBm, PSR (dB), Home Site, Altitude, Tags, Create Date.
-
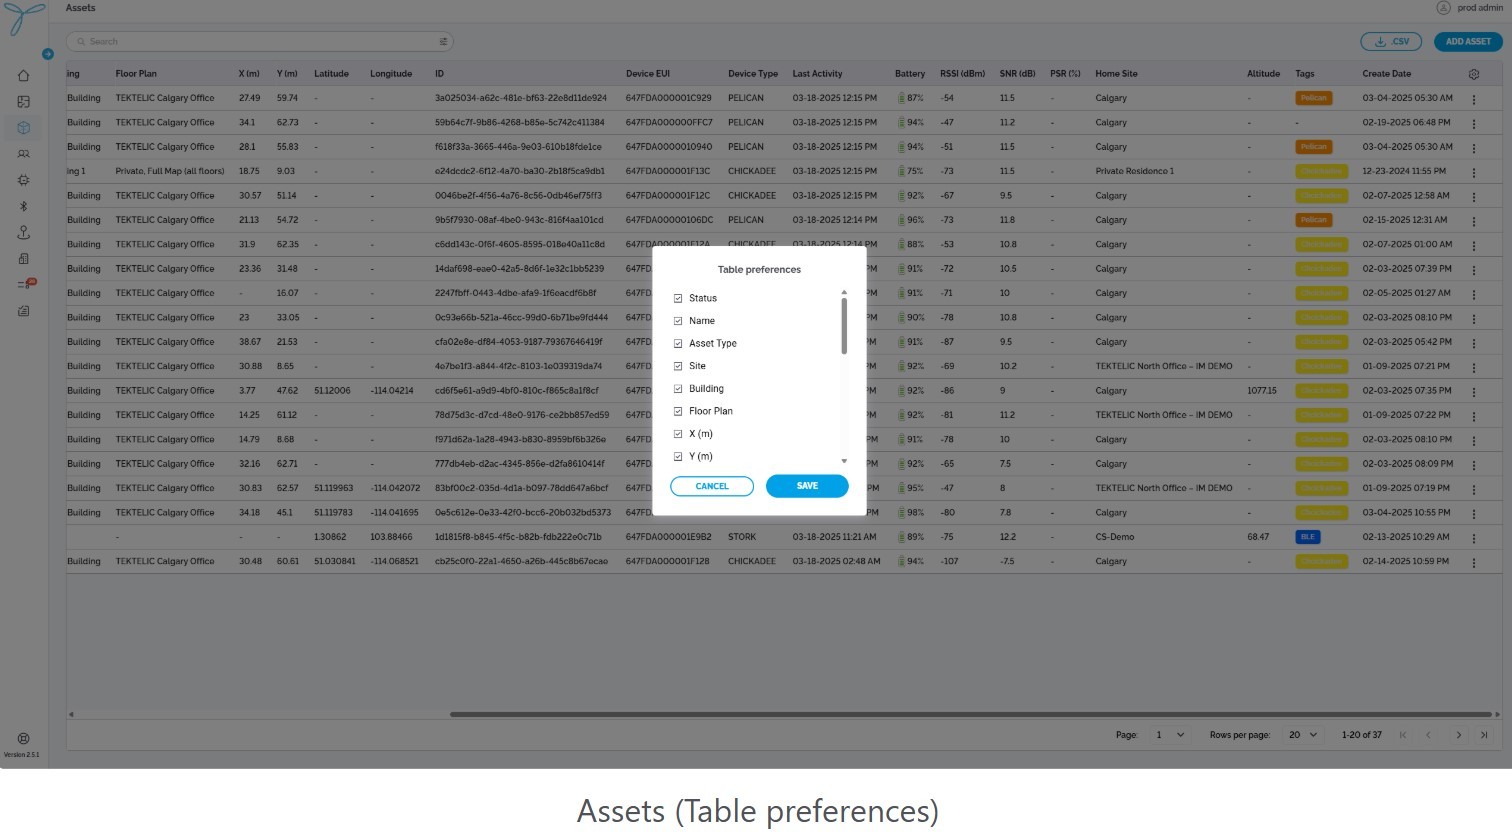
Column Configuration (Table Preferences):
- Click the gear icon to open the Table Preferences modal.
- Select which columns to show or hide (e.g., Status, Name, Asset Type, Site, Building, etc.).
- Columns can be rearranged by dragging, hidden by deselecting, but resizing is not supported.
- Click Save to apply changes; Cancel to discard.
-
Search and Sort: Use the search bar to find assets by name or other criteria (e.g., ID, Device EUI) and sort columns like Last Activity or Battery in ascending or descending order. Filtering by Site, Building, or Floor Plan is available via the filter dropdowns.
-
Export Data: Export the table to a .csv file by clicking the CSV button, including data matching current search and filter criteria.
-
Actions (Based on Permissions):
- Edit: Click the pencil icon next to an asset in the table to open the Edit Asset modal and modify details (see below).
- Delete: Click the trash icon next to an asset in the table to open the Confirm Delete Asset modal and remove the asset (see below).
- Admins: Add, edit, or delete assets; assign devices.
- Standard Users: View assets; edit or delete if granted explicit permissions.
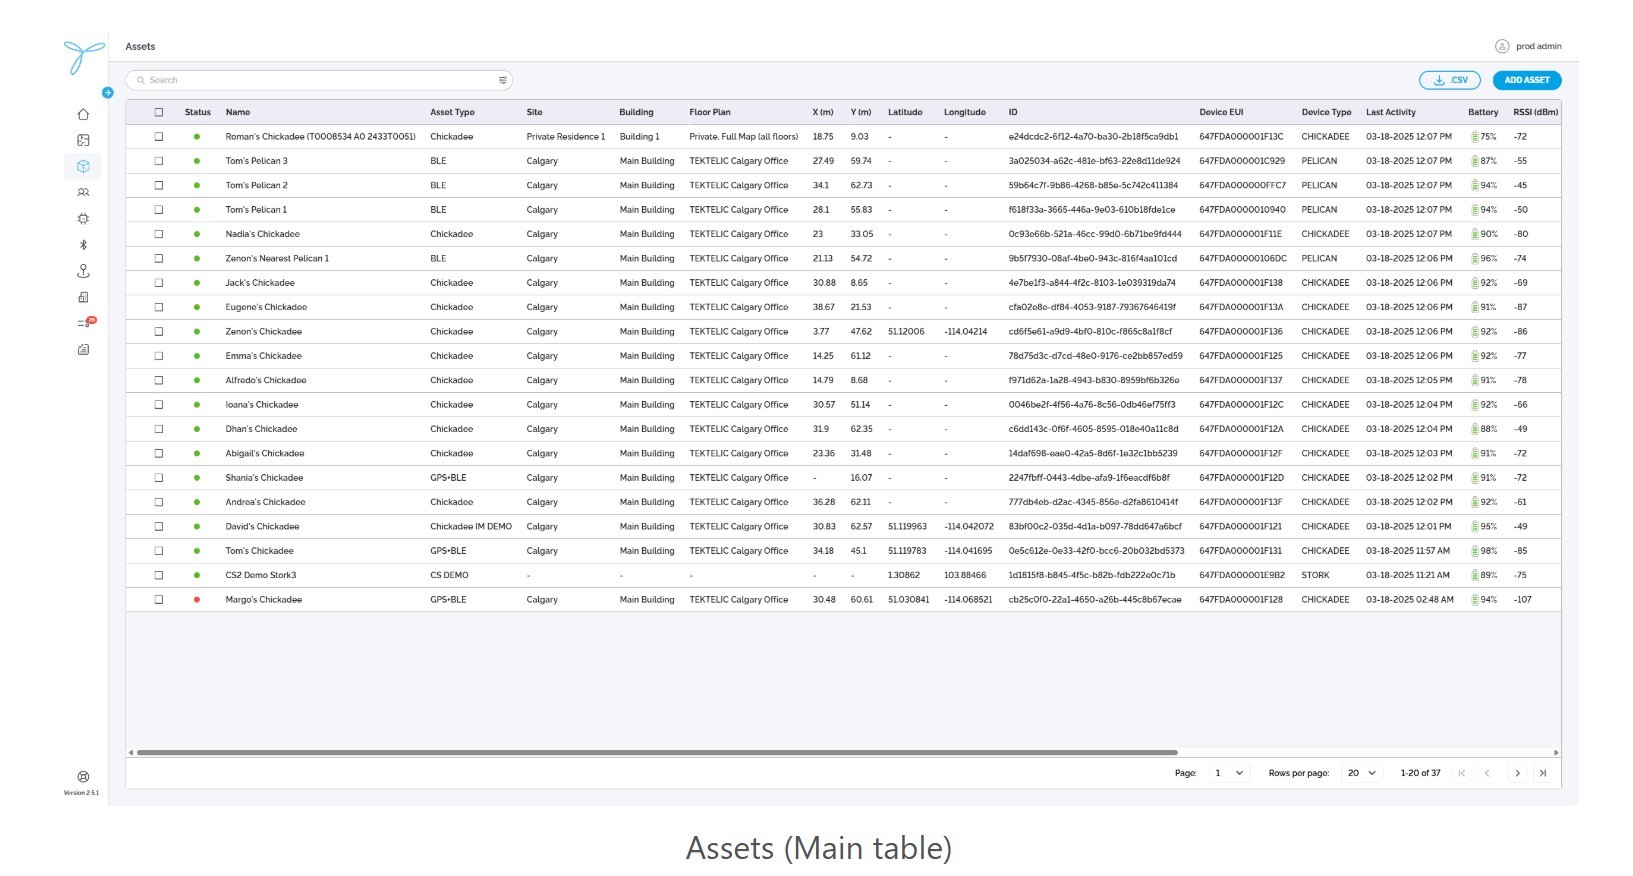
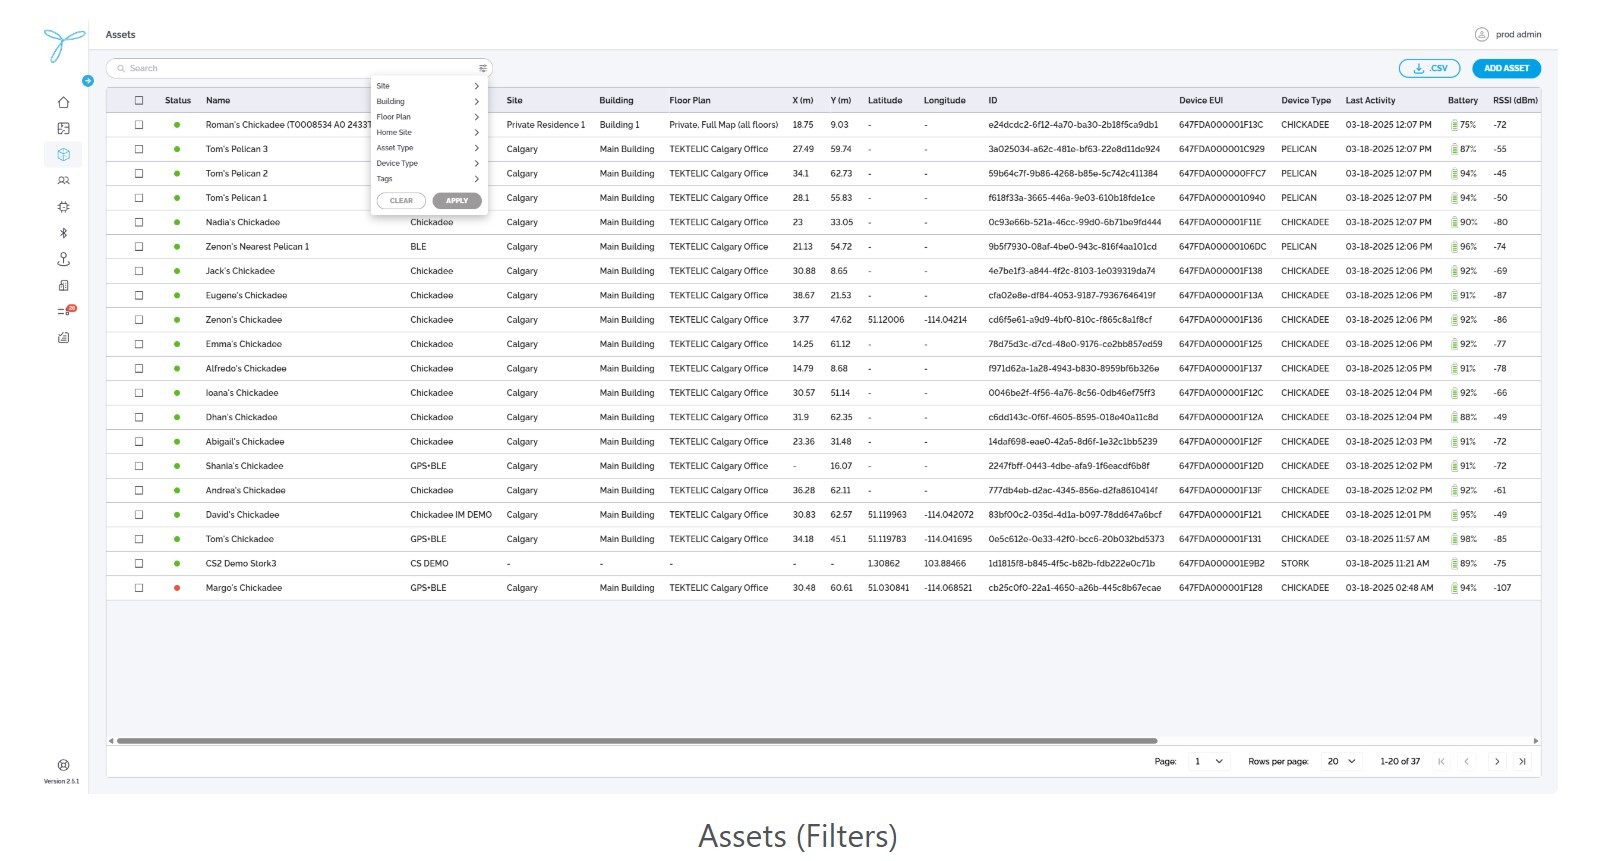
Detailed View
- Open the detailed view by clicking an asset in the table (e.g., “Zenon’s Chickadee” or “Tom’s Pelican 3”).
- The detailed view provides tabs for Details, History, and Events, with modal windows for additional actions.
Conditions: You need admin permissions or explicit rights to add assets.
Modes:
-
Manual:
-
Steps:
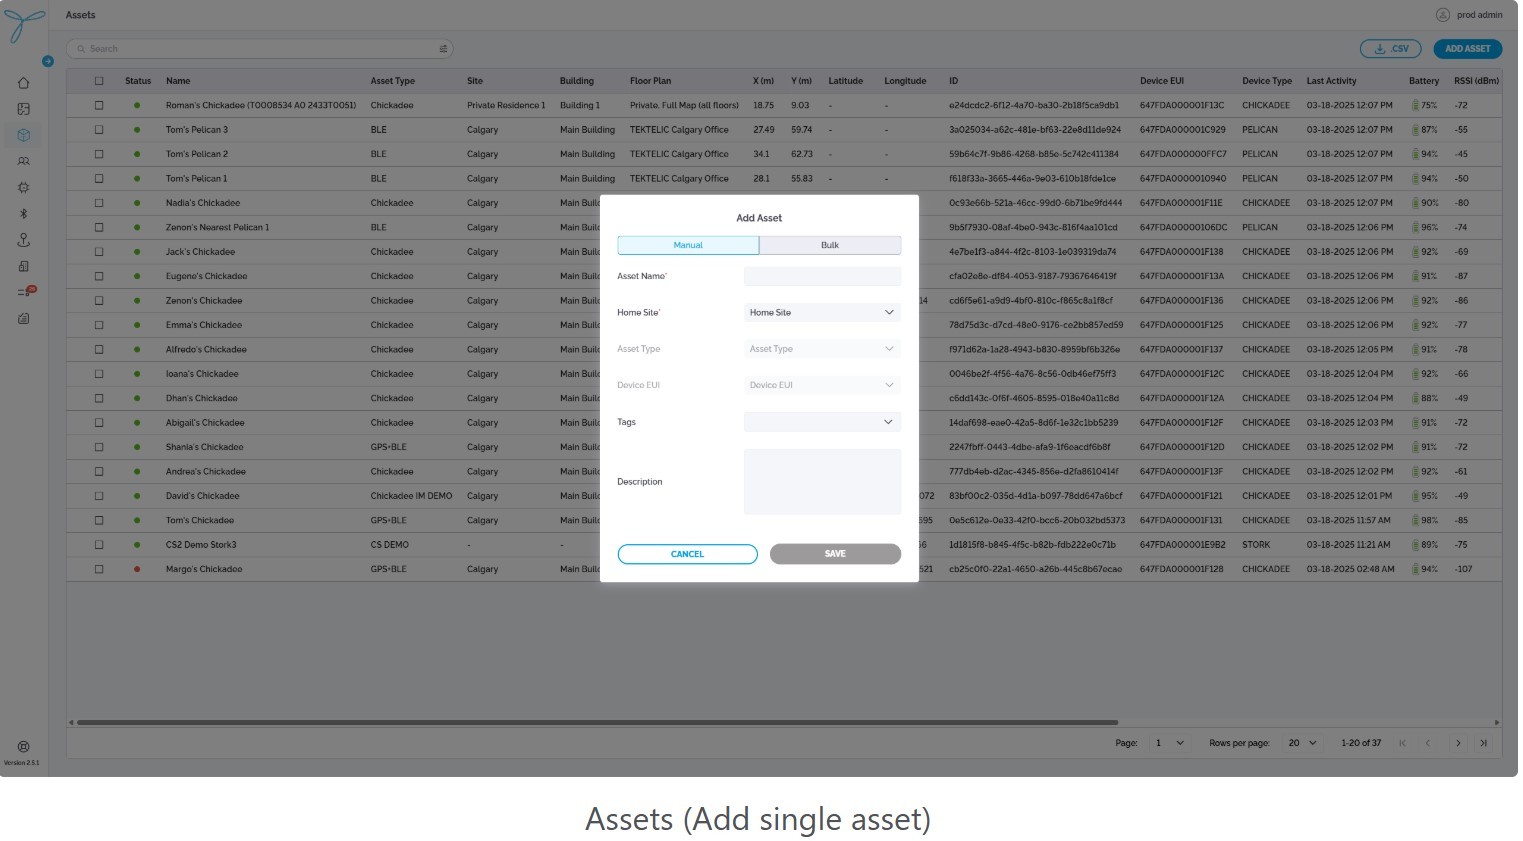
- Click the Add Asset button and select Manual.
- Enter the following fields in the modal:
- Asset Name (Required): Unique name (e.g., “New Asset”).
- Home Site (Required): Select from dropdown (e.g., Calgary).
- Asset Type (Required): Select from dropdown (e.g., Chickadee, Pelican).
- Device EUI (Required): Enter or select a device which will be paired with the Asset and report Asset location.
- Tags (Optional): Add tags for organization.
- Description (Optional): Add a note.
- Click Save to create the asset.
-
Expectations: The new asset appears in the list and can be tracked if associated with a device.
-
-
Bulk:
-
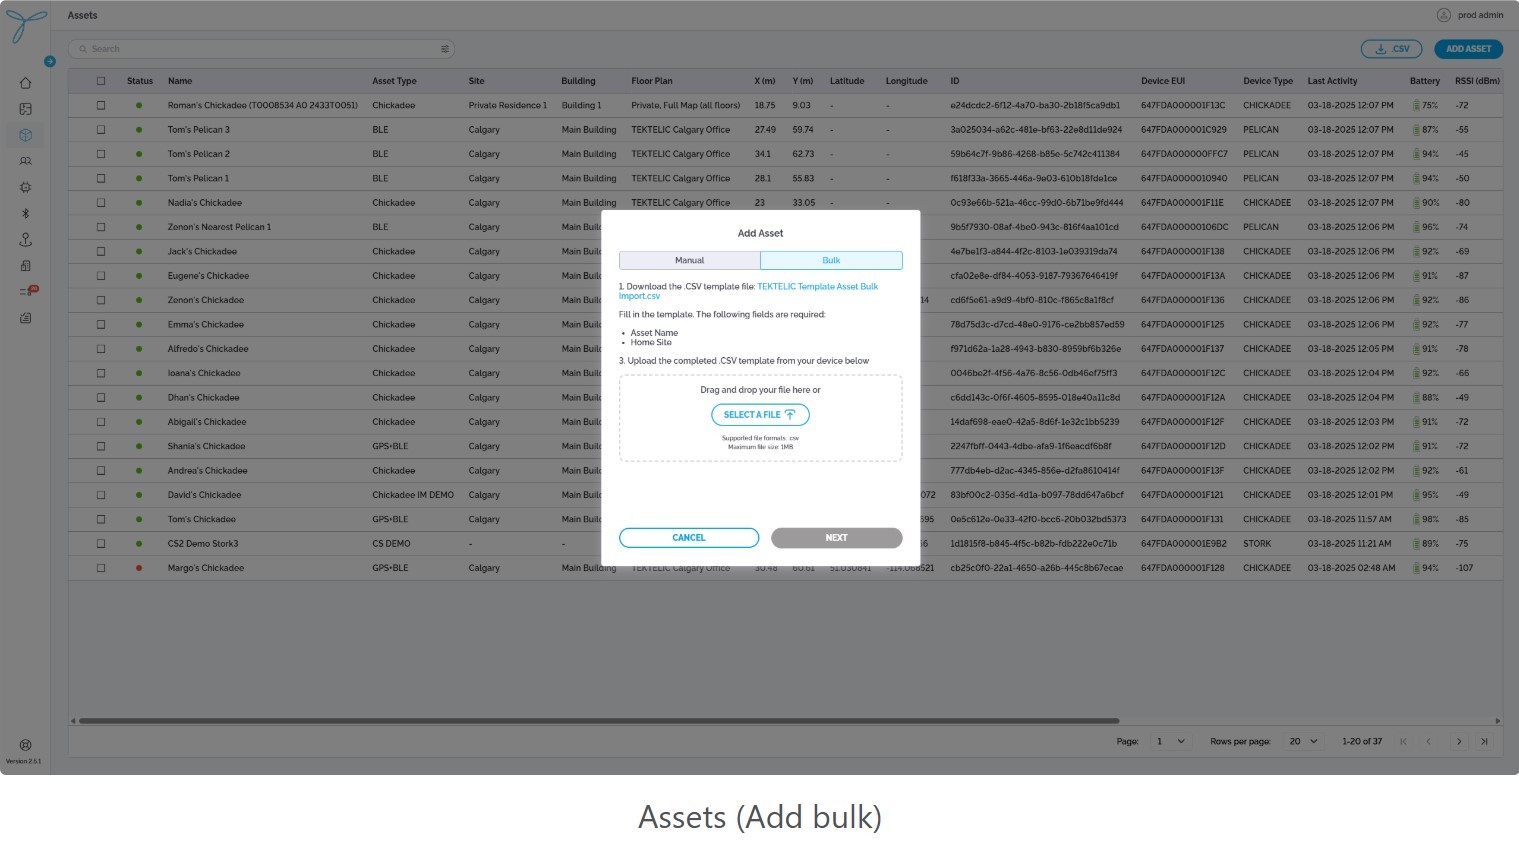
Steps:
- Click the Add Asset button and select Bulk.
- Download the CSV template file by clicking Download the CSV template file.
- Fill in the required fields (Asset Name, Home Site, Asset Type, Device EUI) in the template.
- Upload the completed CSV file by dragging and dropping or using the Select File button.
- Click Next to process the upload.
- Review and confirm the data, then click Save.
-
Expectations: Multiple assets are added based on the uploaded CSV, appearing in the list for tracking.
-
Conditions: You need admin permissions or explicit rights to edit assets. The asset must already exist.
Modes:
-
From Main Table:
-
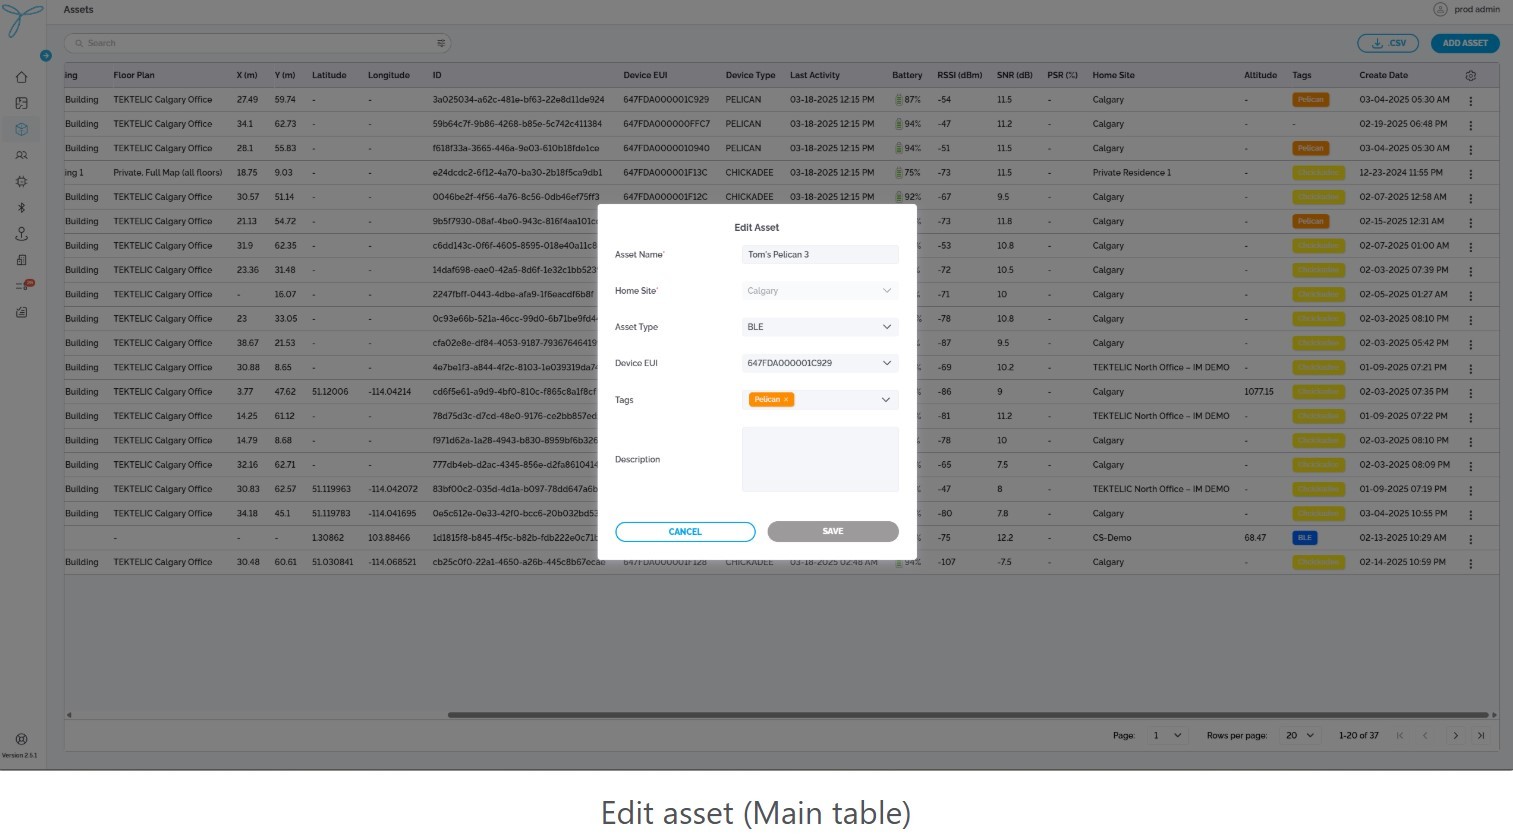
Steps:
-
Click the pencil icon next to an asset (e.g., “Tom’s Pelican 3”) in the table.
-
In the Edit Asset modal, modify the following fields:
- Asset Name (Editable): Update the name.
- Home Site (Editable): Change the site.
- Asset Type (Editable): Update the type.
- Device EUI (Editable): Reassign a device.
- Tags (Editable): Add or remove tags.
- Description (Editable): Update the note.
-
Click Save to confirm changes; Cancel to discard.
-
-
Expectations: The updated asset reflects changes in the list and continues to be monitored.
-
-
From Detailed View:
-
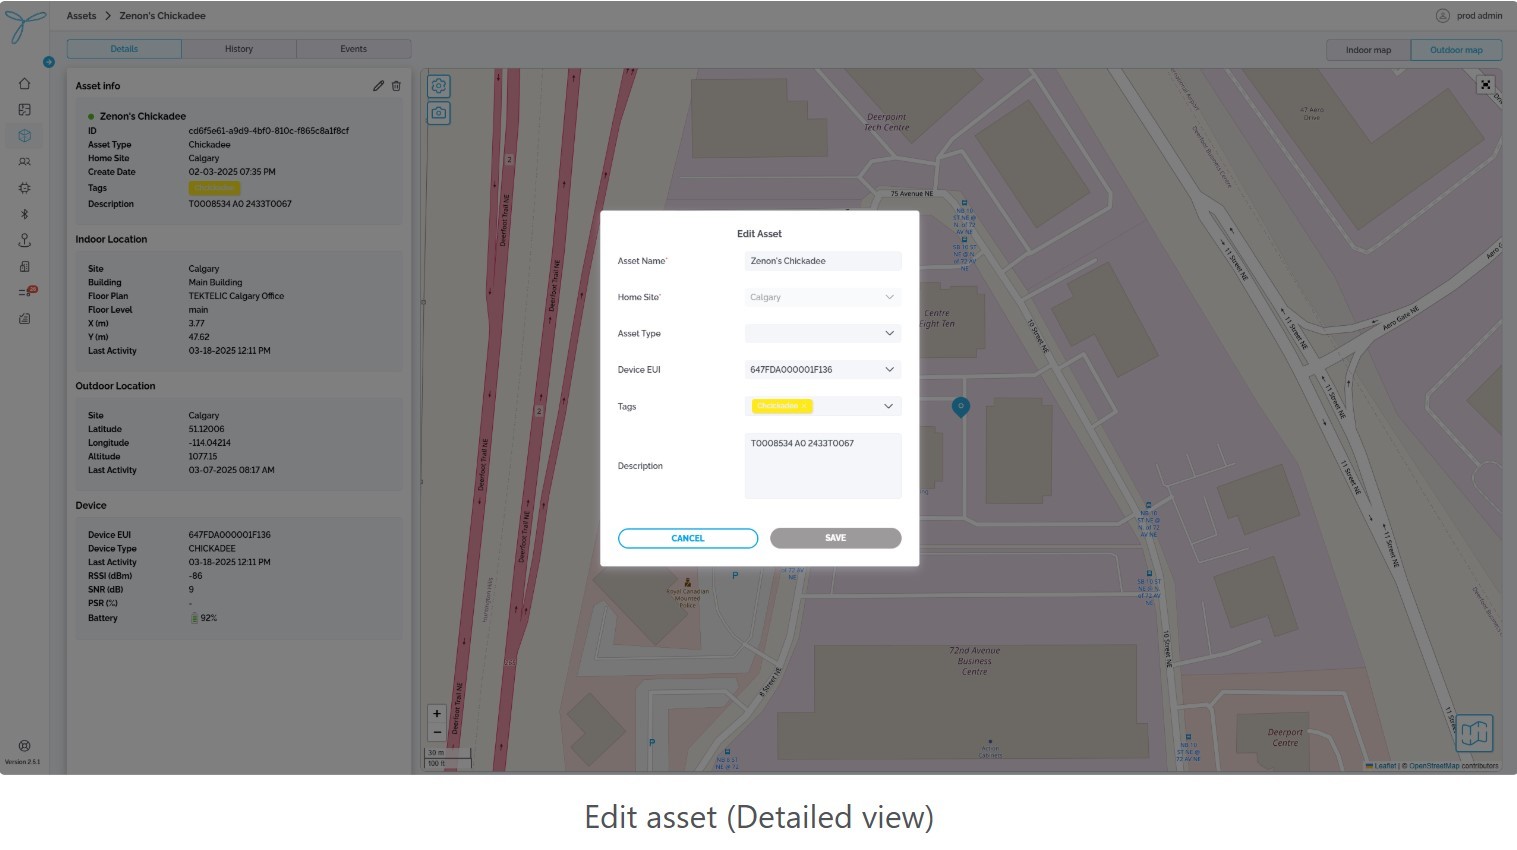
Steps:
- Open the detailed view of an asset (e.g., “Zenon’s Chickadee”).
- Click the pencil icon (if available) or edit fields directly in the Details tab.
- Update the same fields as above and save via the respective section.
-
Expectations: Same as above.
-
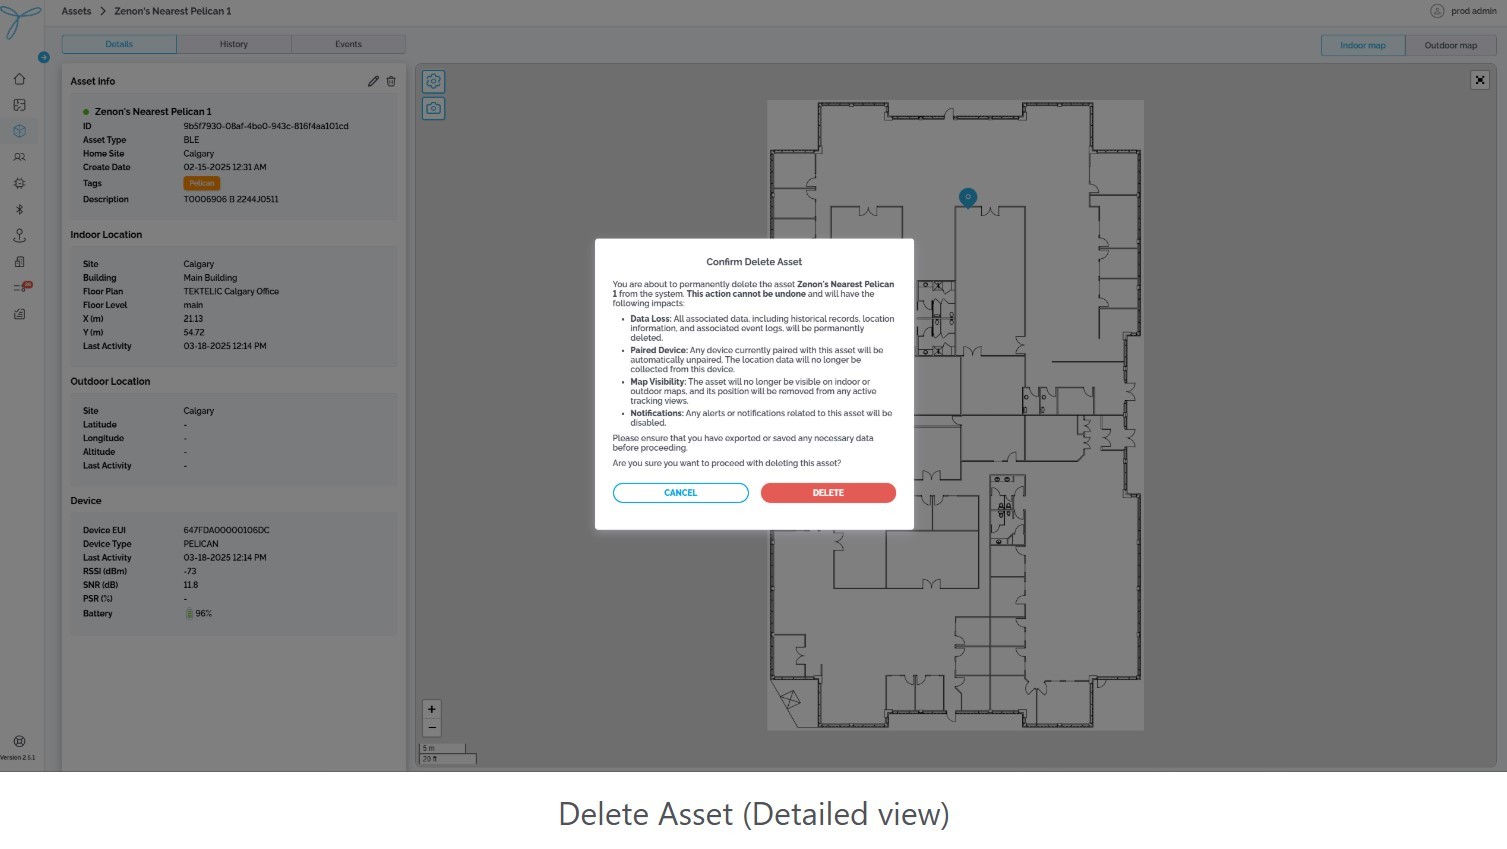
Conditions: You need admin permissions or explicit rights to delete assets. The asset must not be linked to active event rules.
Consequences: Deleting an asset removes it from the system and stops its tracking. This affects associated data, including historical records, location logs, paired devices, event logs, geofence notifications, and map visibility.
Modes:
-
From Main Table:
-
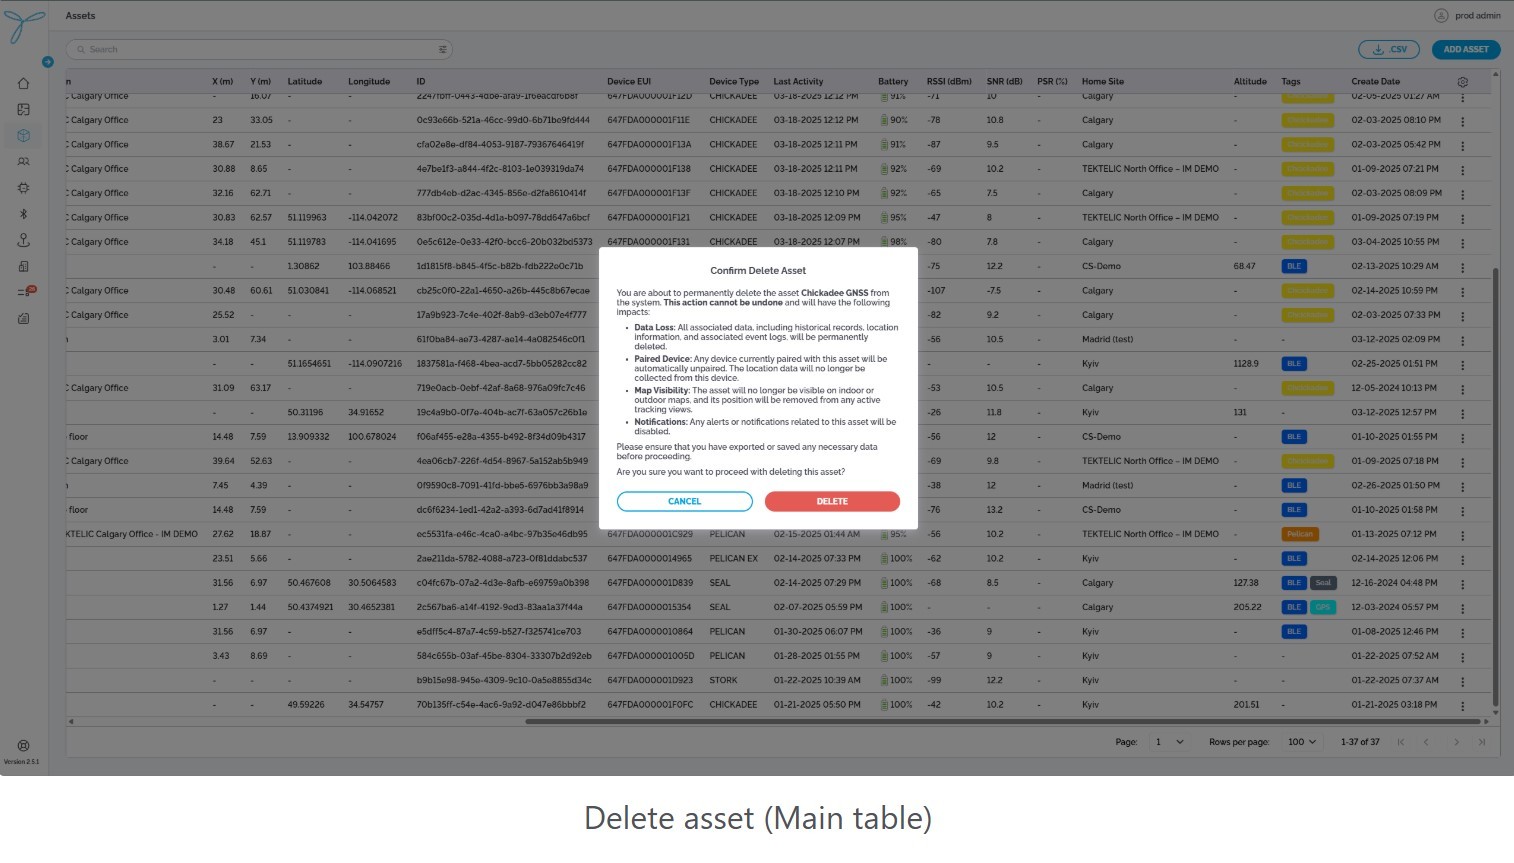
Steps:
- Click the trash icon next to an asset (e.g., “Zenon’s Nearest Pelican 1”) in the table.
- In the Confirm Delete Asset modal, review the warning about permanent deletion and its impacts.
- Click Delete to confirm; Cancel to abort.
-
Expectations: The asset is permanently removed from the list and cannot be restored.
-
-
From Detailed View:
-
Steps:
- Open the detailed view of an asset (e.g., “Zenon’s Nearest Pelican 1”).
- Click the trash icon (if available) to open the Confirm Delete Asset modal.
- Review the warning and click Delete to confirm; **Cancel **to abort.
-
Expectations: Same as above.
-
-
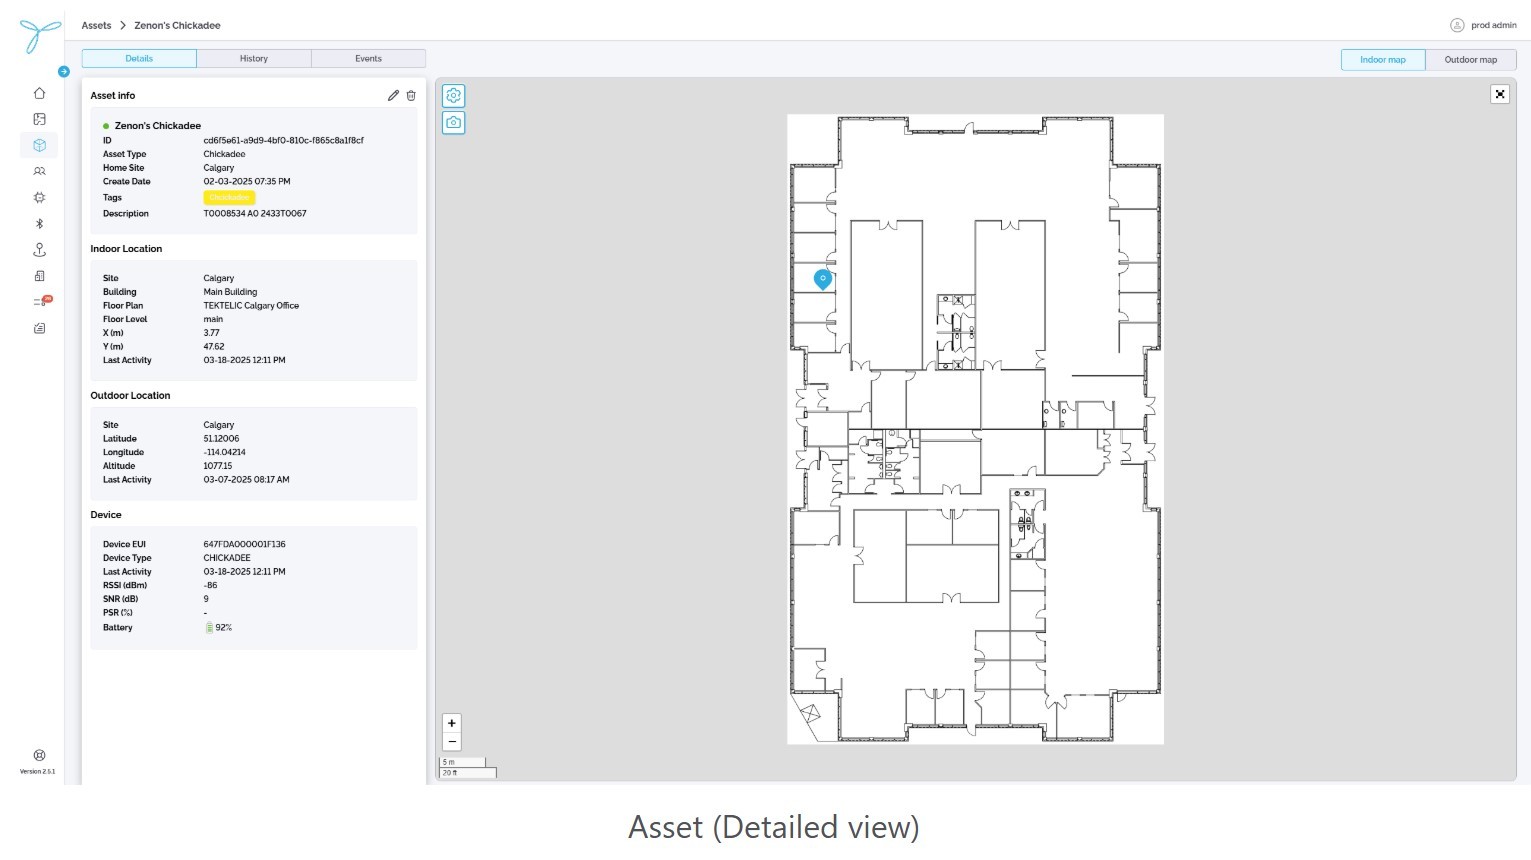
Details Tab:
-
Fields:
- Asset Info: Name, Home Site, Create Date, Tags, Description.
- Indoor Location: Site, Building, Floor Plan, X(m), Y(m), Last Activity.
- Outdoor Location: Site, Latitude, Longitude, Altitude, Last Activity.
- Device: Device EUI, Device Type, Last Activity, RSSI (dBm), SNR (dB), Battery.
-
Actions: Edit asset details (pencil icon), delete asset (trash icon), view indoor/outdoor map by switching between Indoor Map and Outdoor Map tabs, toggle asset visibility with Visibility Preferences.
-
Expectations: Displays real-time or last-known location data on the selected map.
-
-
History Tab:
- Fields: Table with columns for Timestamp, X(m), Y(m), Latitude, Longitude, Altitude, Site, Building, Floor Plan.
- Actions: Filter by date range (e.g., 03/17/2025 12:13 PM - 03/18/2025 12:13 PM) and export to .csv.
- Expectations: Shows a historical log of the asset’s positions over time.
-
Events Tab:
- Fields: Table with columns for Timestamp, Event Status, Event Type, Asset Name, Asset ID.
- Actions: Filter by date range and export to .csv.
- Expectations: Displays event logs (e.g., entry/exit from geofences) associated with the asset.
-
Visibility Preferences:
- Options: Toggle Assets and Geofences on/off.
- Actions: Click Apply to update the map view; Cancel to discard changes.
- Expectations: Controls which elements are visible on the indoor/outdoor map.
List View
The table will display all asset types with the following default columns: Name, Site ID, Create Date.
- Name: The name of the asset type (e.g., “Chickadee beacon_model”).
- Site ID: The unique identifier of the site to which the asset type is tied (e.g., “ddf86946-f157-47bb-a942-ed9f358d9850”).
- Create Date: The date when the asset type was created (e.g., “03-21-2025 10:00 AM”).
Column Configuration (Table Preferences):
- Click the gear icon to open the Table Preferences modal.
- Select which columns to show or hide (e.g., Name, Site ID, Create Date).
- Columns can be rearranged by dragging, hidden by deselecting, but resizing is not supported.
- Click Save to apply changes; Cancel to discard.
Search and Sort: Use the search bar to find asset types by name. Sort columns like Create Date in ascending or descending order.
Export Data: Export the table to a .csv file by clicking the CSV button, including all visible columns.
Actions (Based on Permissions):
- Admins: Add, edit, or delete asset types.
- Standard Users: View asset types; edit or delete if granted explicit permissions.
Detailed View
Open the detailed view by clicking an asset type in the table (e.g., “Chickadee beacon_model”).
The detailed view provides the following fields:
- ID: A unique identifier for the asset type (e.g., “at123”).
- Name: The name of the asset type (e.g., “Chickadee beacon_model”).
- Site ID: The site identifier (e.g., “ddf86946-f157-47bb-a942-ed9f358d9850”).
- Create Date: When the asset type was created (e.g., “03-21-2025 10:00 AM”).
- Last Modified: The last update timestamp (e.g., “03-21-2025 10:00 AM”).
- Last Modified By: The user who last edited the asset type (e.g., “admin@tektelic.com”).
Actions (Based on Permissions):
- Admins: Edit or delete the asset type.
- Standard Users: View details; edit or delete if permitted.
Conditions: You need admin permissions or explicit rights to add beacon models. This functionality is currently available only through the backend API.
Steps (via API):
- Use an API client (e.g., Postman) to send a POST request to the endpoint for creating asset types (e.g., https://api.locus.tektelic.com/asset-types).
- In the request body, provide the following JSON payload:
{
  "name": "Chickadee beacon_model",
  "siteId": "ddf86946-f157-47bb-a942-ed9f358d9850"
}
- Set the appropriate headers (e.g., Content-Type: application/json, and include an authorization token).
- Send the request and verify the response (e.g., a 201 Created status with the created asset type’s details, including a generated id).
