Locus Setup Guide
- LOCUS WEB Application
- 1. Receive new client details from the Sales team
- 2. Create Tenant Account
- 3. Network Server Account
- 4.Semtech LoRa Cloud integration
- 5. Locus Administrator User Account Setup
- 6. Features
- 7. Floor plans (required for indoor-tracking)
- 8. Devices
- 9. Assets
- 10. Beacons
- 11. Geofences
- 12. Event Rules (Optional)
- 13. Setup Verification
- 14. Acronyms and Glossary
Please refer to the guide to verify the client details that the client will complete. Locus new client onboarding checklist
Please contact development team: astarchenko@tektelic.com or orassykhin@tektelic.com for the next actions:
-
Setup a new tenant (client account) users to Locus.
-
Create temporal Administrator user for Support engineer (which is using this guide and performing Locus setup)
It is used for setup process and can be removed from client account later if needed. -
Create Administrator user for the client (based on email provided by the client)
-
Create standard users for the client (based on emails provided by the client)
- Check that the user has access to NS.
- Create NS account if needed.
- Ensure the NS account has at least one gateway online and tracking devices.
- In case on-prem NS deployment is required contact the NS Team (astarchenko@tektelic.com, yturovska@tektelic.com, akushnir@tektelic.com)
-
Configure Data Converter:
-
Open the TEKTELIC NS dashboard and navigate to the “Data Converters” section.
-
Create a new converter named “LocusDataConverter”.
-
Select “Custom v2” option.
-
Decoder:
// input object structure: // - bytes - int[] // - fPort - int // - recvTime - Date (needs type check) // - tektelicMetadata - Object if (input.recvTime instanceof Date) { // date operations } // output object structure: // - data - Object // - errors - string[] // - warnings - string[] // - tektelicMetadata - Object return { "data": {"bytes": input.bytes}, "errors": [], "warnings": [], "tektelicMetadata": input.tektelicMetadata }; -
Encoder:
// input object structure: // - data - Object (customer-defined) // output object structure: // - fPort - int // - bytes - int[] // - errors - string[] // - warnings - string[] return { "fPort": input.data.fPort, "bytes": input.data.bytes, "errors": [], "warnings": [] }; -
Save the converter.
-
-
Integration Setup:
-
Navigate to the “Applications” section in the TEKTELIC NS dashboard.
-
Select the application with devices that will be used with Locus.
-
Open the “Manage Integrations” section.
-
Add a new integration with the following settings:
- Name: Locus_Integration
- Type: Select “HTTP_V2”
- Data Converter: Select “LocusDataConverter”
- Application Address: locus-pc.tektelic.com
- Port: 443
- Base Path: /v2/integration
- HTTPS: Check the box to Enable HTTPS
- Request Headers: Click to “Add” and fill in the fields:
Key: ApiKey
Value: ApiKey
-
In case additional information needed please use HTTP V2 Integration
- Configure Data Converter:
- Access your 3rd party NS dashboard and locate the section for custom data converters (e.g., “Functions” or “Scripts”).
- Create a new converter named “LocusDataConverter”.
- Use the same decoder and encoder scripts as above.
- Save the converter and associate it with your application.
- Integration Setup:
-
Navigate to the integrations section in your 3rd-party NS dashboard.
-
Add a new integration with the same settings as for TEKTELIC NS:
- Name: “Locus_Integration”.
- Type: HTTP (or equivalent, depending on NS).
- Data Converter: Select “Locus_Data_Converter”.
- Application Address: locus-pc.tektelic.com/v2/integration/
- Port: 443.
- HTTPS: Enabled.
- Request Headers
Key: ApiKey
Value: ApiKey
-
Test the integration to ensure data is transmitted to Locus.
-
Note: Some 3rd party NS may require additional configuration (e.g., custom endpoints or authentication methods). Refer to your NS documentation.
-
Stork and Chickadee devices require Semtech LoRa Cloud integration for GNSS/outdoor tracking.
In case client plans to use Stork or Chickadee please contact Kyiv RnD team astarchenko@tektelic.com or orassykhin@tektelic.com to enable Semtech LoRa Cloud support for particular tenant / client account.
-
Get Password Confirmation Email
Following step 2 of this guide, Kyiv R&D team will create user accounts.
Please check your email: Locus sends a password confirmation email.
The email will contain a button labeled Link to Account Update. -
Click the Link to Account Update in the email:
This will redirect you to a page called “Perform the Next Actions.”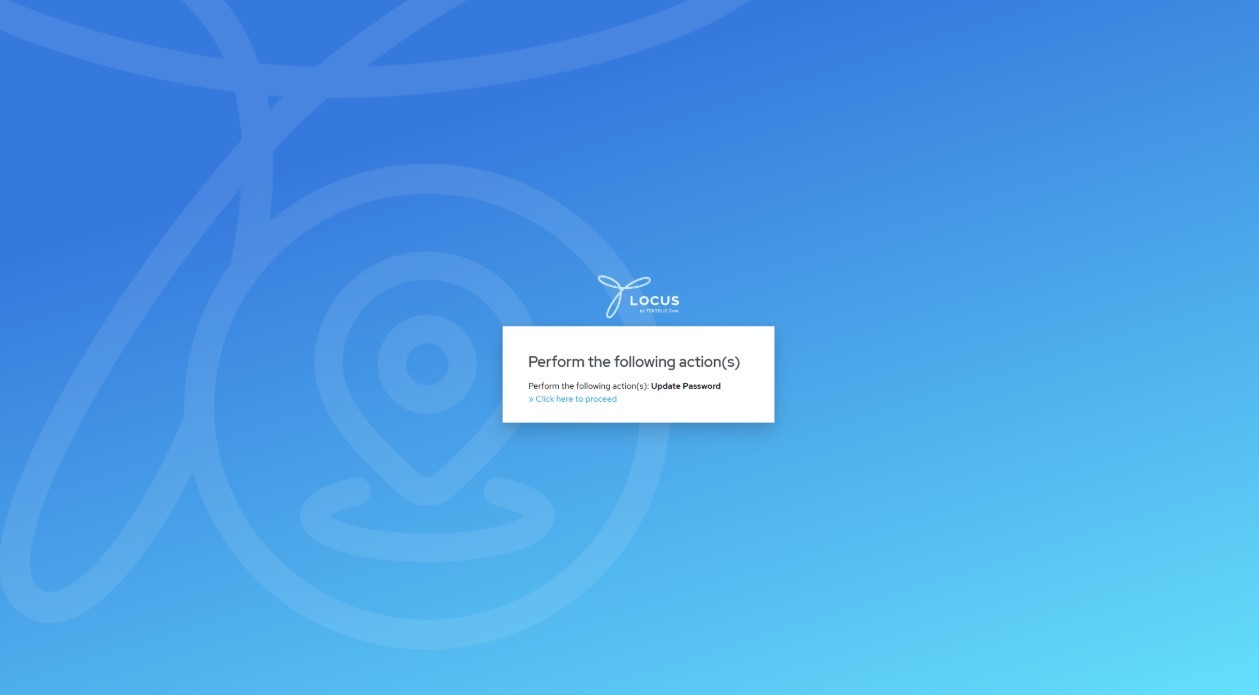
-
Verify Organization Setup:
Since the client’s tenant account (e.g., “Acme Corp”) is created (step 2 of this guide), use the organization`s name to proceed.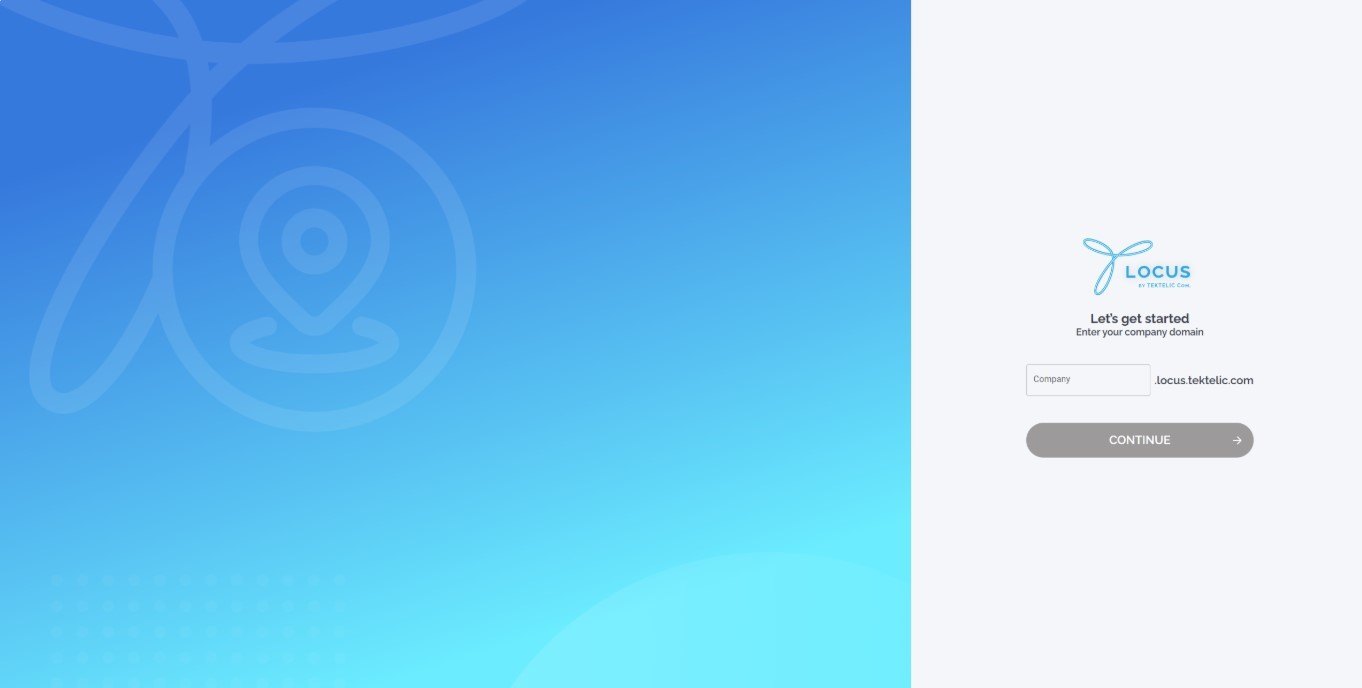
-
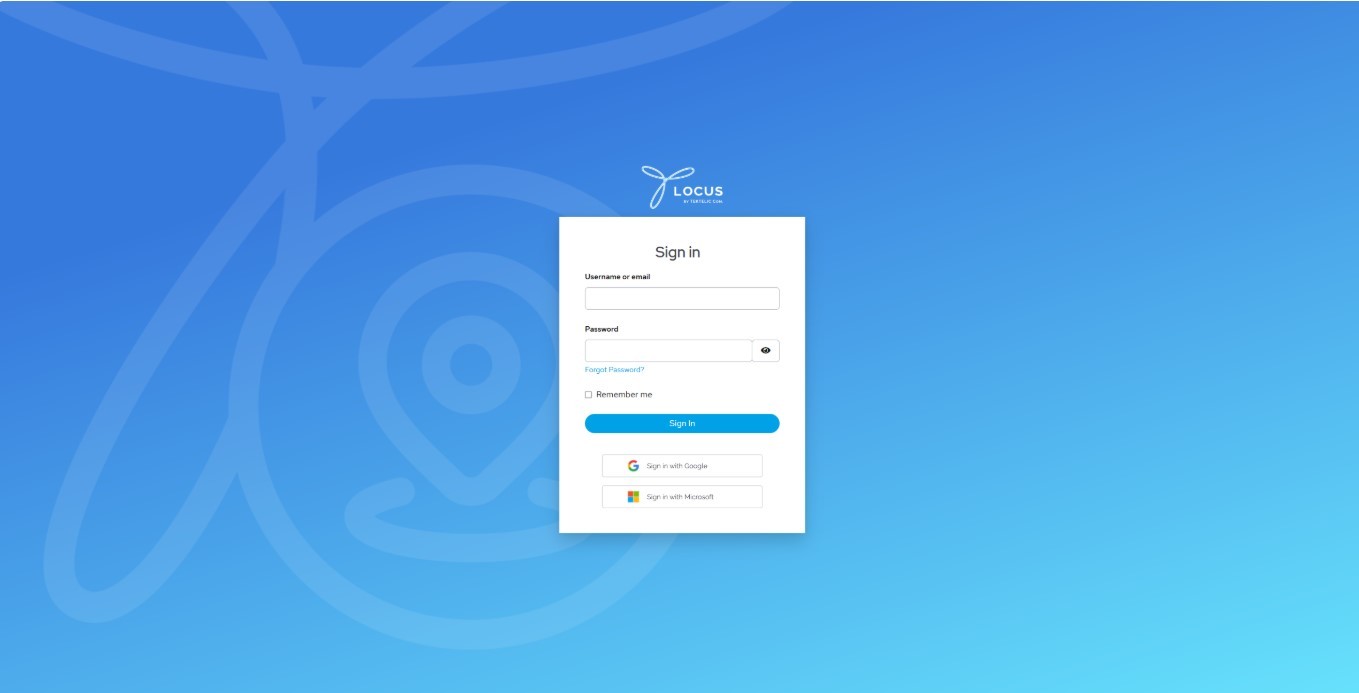
Sign-In: Sign in using your credentials (email and password) or Single Sign-On (SSO) if it enabled.
For details on managing user accounts, troubleshooting login issues, or updating organization details, refer to the [WIP] KeyCloak Administration or contact Kyiv RnD team (astarchenko@tektelic.com or orassykhin@tektelic.com)
Overview
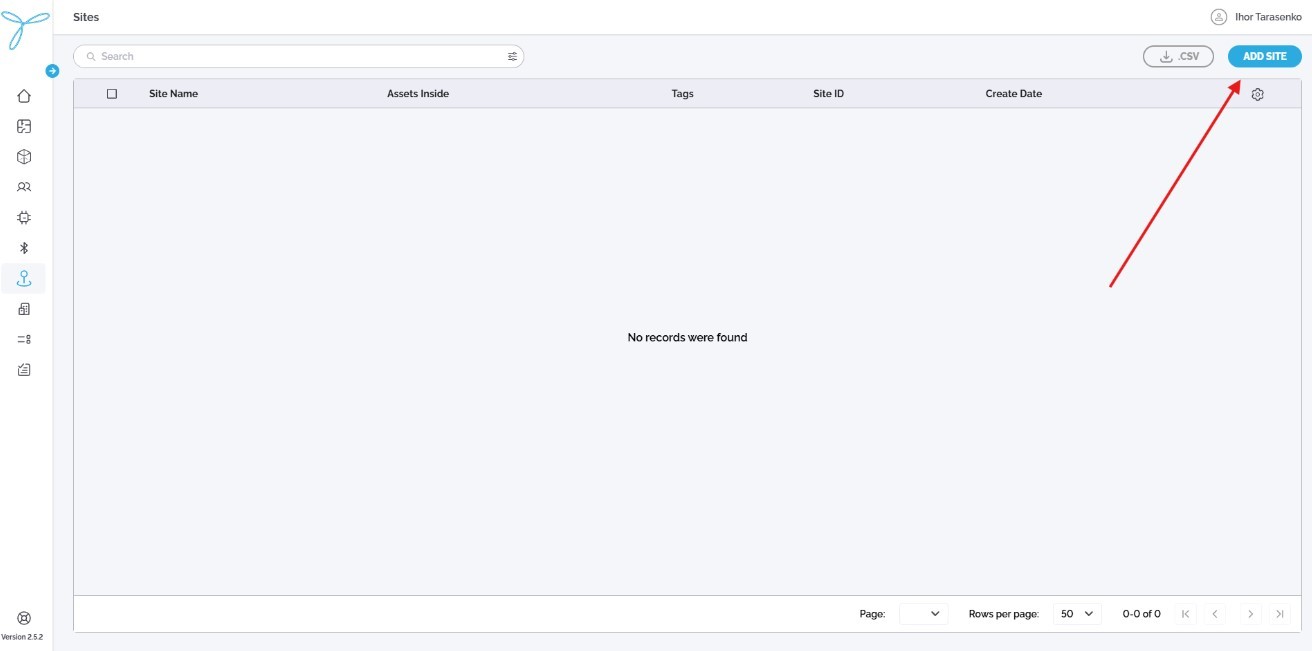
A Site is represents highest level of locations hierarchy. Site typically includes area with one or more buildings inside. e.g. university campus.
Sites also help to control/restrict location-based permissions. E.g. some users will be able to see only Site A, but not Site B and C.
Before You Start
Ensure you have:
- A list of sites provided by the customer.
-
Navigate to the Sites menu and click Add Site:
-
Enter the Site Name (e.g., “Madrid”). Other fields can be left blank.
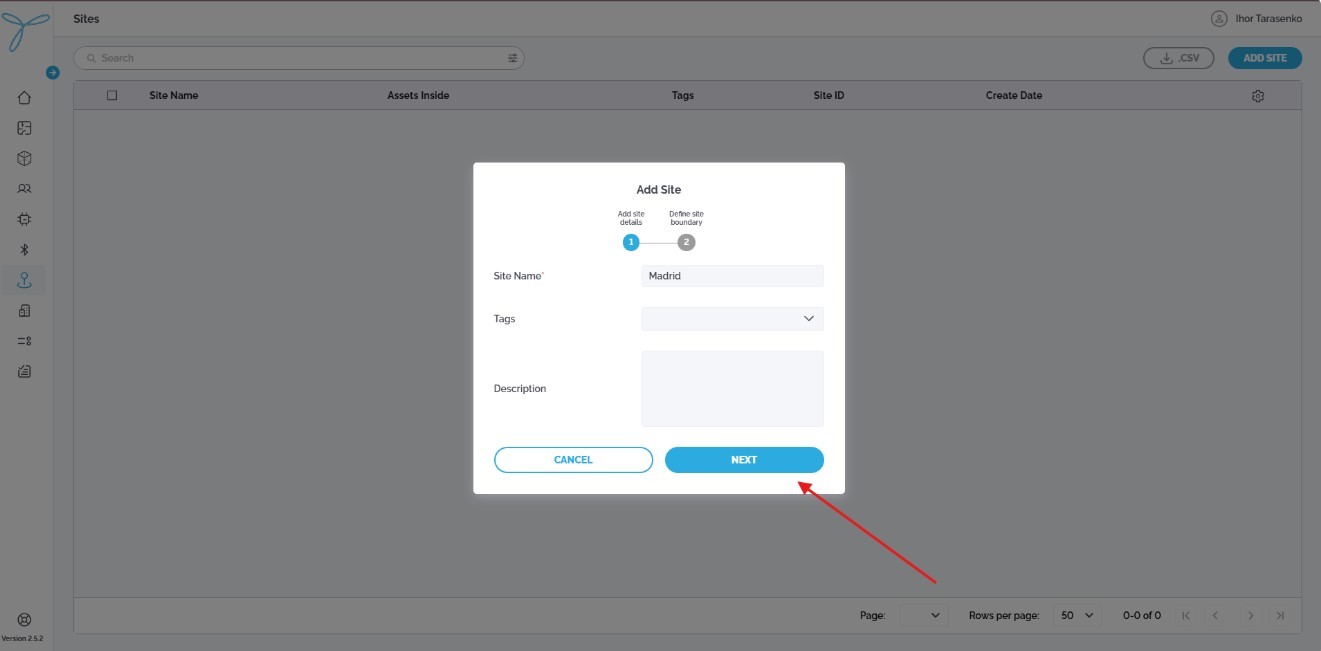
-
Click Next, then follow the on-screen instructions to define the site boundary.
Site boundary sets default outdoor map position and zoom when particular Site is selected by the user.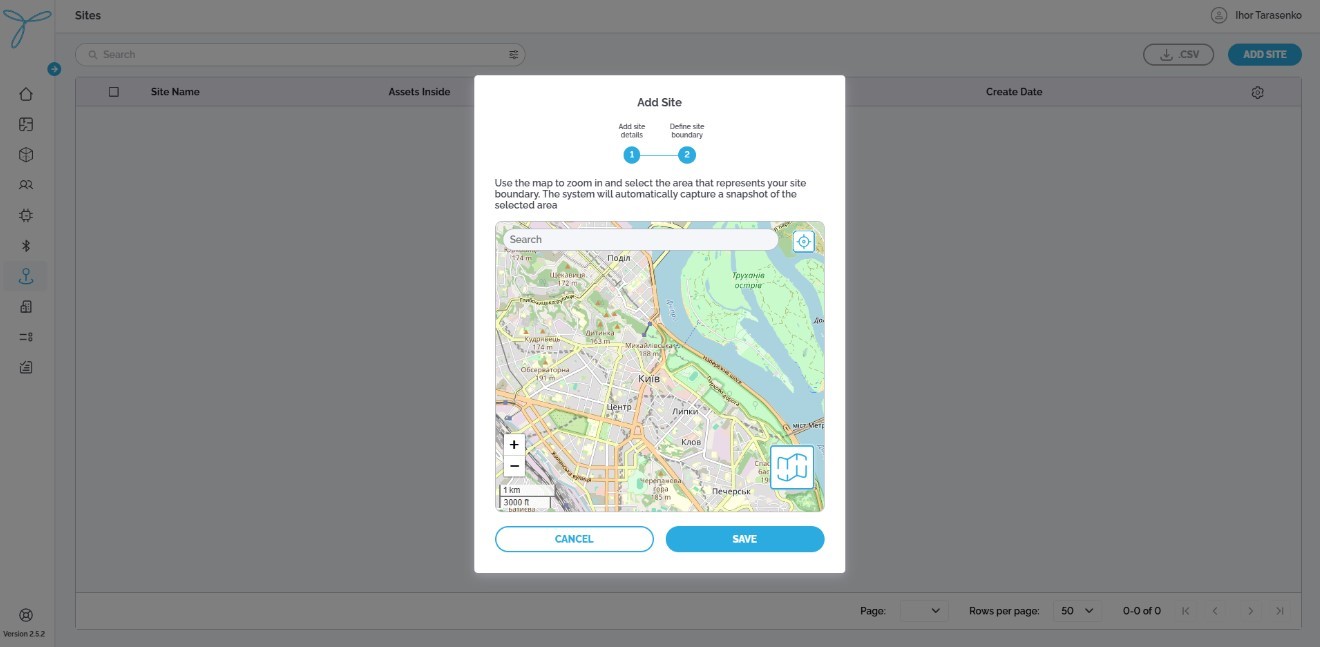
For details on editing, deleting, or viewing sites, refer to the Locus User Documentation
Overview
A Building entity represents physical buiding and has marker to highlight position on the map. Building can contain Floor Plans.
Before You Start
Ensure you have:
- A list of buildings provided by the customer.
-
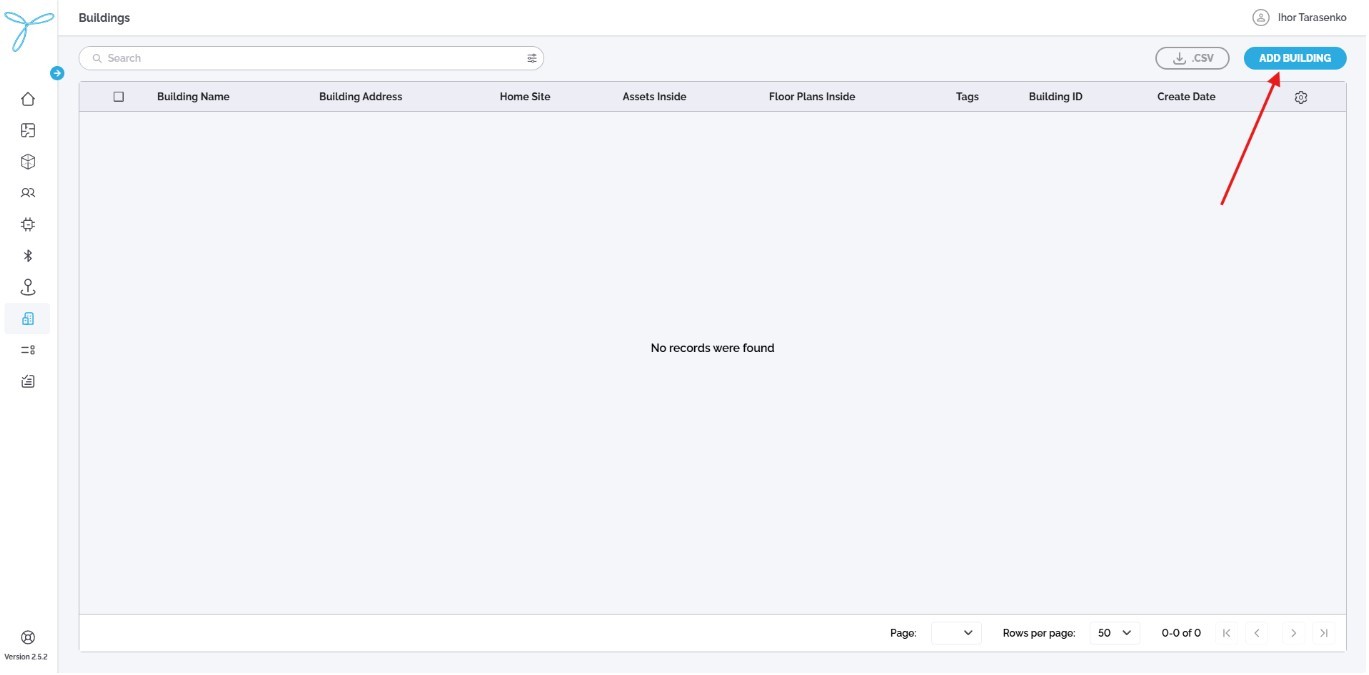
Navigate to the Building menu and click Add Building:
-
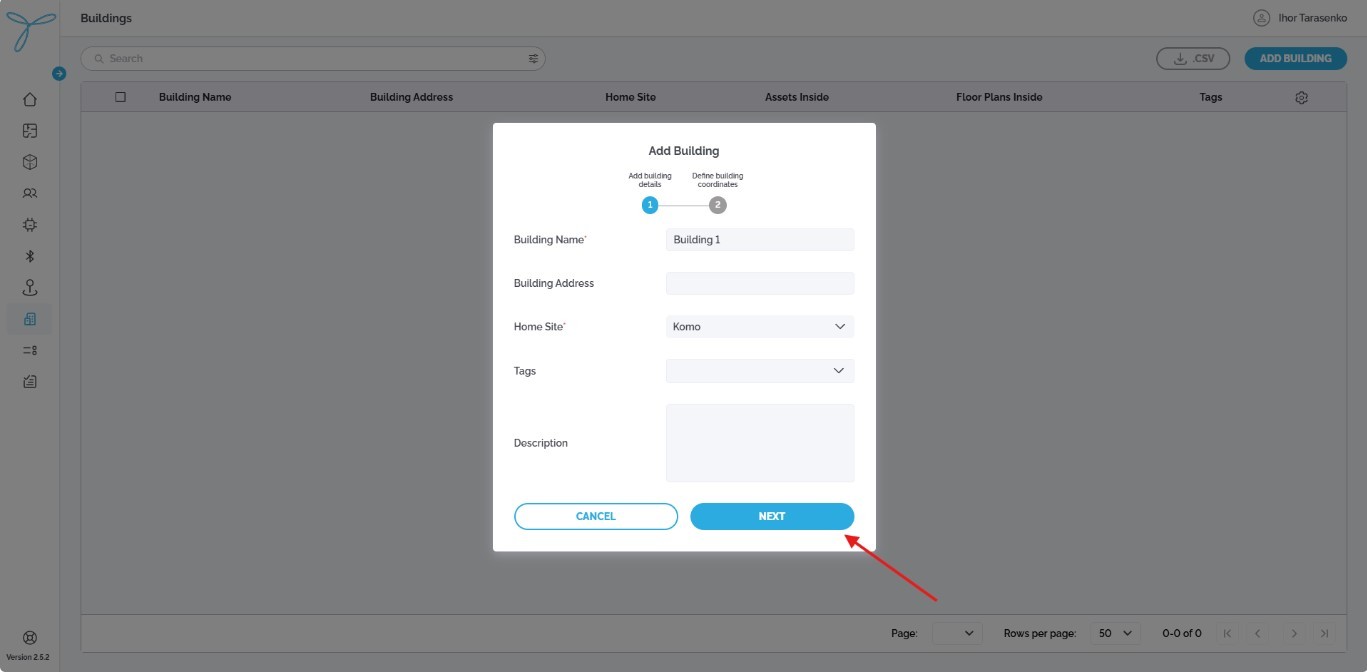
Enter the Building Name (e.g., “Building1”). Assign building to an existing Site
-
Click Next, then follow the on-screen instructions to add building pin
For details on editing, deleting, or viewing buildings, refer to the Locus User Documentation
Floor Plans allow users to manage indoor layouts and required to track assets indoor.
Before You Start
Ensure you have:
- A list of floor plans with images and scale indication provided by the customer.
-
Navigate to the Building menu and click Add Floor plan:

-
Select Site for the Floor plan.
Select Building for the Floor plan.
Enter the Floor Plan Name (e.g., “Floor F8”).
Assign a picture to the Floor plan.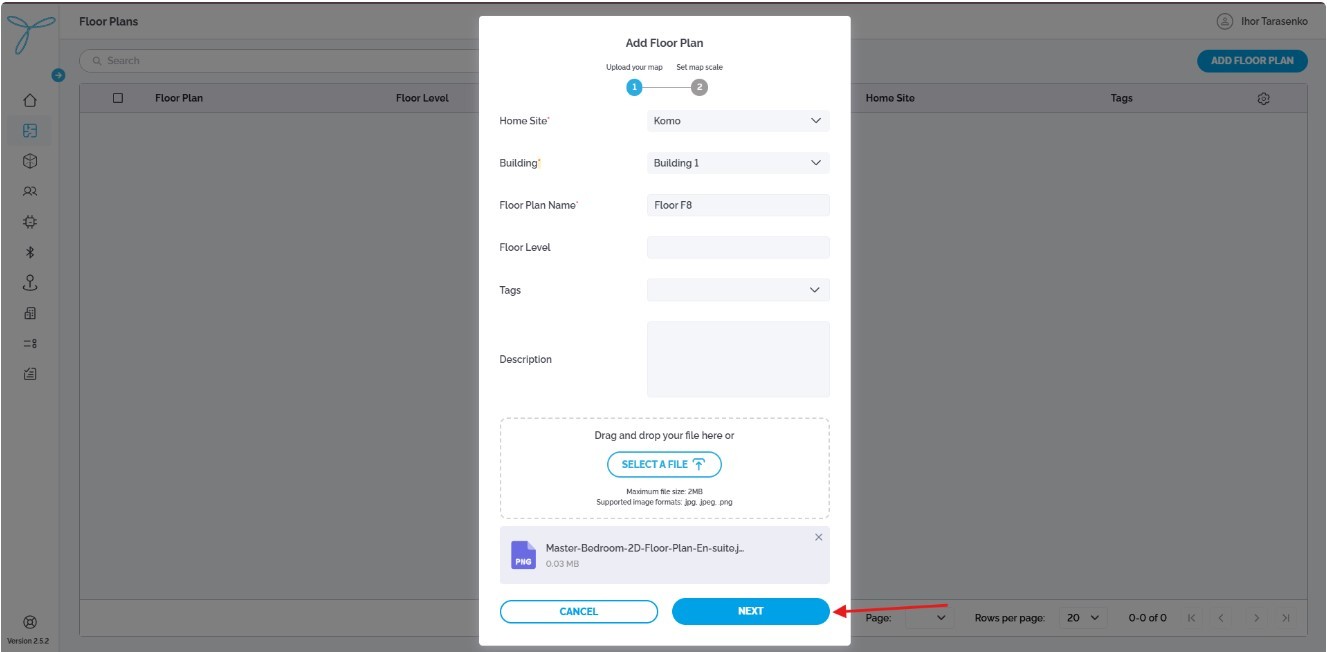
-
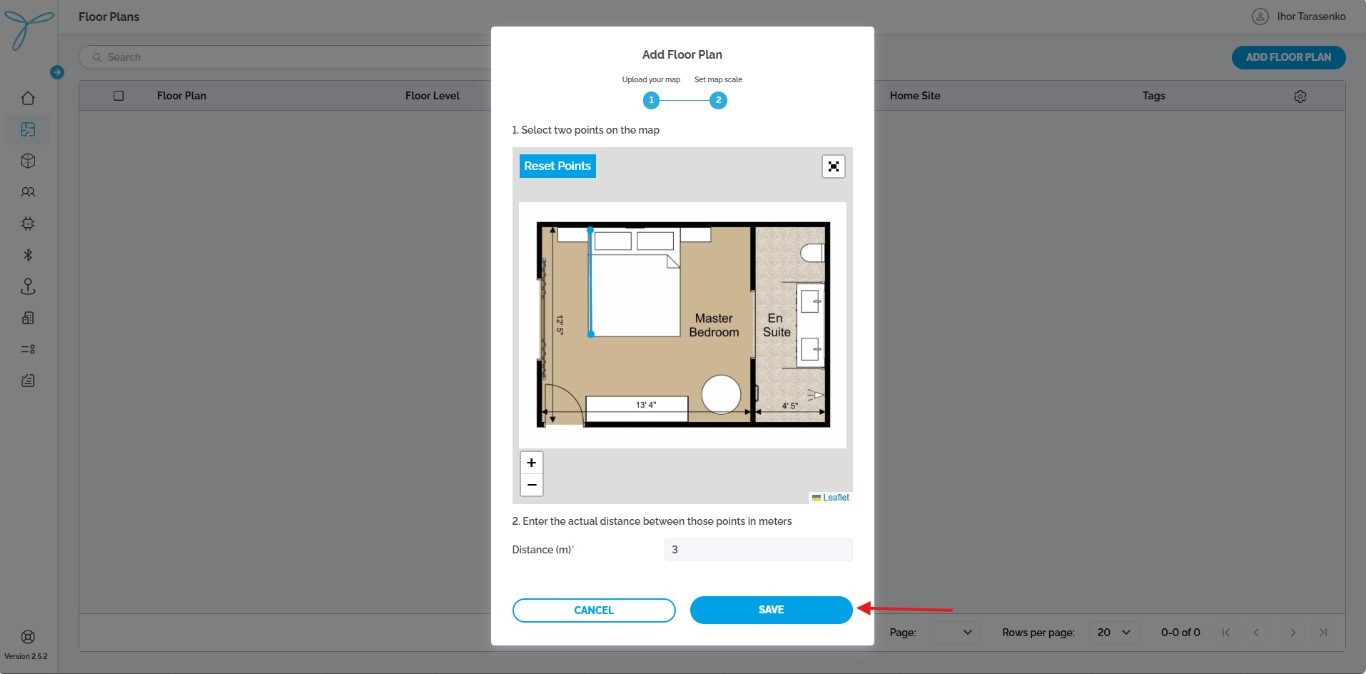
Click Next, then follow the on-screen instructions to define the Floor plan scale.
For details on editing, deleting, or viewing floor plans, refer to the Locus User Documentation
Overview
The Devices page lets you manage and monitor TEKTELIC trackers.
NOTE: Stork and Chickadee devices require Semtech LoRa Cloud integration for GNSS/outdoor tracking. In case client plans to use Stork or Chickadee please contact Kyiv RnD team astarchenko@tektelic.com or orassykhin@tektelic.com to enable Semtech LoRa Cloud support for particular tenant / client account.
Before You Start
Ensure you have:
- A list of devices provided by the customer.
- For bulk import, a CSV file filled with customer’s devices.
-
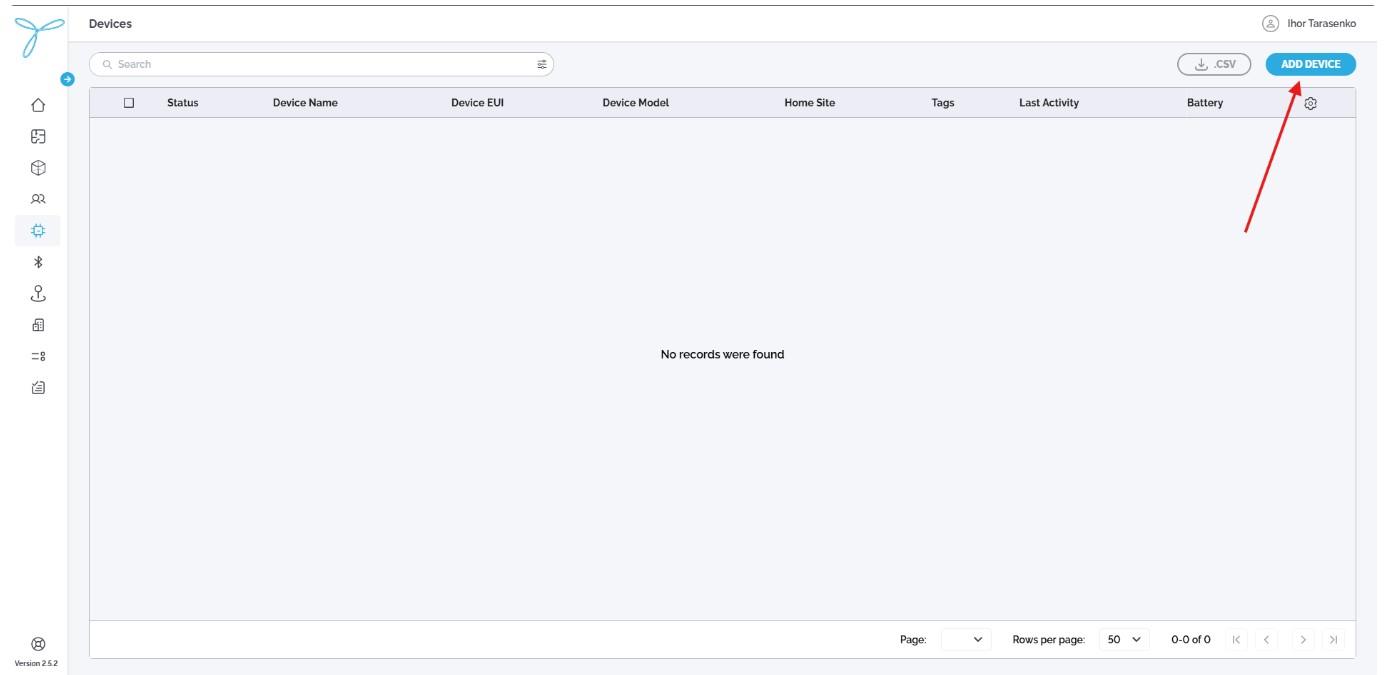
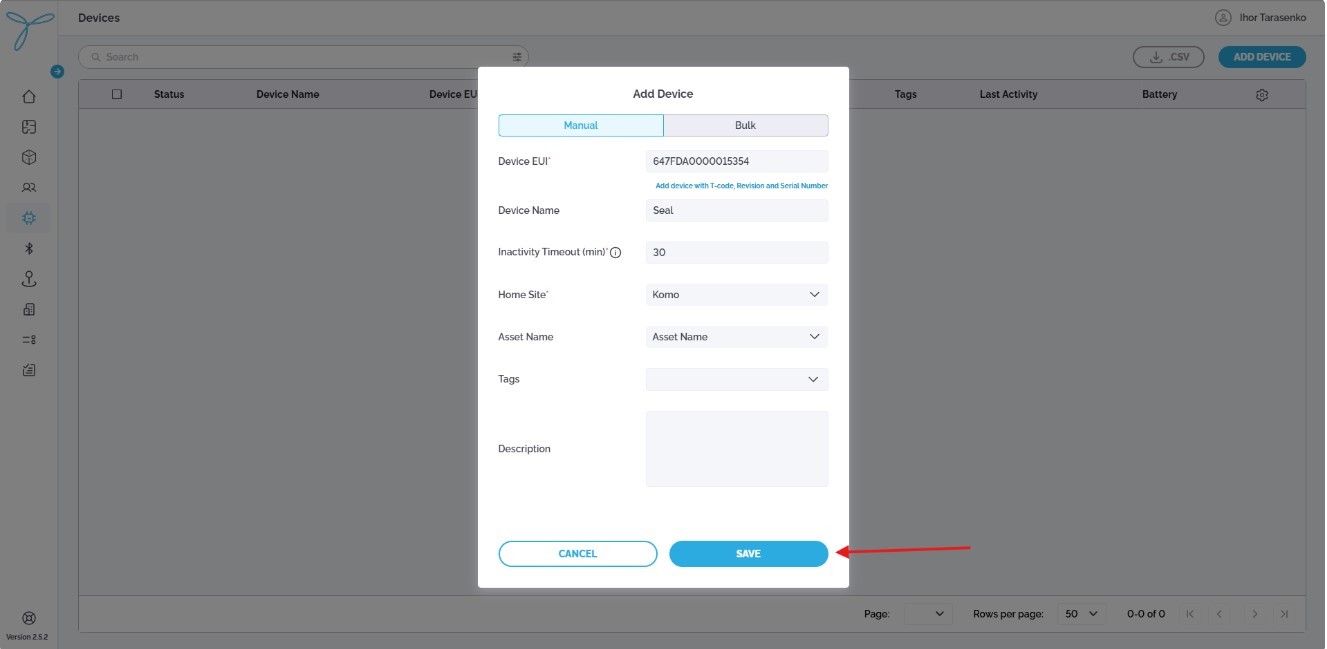
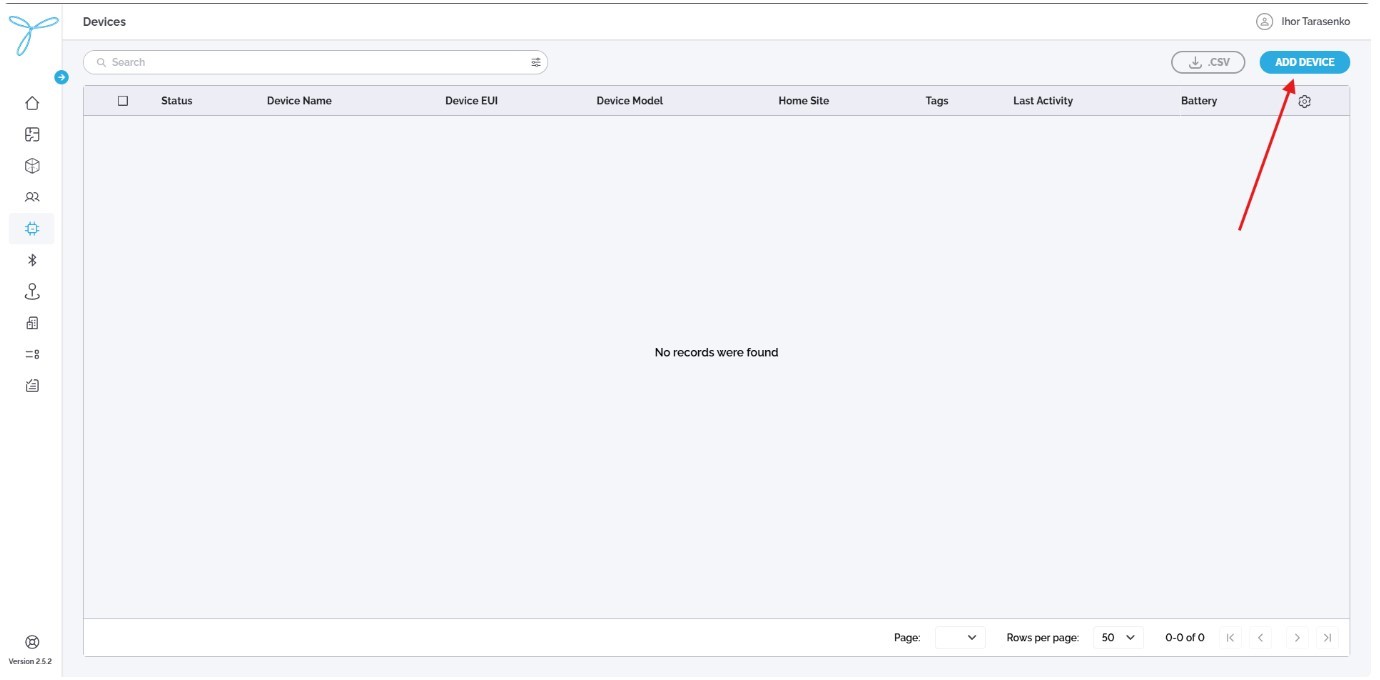
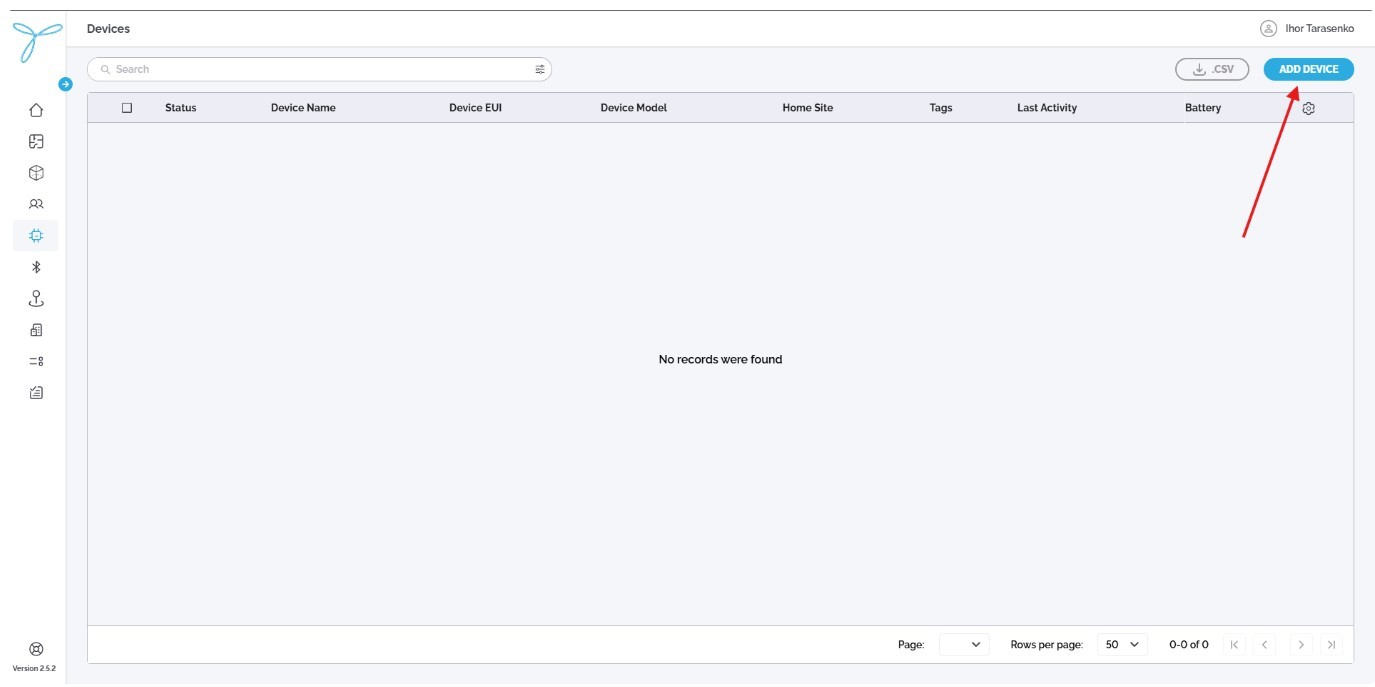
Navigate to the Devices menu and click Add device
-
Enter DevEUI of the device. Enter Inactivity timeout for device. Assign Device to the existing Site. Other fields can leave blank. Click “Save”
-
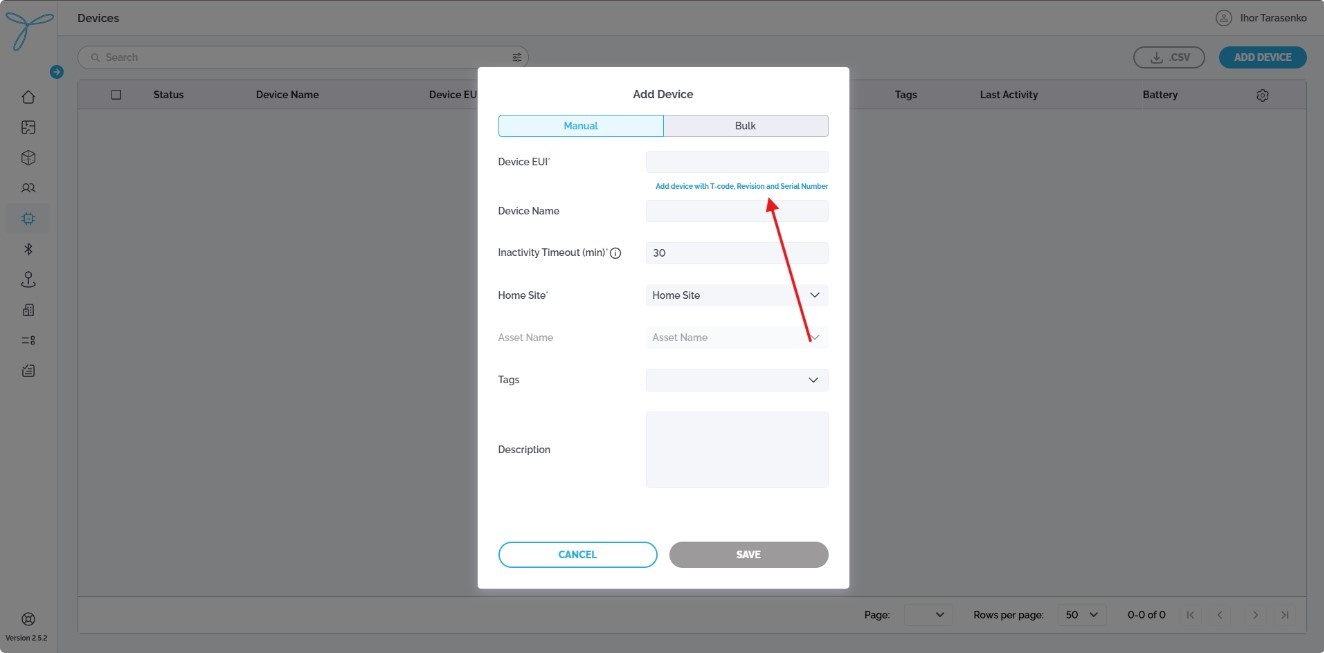
Navigate to Devices menu and click Add device.
-
Click on “Add device with T-code, Revision and Serial number” button.
-
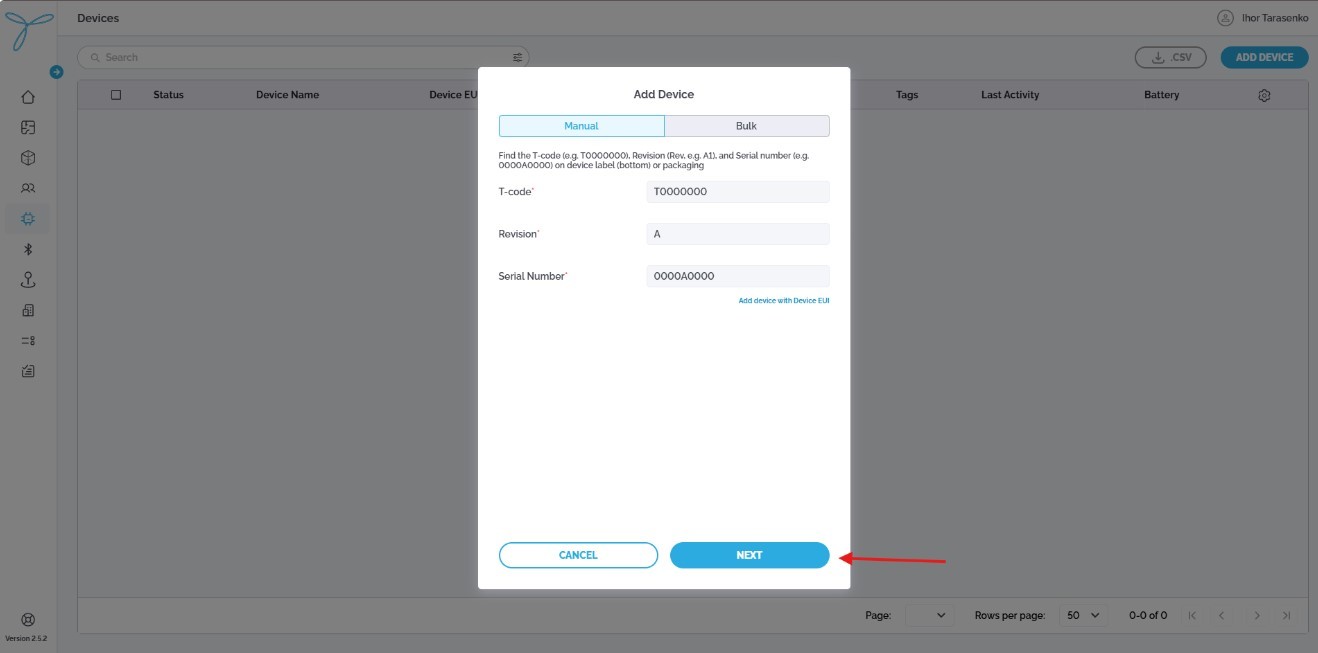
Enter T-code, Revision and Serial number, click “Next”.
-
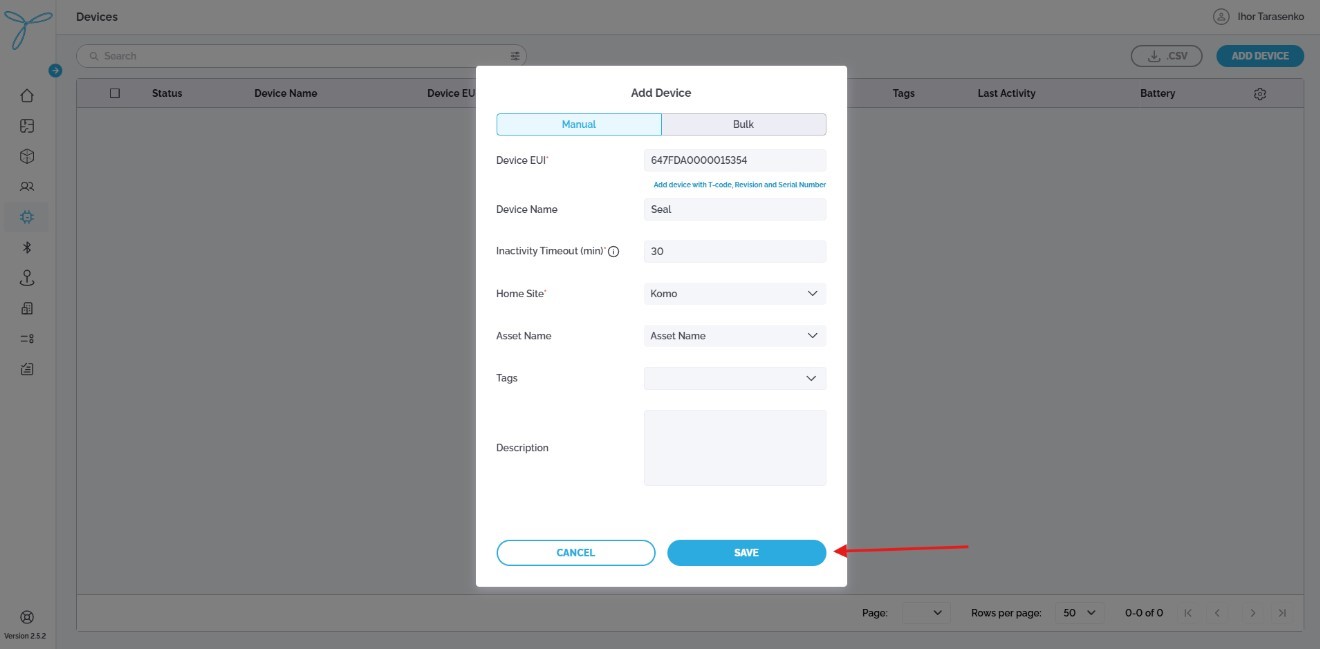
Enter Inactivity timeout for device. Assign Device to the existing Site. Other fields can leave blank. Click “Save”.
-
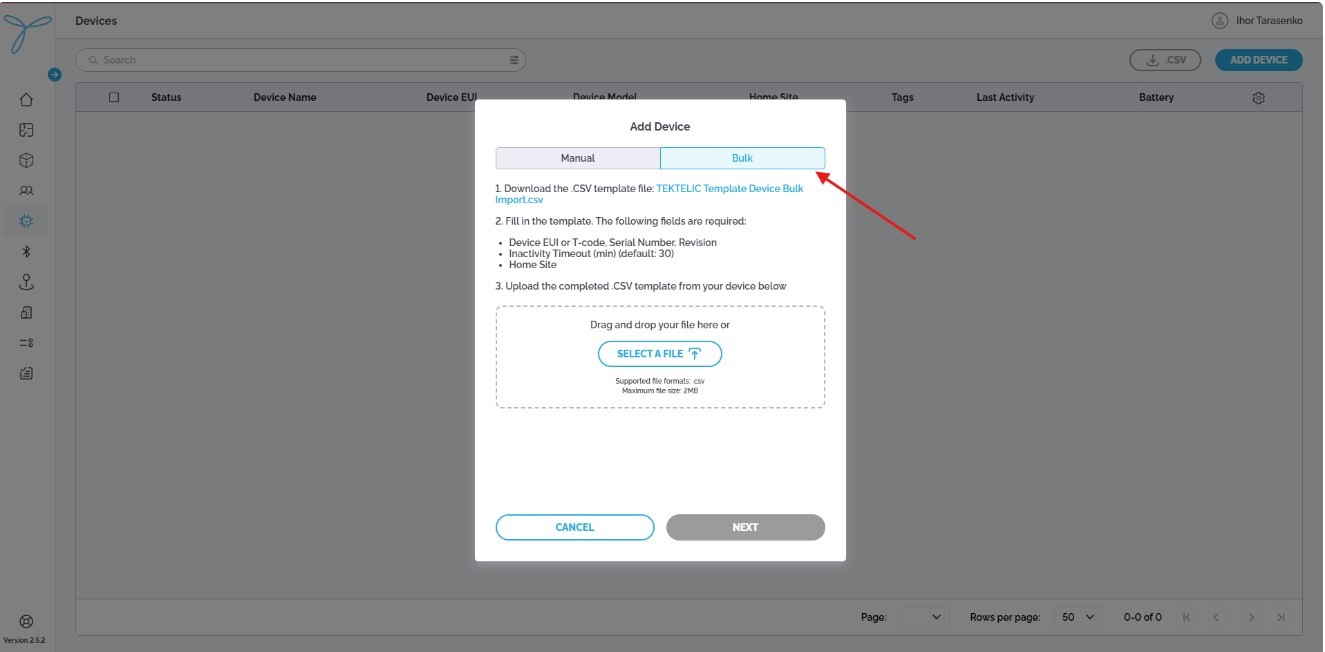
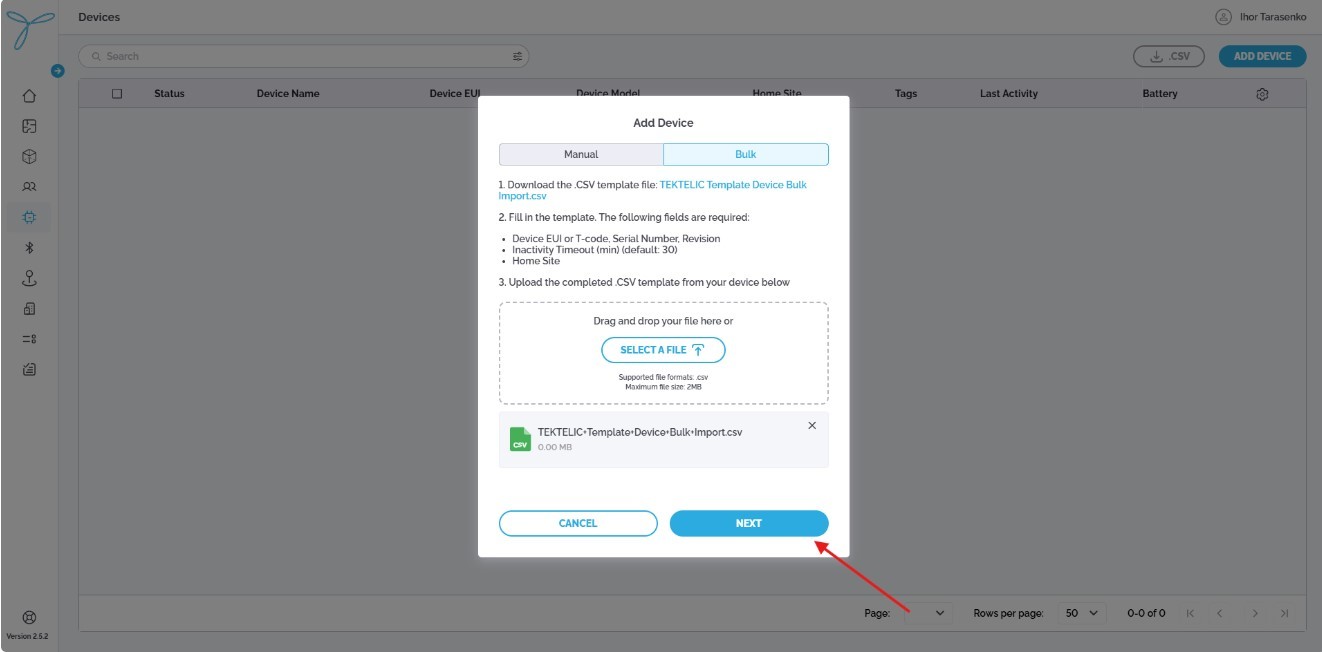
Navigate to Devices menu and click “Add device”.
-
Select “Bulk”
-
Import CSV file from the customer. Click on “Next”
For details on editing, deleting, CSV export or viewing devices, refer to the Locus User Documentation
Before You Start
Ensure you have:
- A list of assets provided by the customer.
- For bulk import, CSV file filled with customers assets.
-
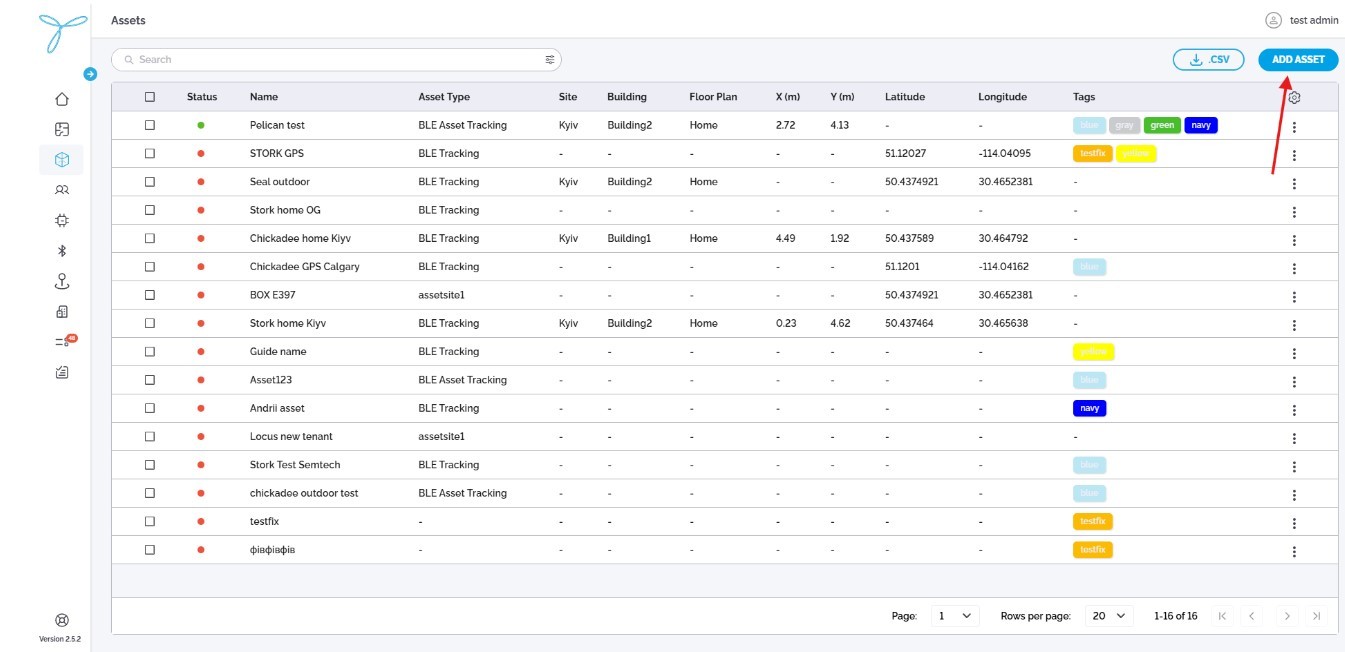
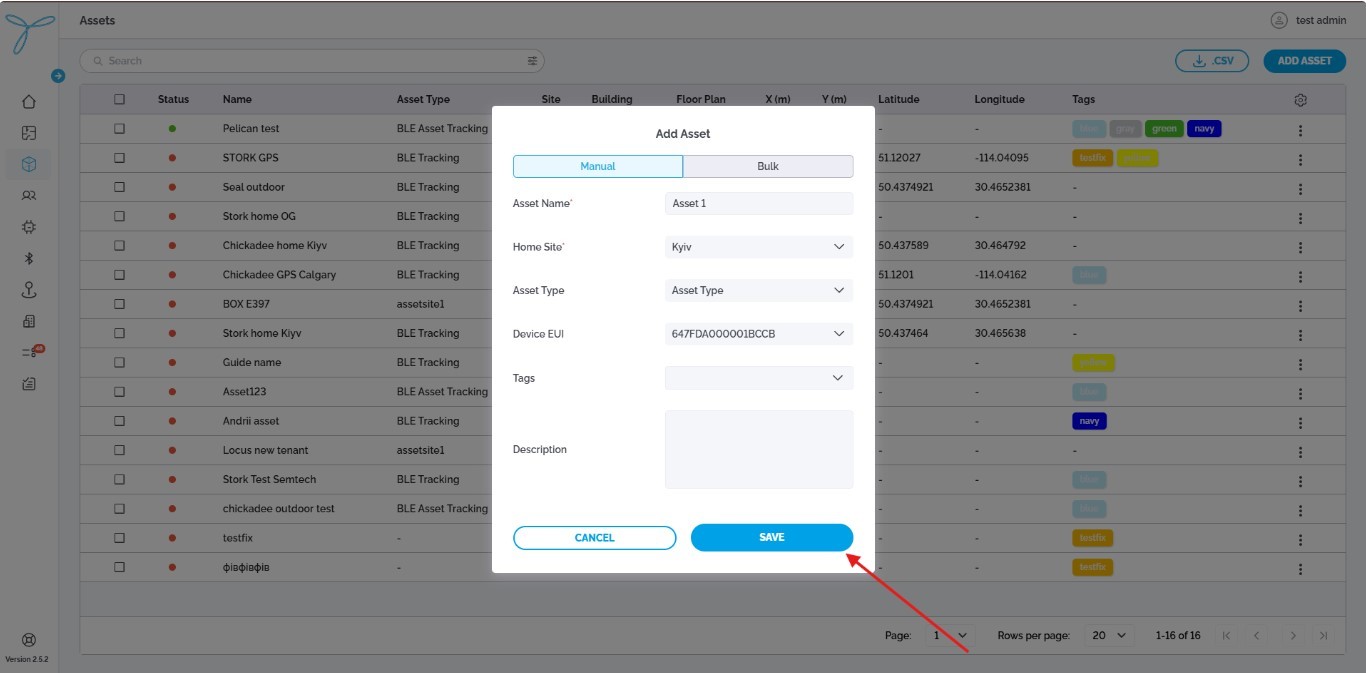
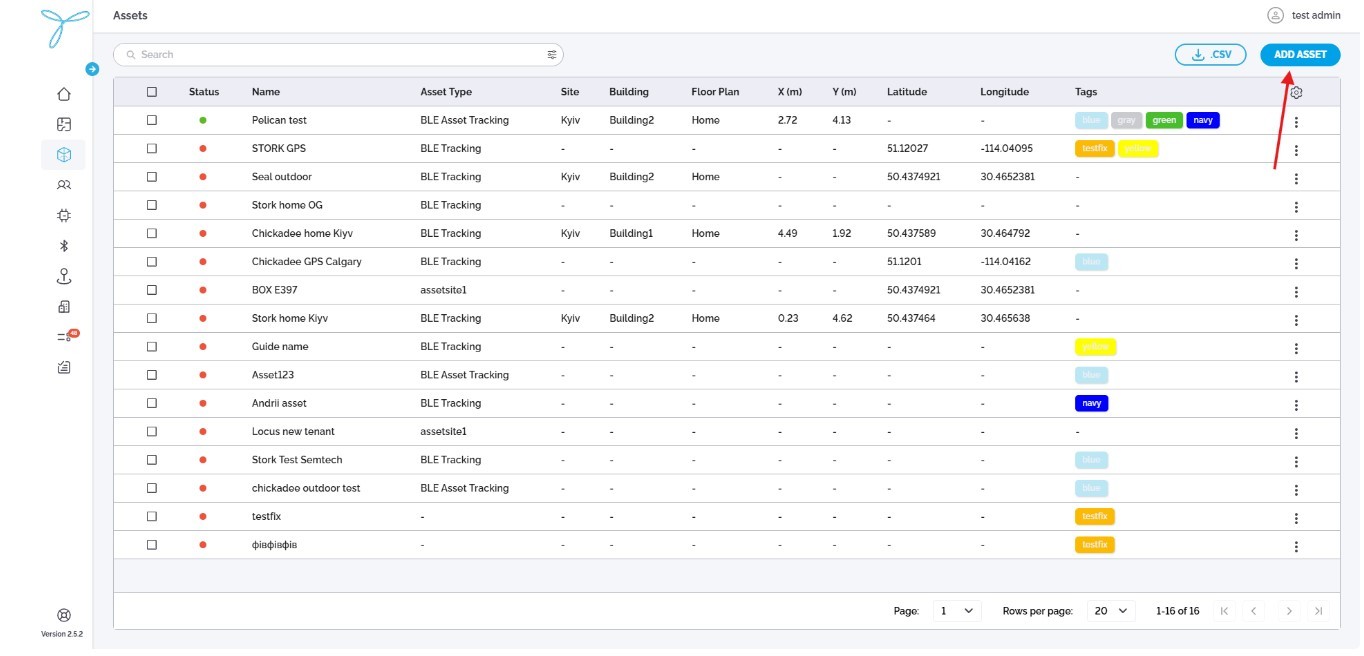
Navigate to Assets menu and click “Add asset”.
-
Enter asset name. Assign asset to an existing Site. Select DevEUI of existing Device to bound asset (optional). Click on “Save” button
-
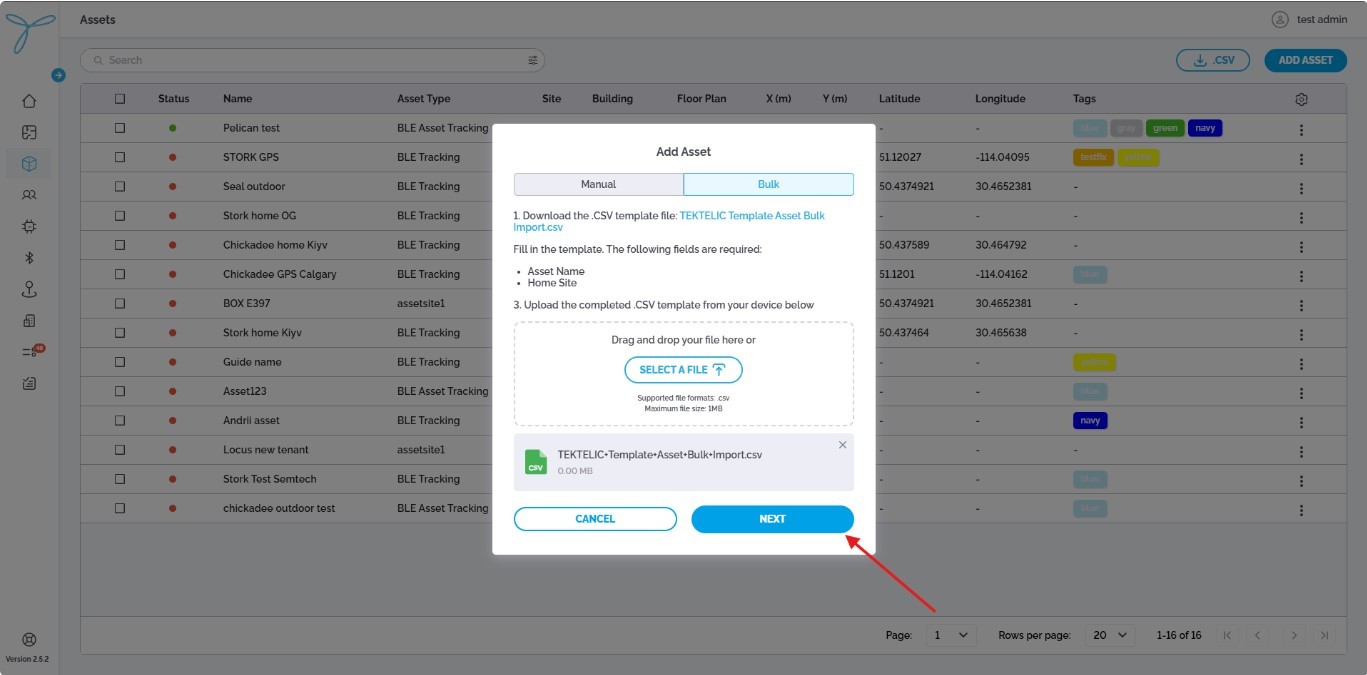
Navigate to Assets menu and click “Add asset”.
-
Import customer`s CSV file. Click on “Next” button
For details on editing, deleting, CSV export or viewing assets, refer to the Locus User Documentation
Overview
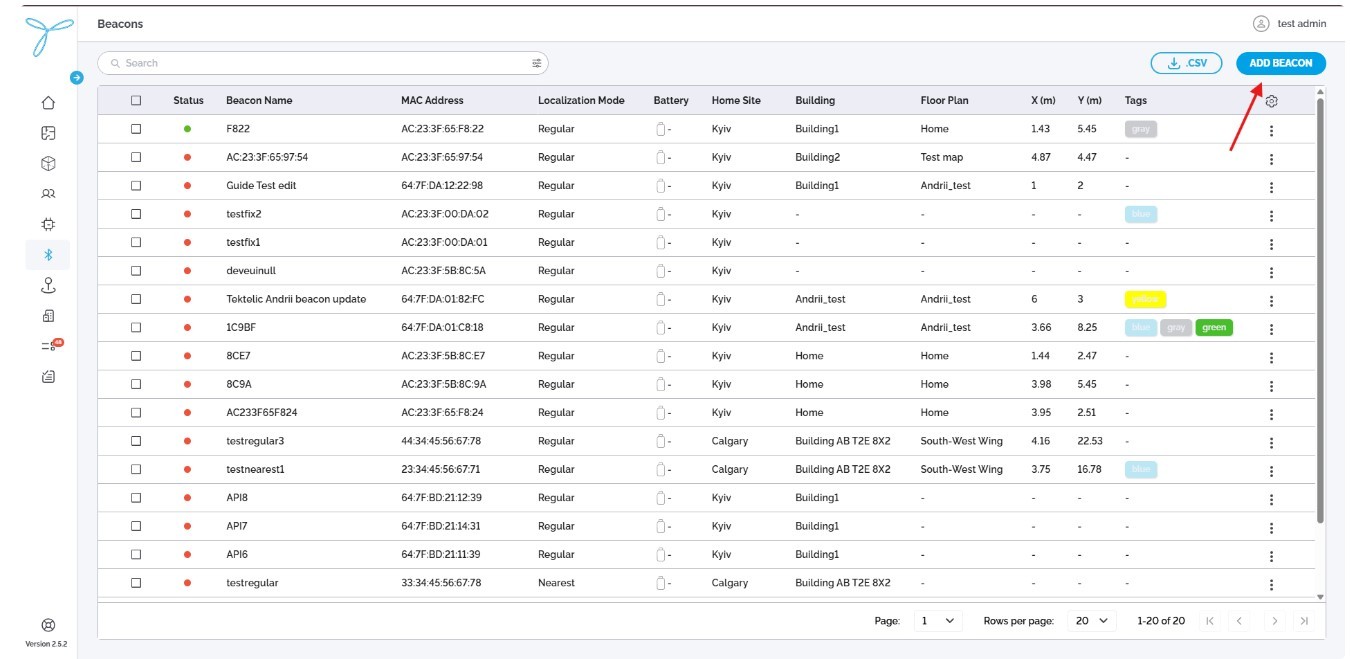
The Beacons page lets you manage and monitor beacons for indoor positioning and asset tracking.
Before You Start
Ensure you have:
-
A list of beacons provided by the customer.
-
For bulk import, CSV file filled with customers beacons.
-
In case 3rd party beacons are used:
- Contact Kyiv RnD team (astarchenko@tektelic.com or orassykhin@tektelic.com) to create a “beacon model”
- Or use the following steps here : Locus User Documentation
-
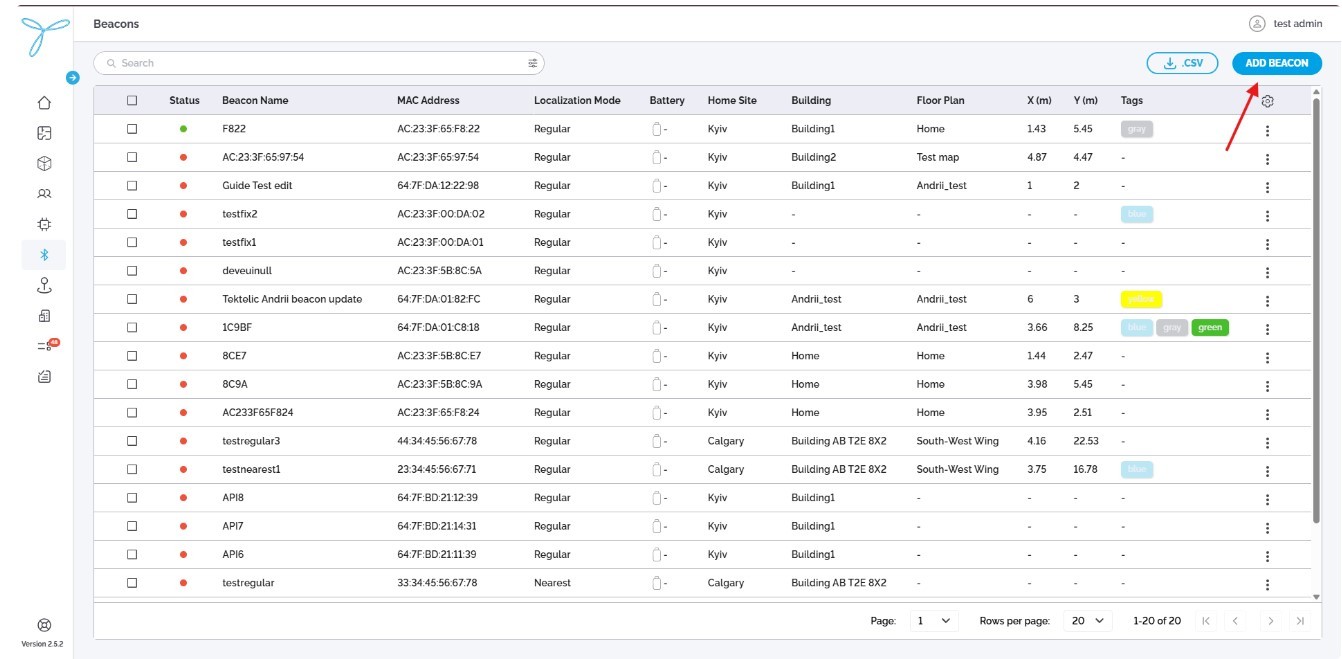
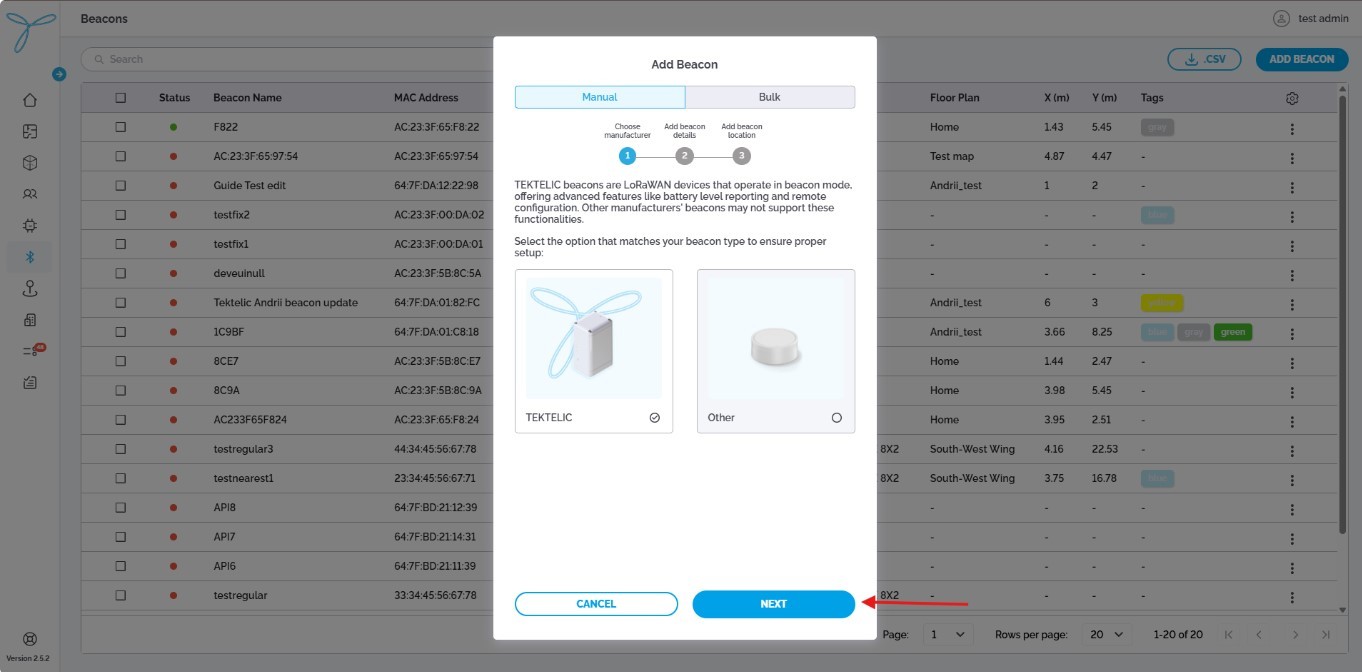
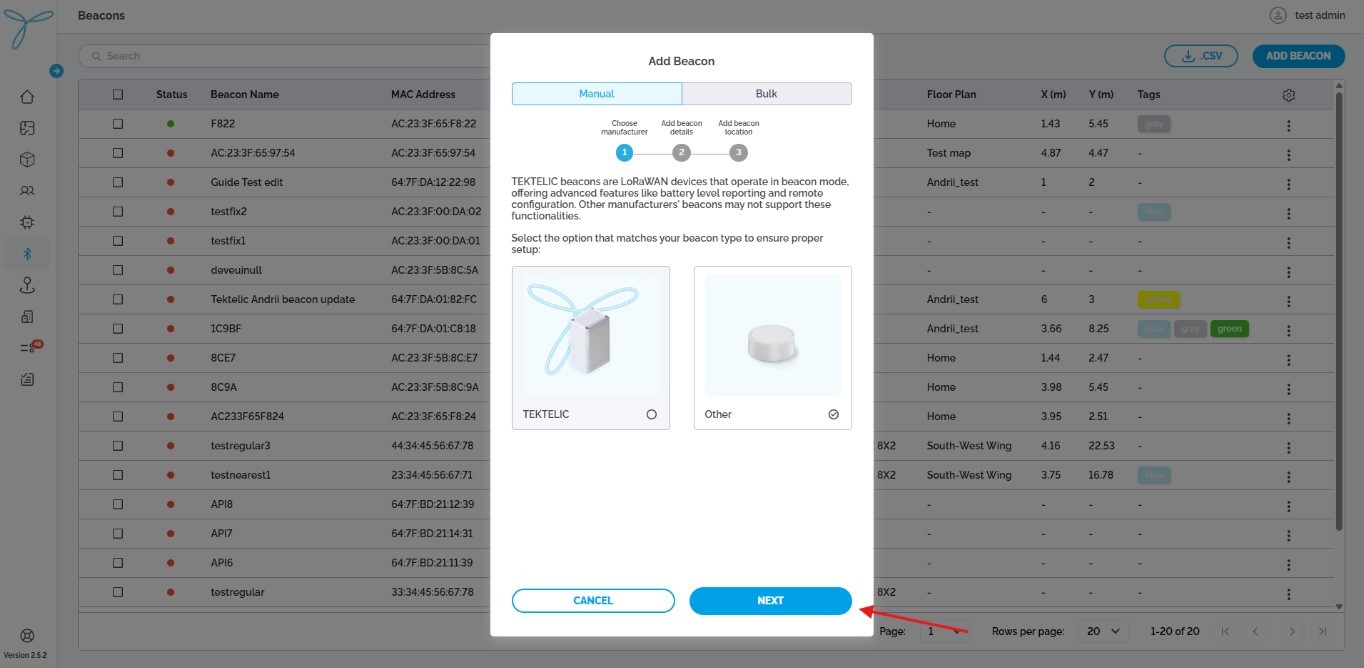
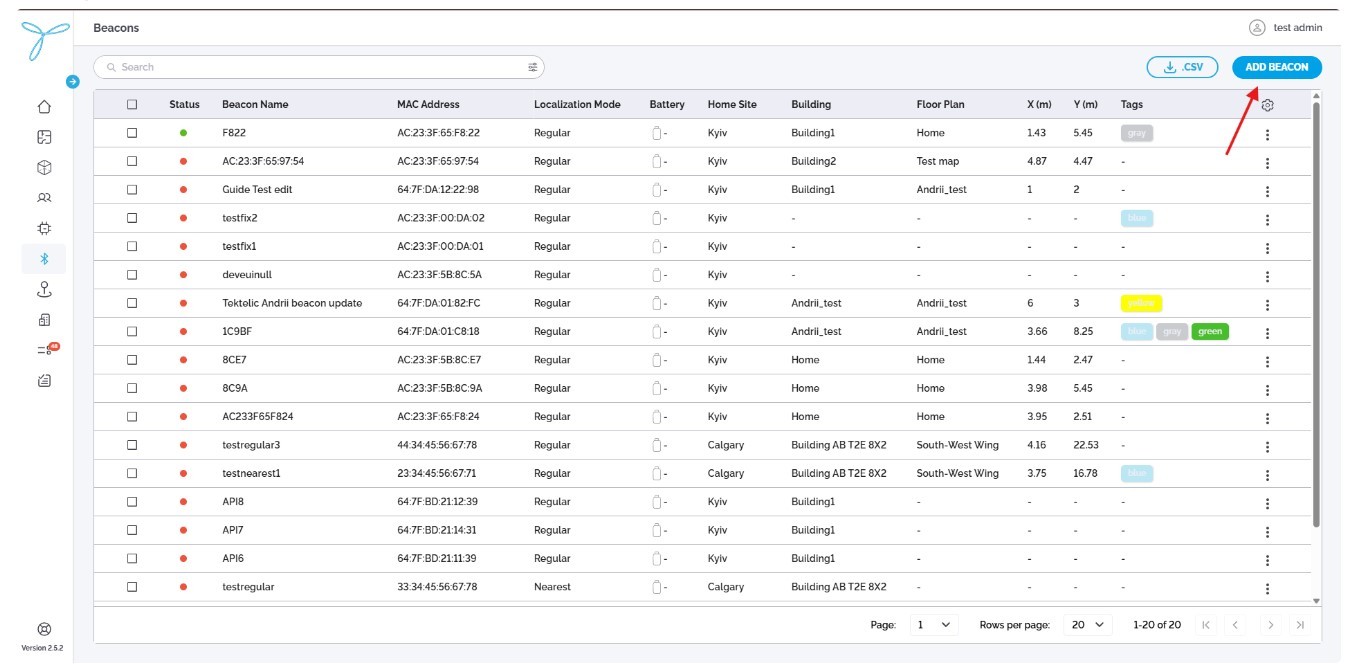
Navigate to Beacons menu and click “Add beacon”.
-
Select “TEKTELIC” as manufacturer. Click on “Next” button
-
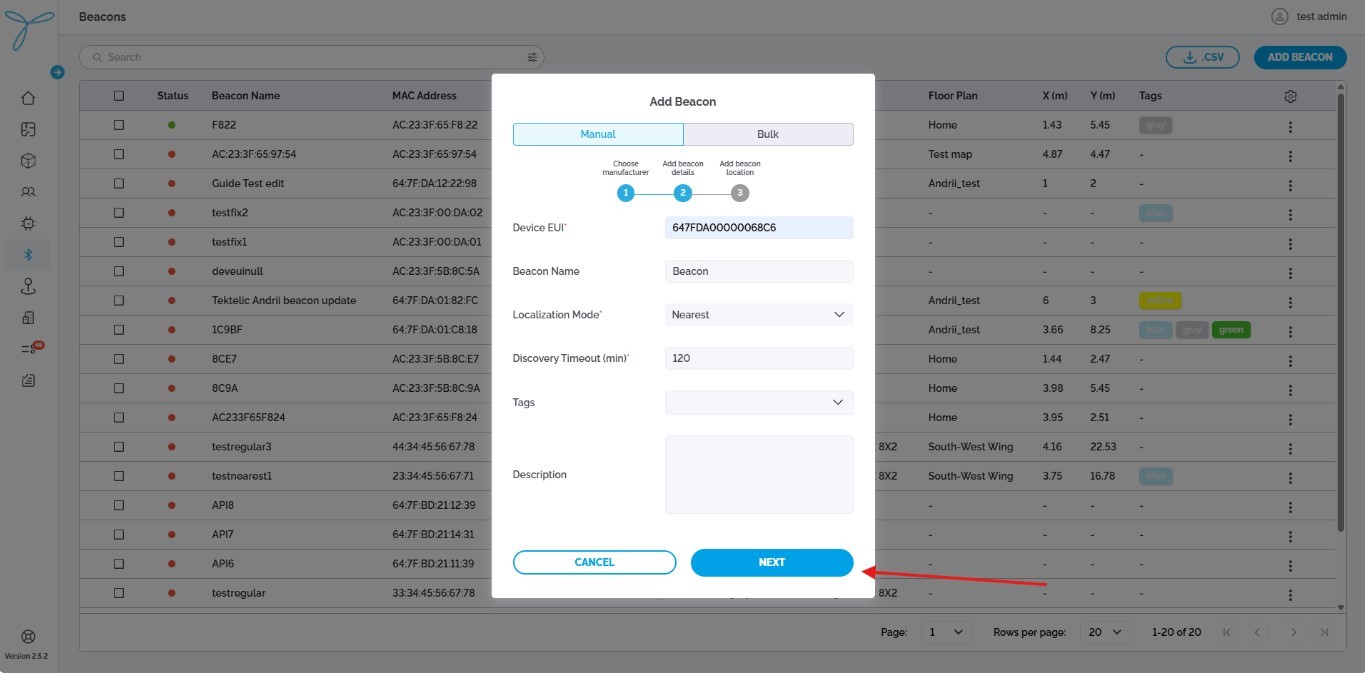
Enter DevEUI of TEKTELIC tracker. Add beacon name(optional). Select “Localization mode”. Enter discovery timeout. Click on “Next” button
-
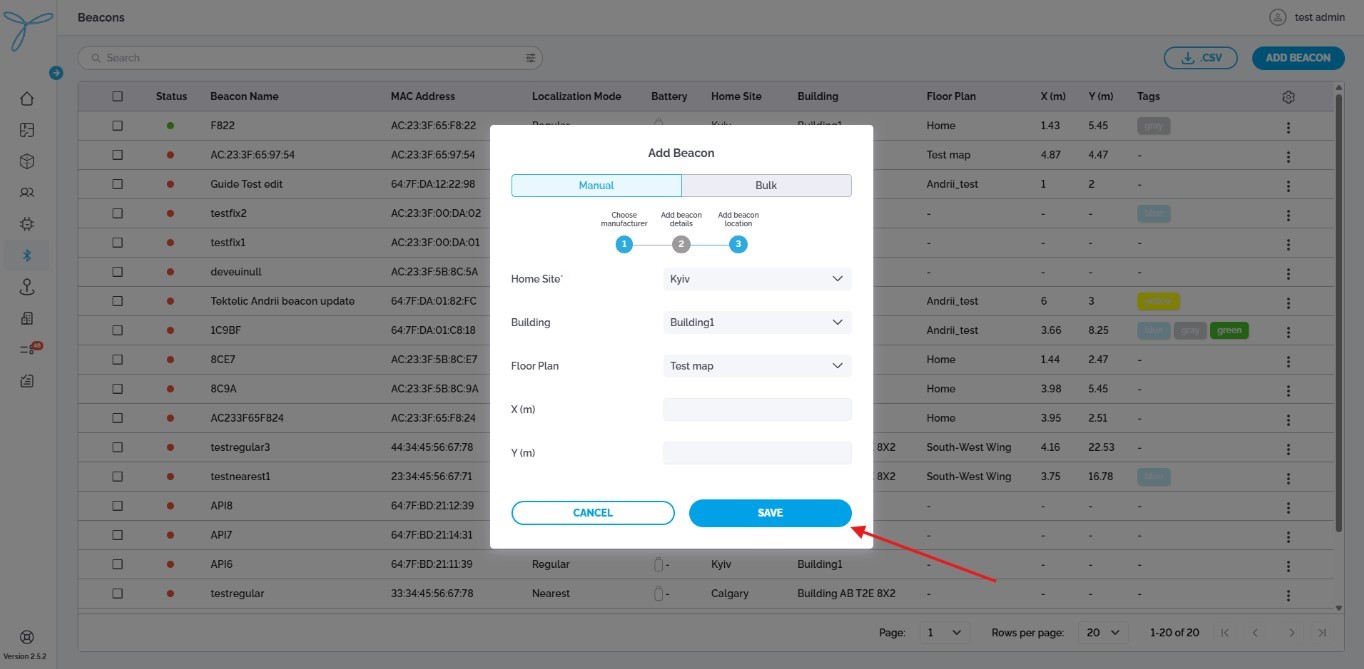
Select “Home Site”. Select “Building”. Select “Floor plan”. Click “Save”
-
Navigate to Beacons menu and click “Add beacon”.
-
Select “Other” as manufacturer. Click on “Next” button
-
Select “Beacon model”. Enter “MAC address”. Enter “Name”. Select “Localization mode”. Enter discovery timeout. Click on “Next” button.
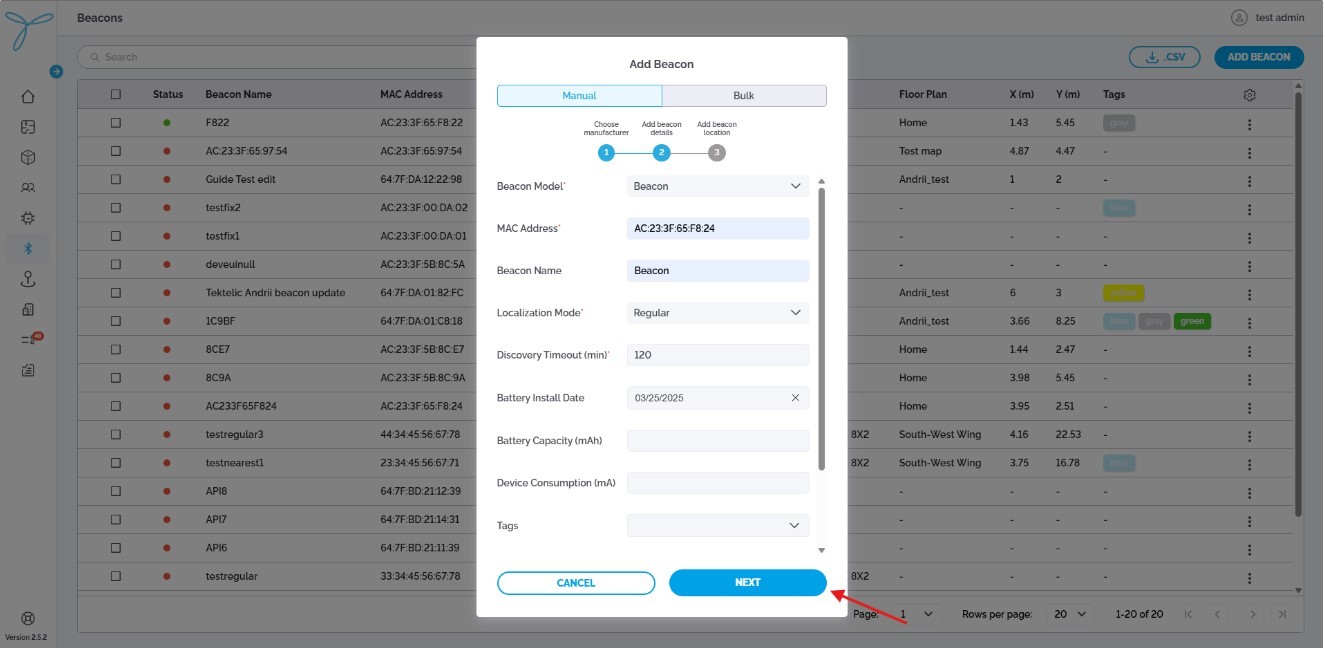
-
Select “Home Site”. Select “Building”. Select “Floor plan”. Click “Save”

-
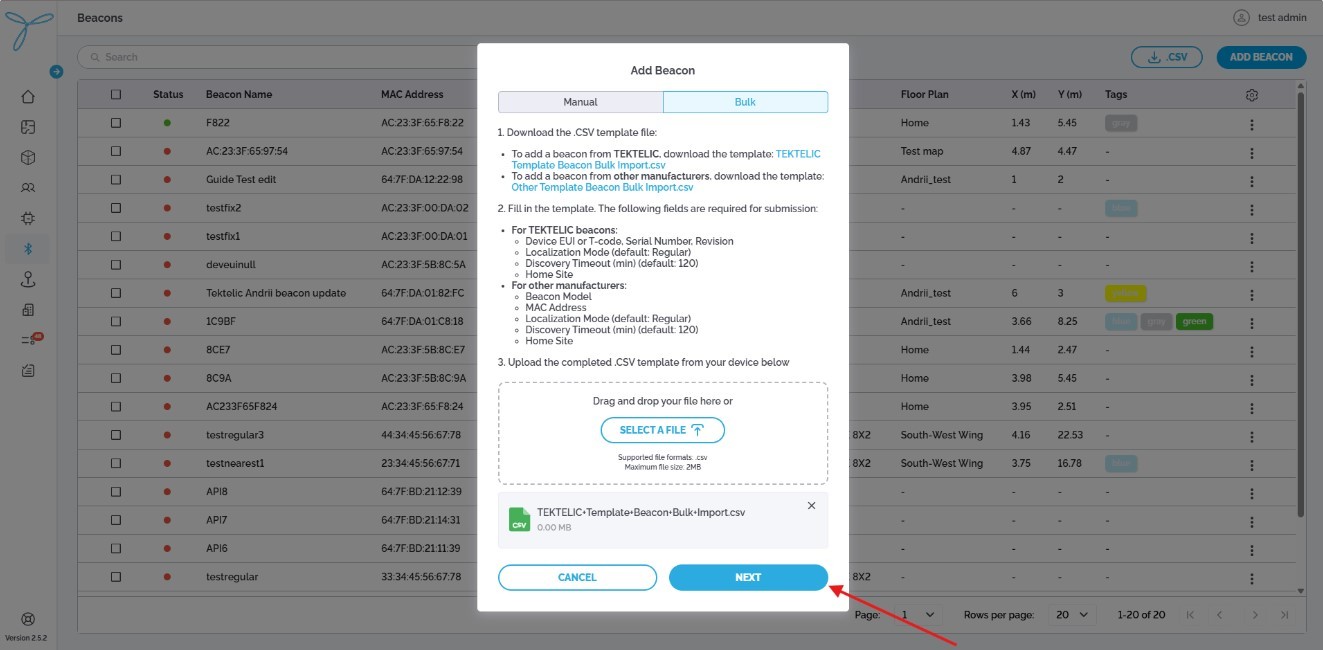
Navigate to Beacons menu and click “Add beacon”.
-
Select “Bulk”
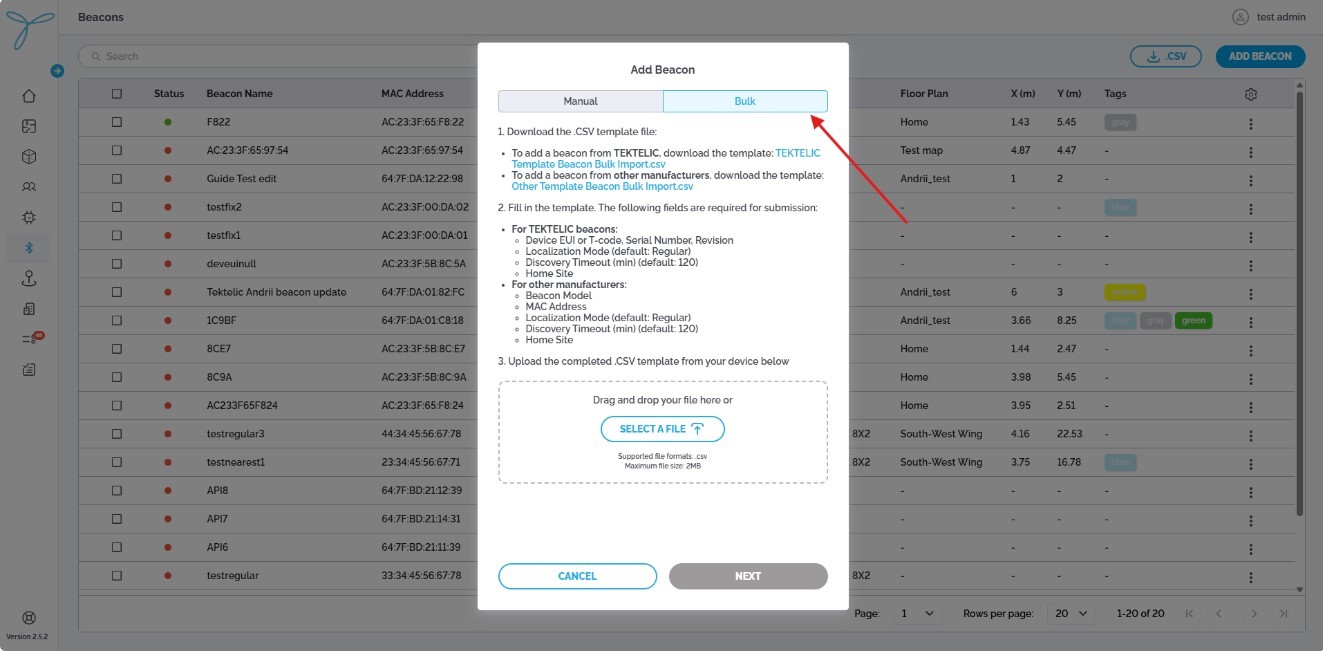
-
Import customer`s CSV file. Click “Next”
For details on editing, deleting, CSV export or viewing beacons, refer to the Locus User Documentation
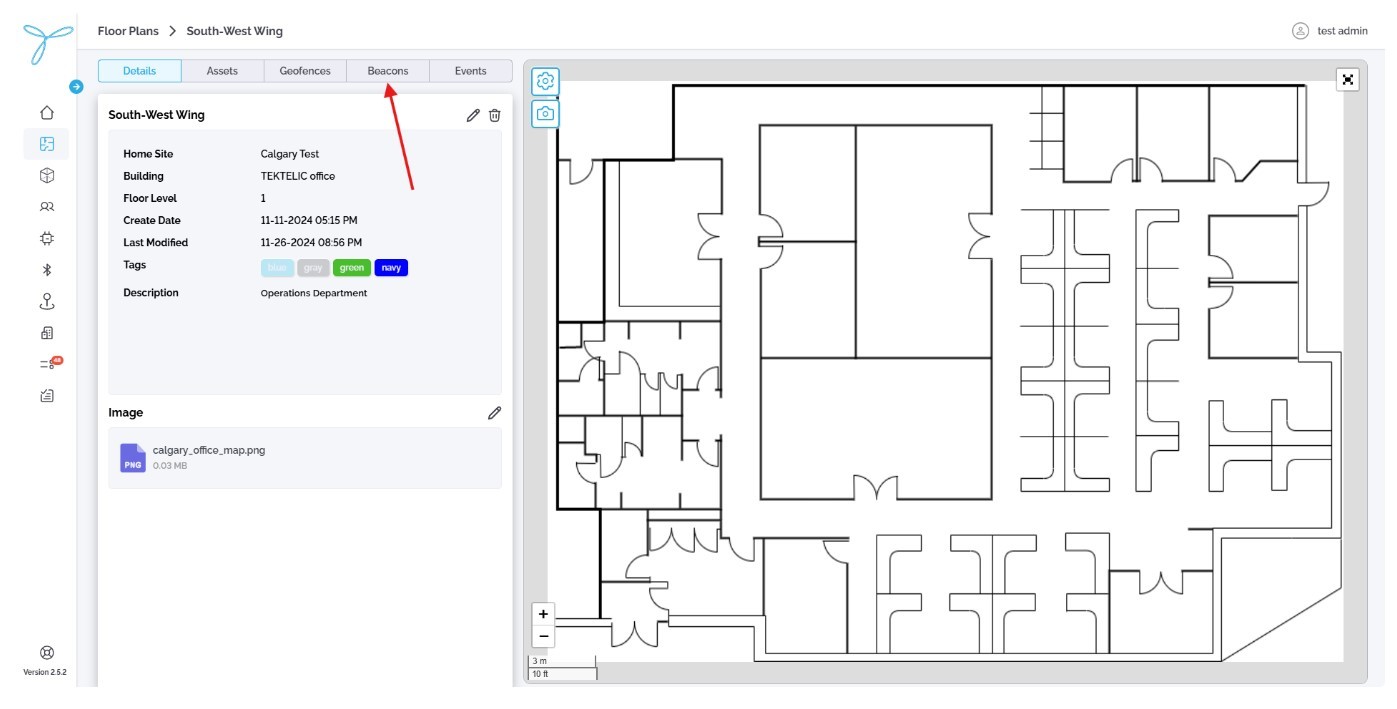
-
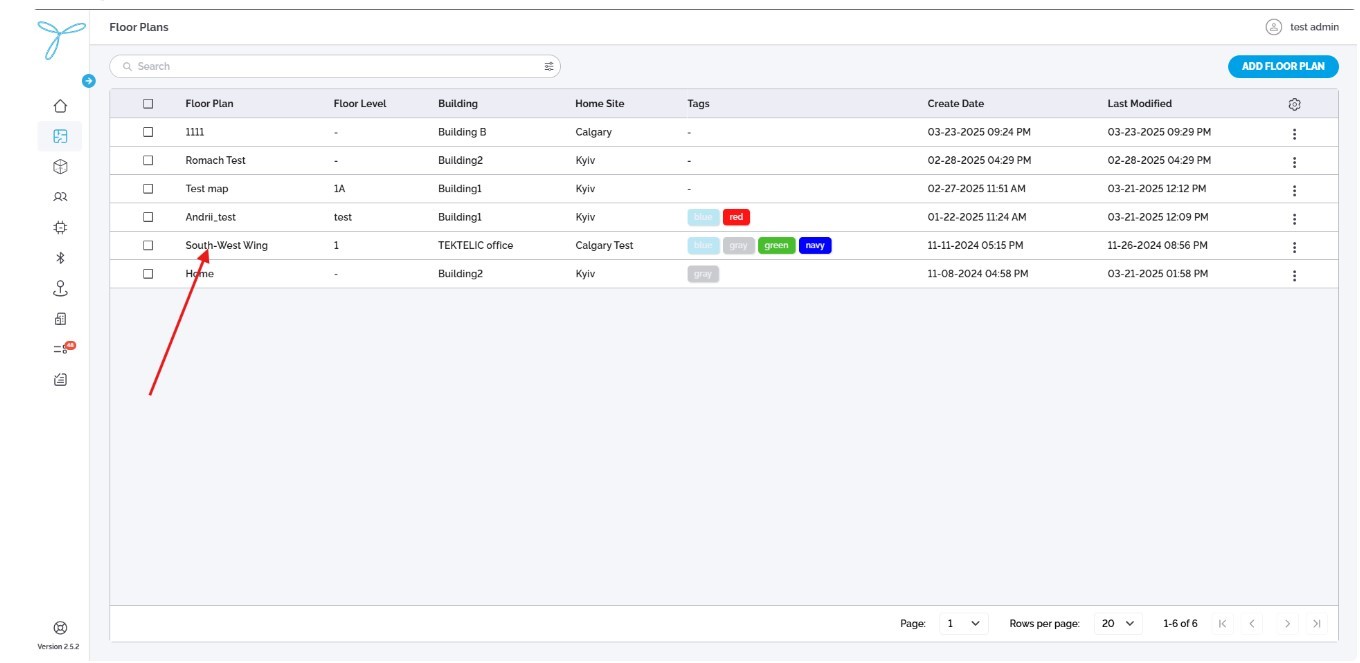
Navigate to Floor plans menu and select “Floor plan”

-
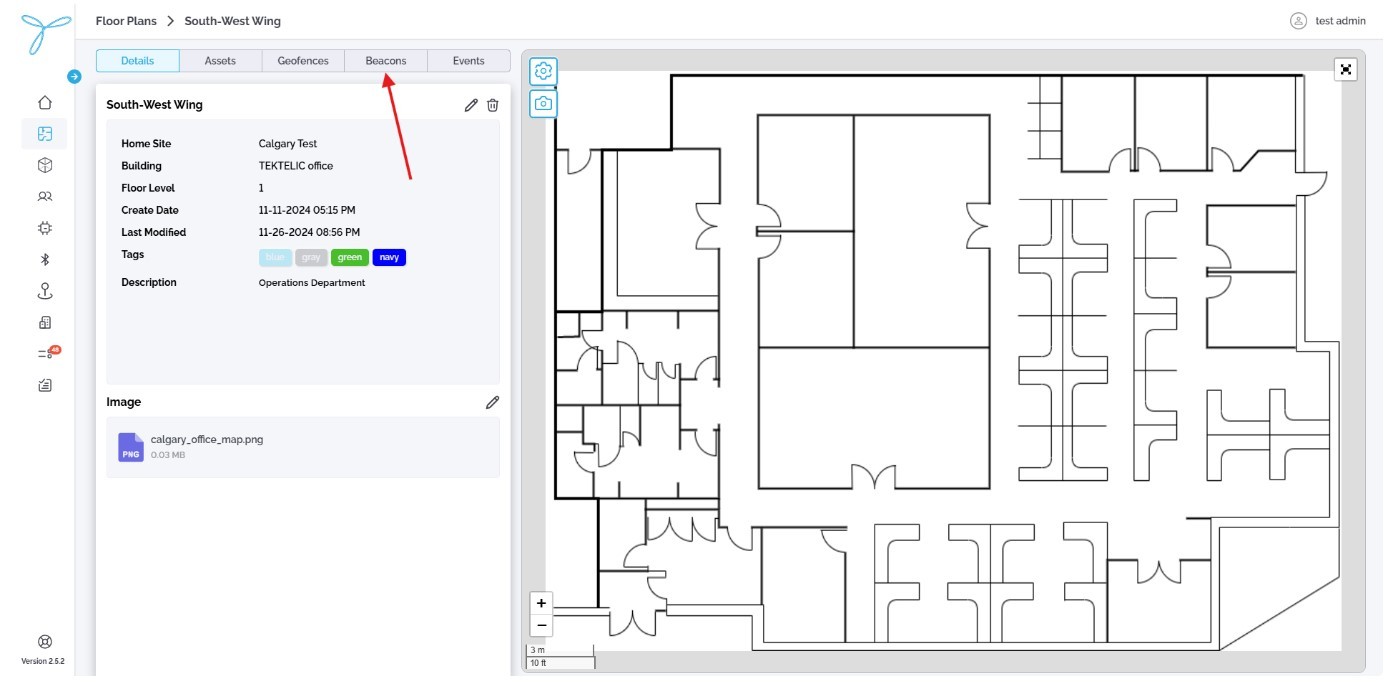
Open “Beacons” tab.
-
Click on “Draw mode” button. Click on the map to set beacon position.
Once all beacons are positioned, click on “Draw mode” again to exit Draw mode.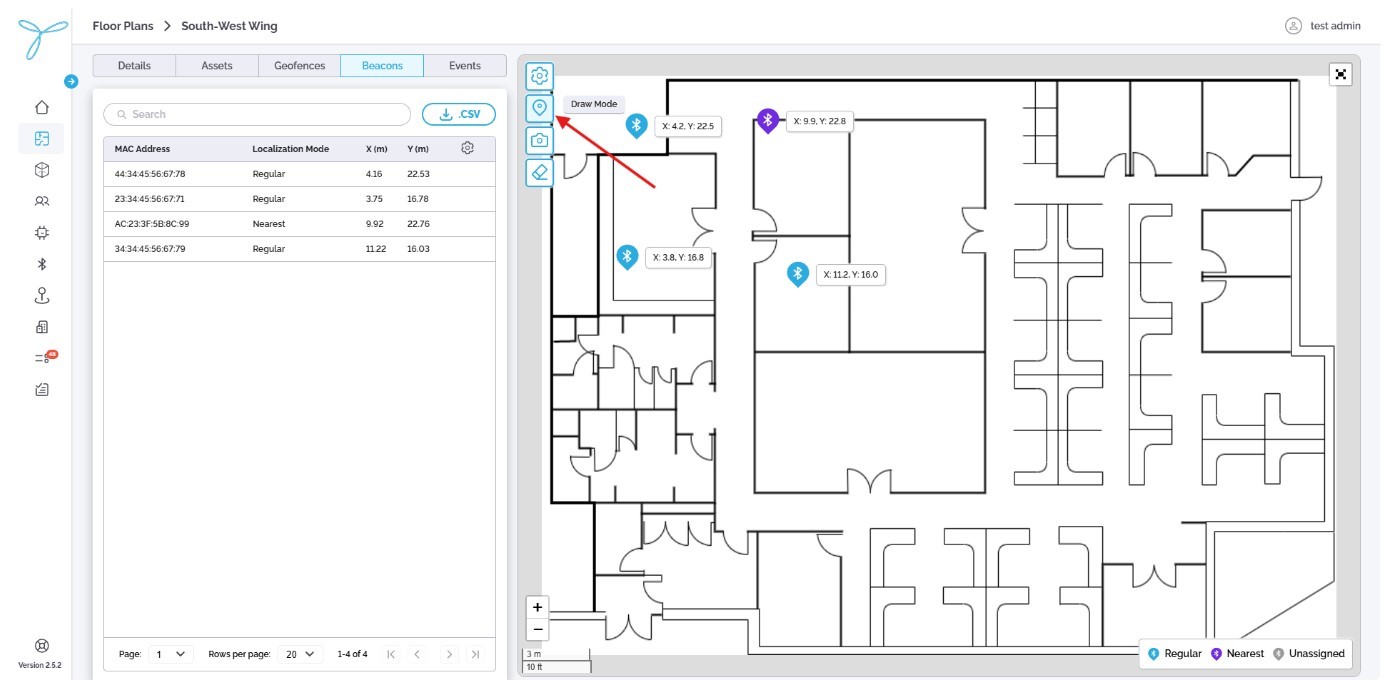
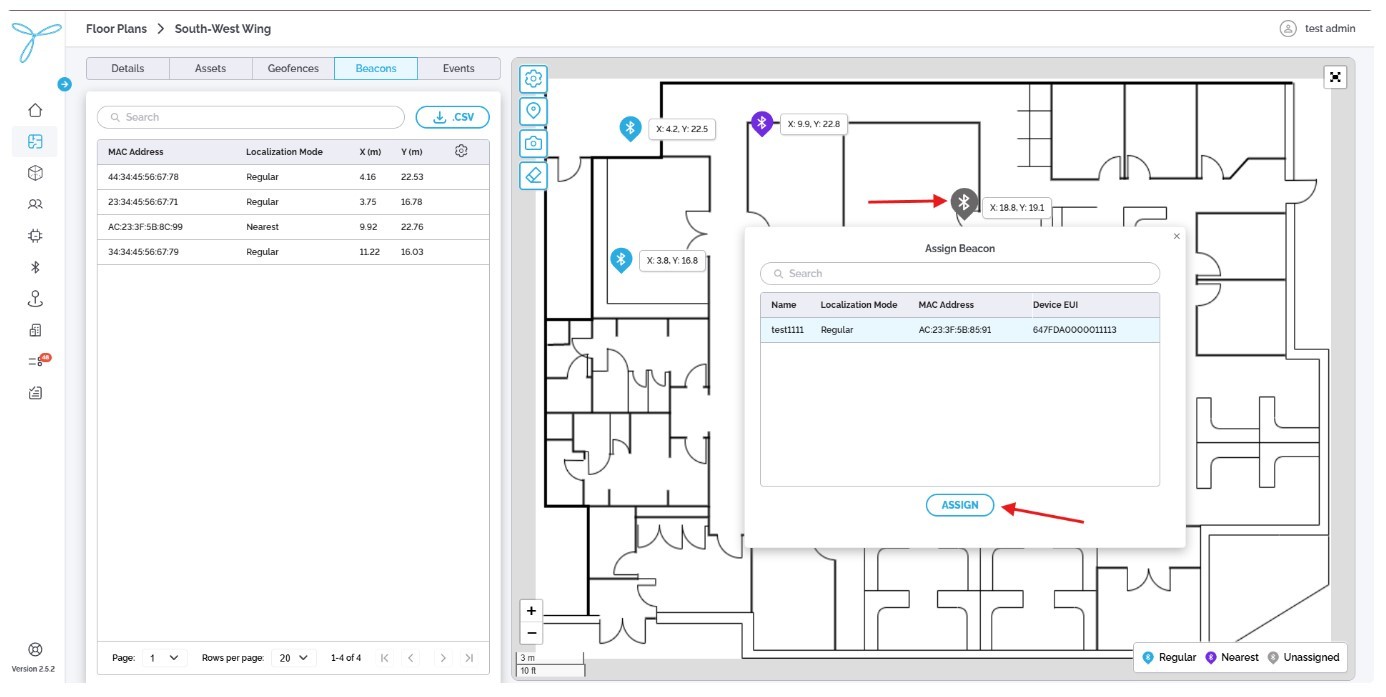
-
Click on the beacon`s pin. Select beacon from the list. Click on “Assign”
-
Navigate to Floor plans menu and select “Floor plan”
-
Open “Beacons” tab.
-
Click on “Draw mode”. Hold and “drag” beacon to it`s new position.
Click on “Draw mode” again to exit Draw mode and apply changes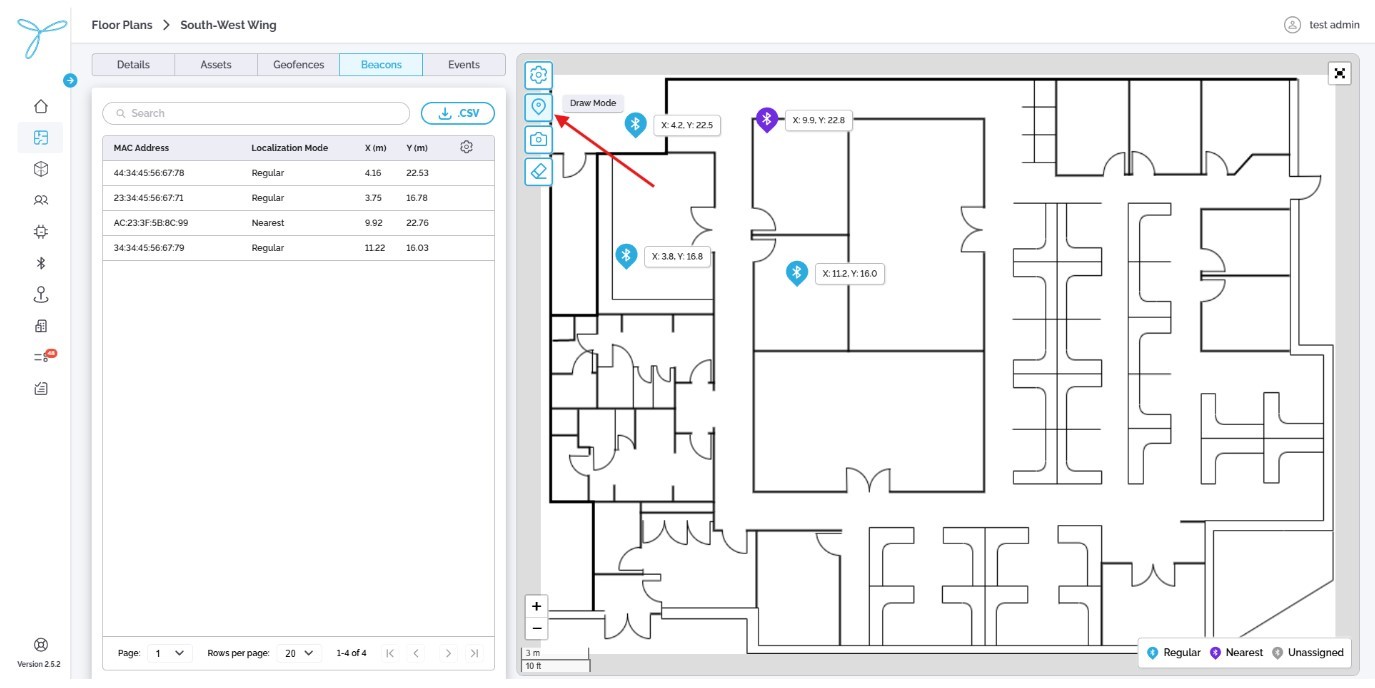
For more details on beacons positioning, refer to the Locus User Documentation
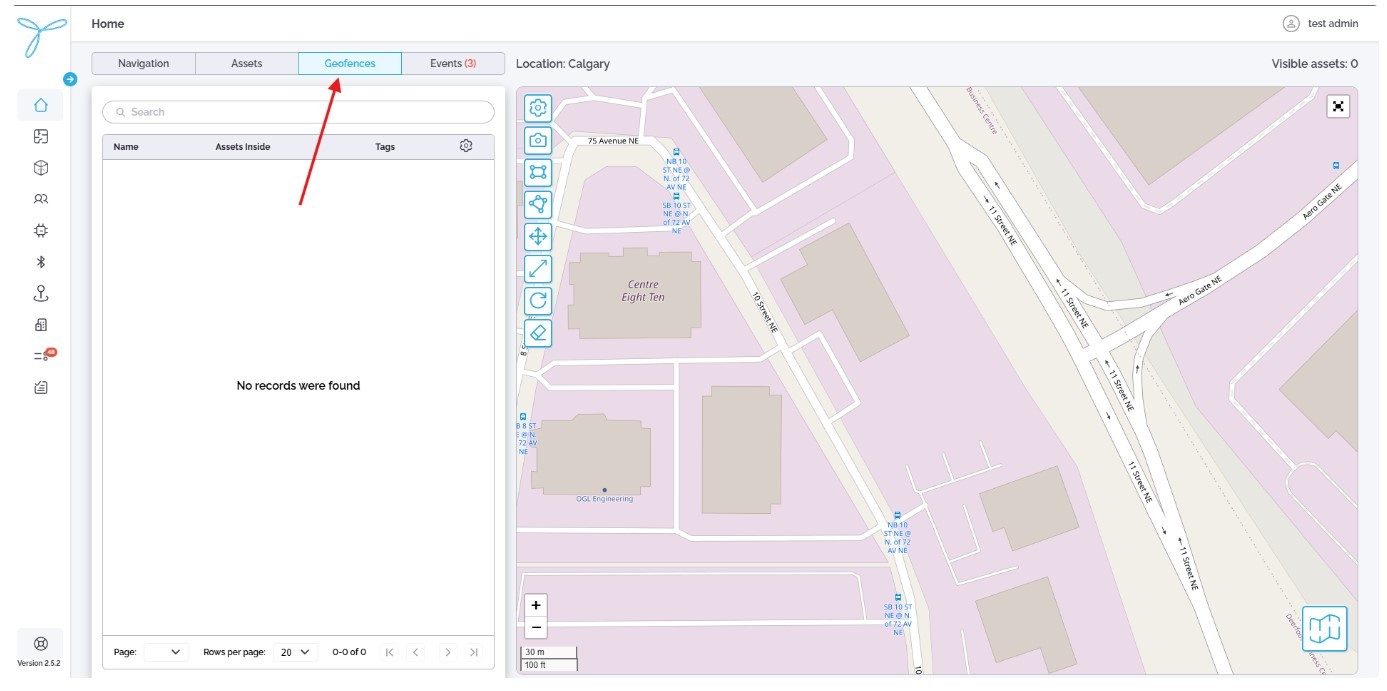
Overview
The specific geofence(s) on either the indoor or outdoor map defines the zone which can be configured to trigger events. E.g. “Asset A left geofence zone B” or “Asset A entered geofence zone C“. Geofence rules must be configured in addition to geofences to enable this functionality. (please see section 8. Event Rules )
Before You Start
Ensure you have:
- A list of geofences provided by the customer.
-
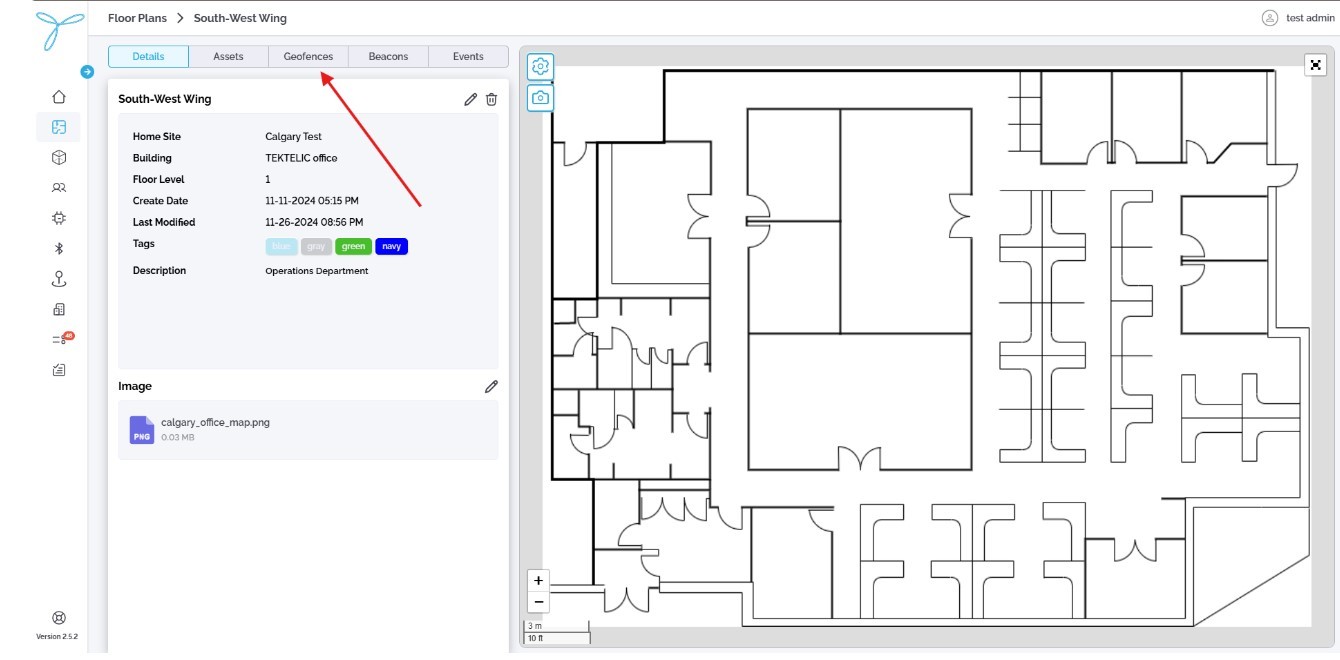
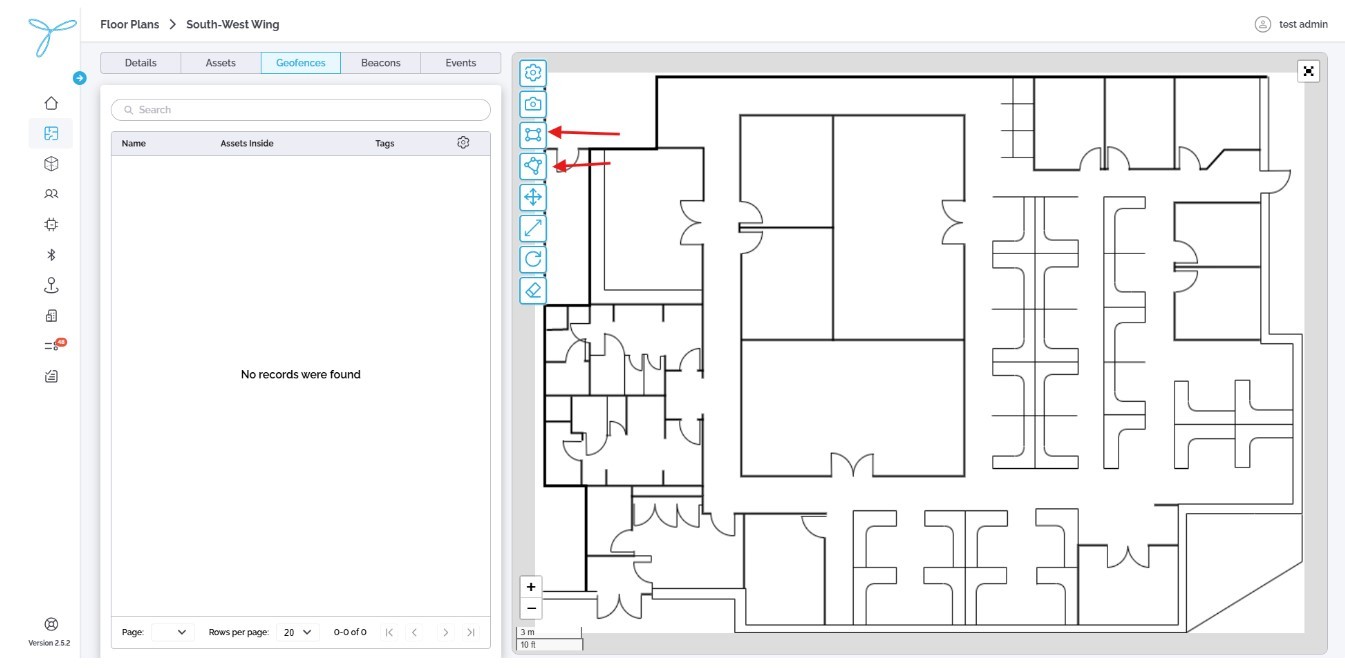
Navigate to Floor plans menu and select “Floor plan”

-
Open “Geofences” tab.
-
Select “Draw polygon” or “Draw rectangle” option
-
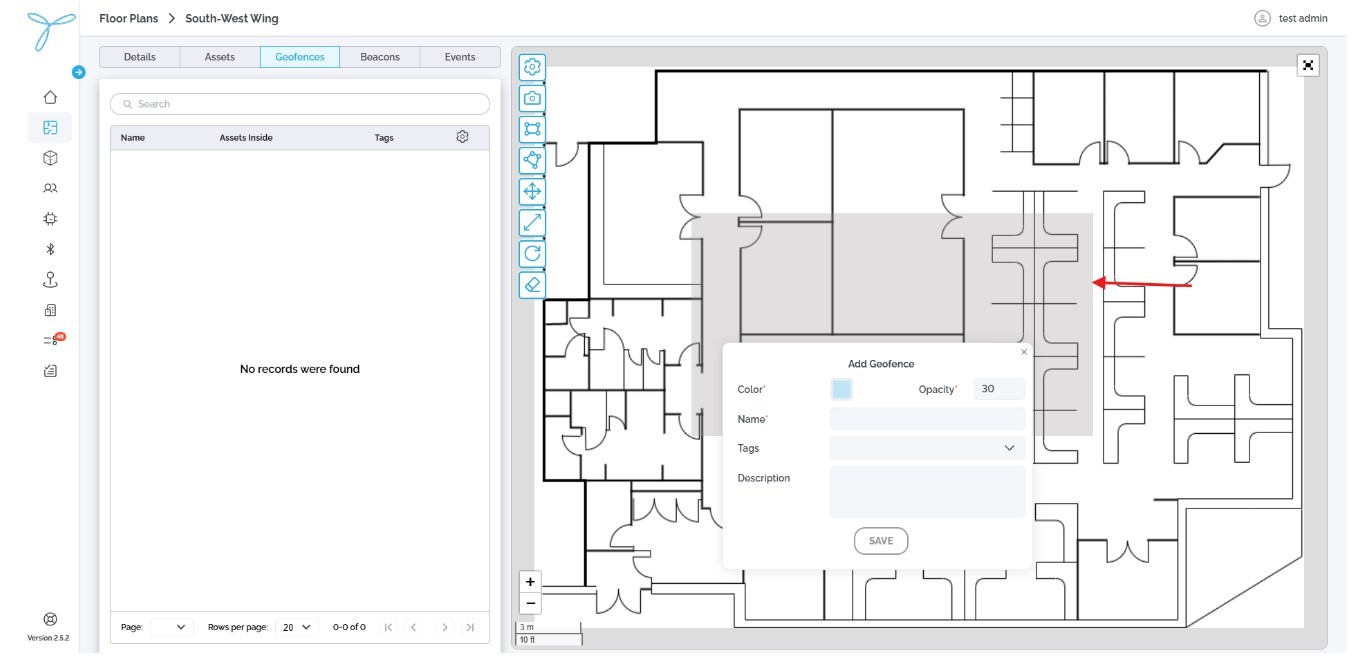
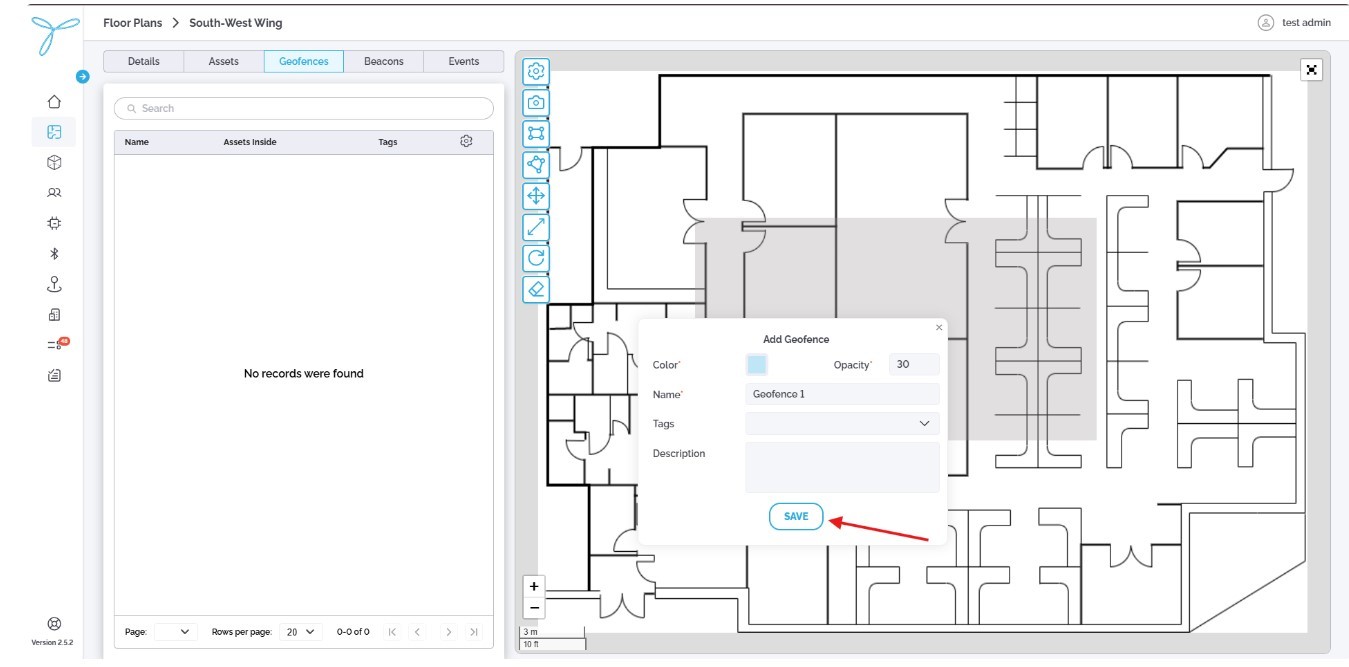
Define geofence boundaries. Click on “Draw polygon” or “Draw rectangle” button to exit edit mode. Click on geofence boundaries to open “Add geofence” modal window.
-
Select geofence color. Enter geofence name. Click on “Save” button
-
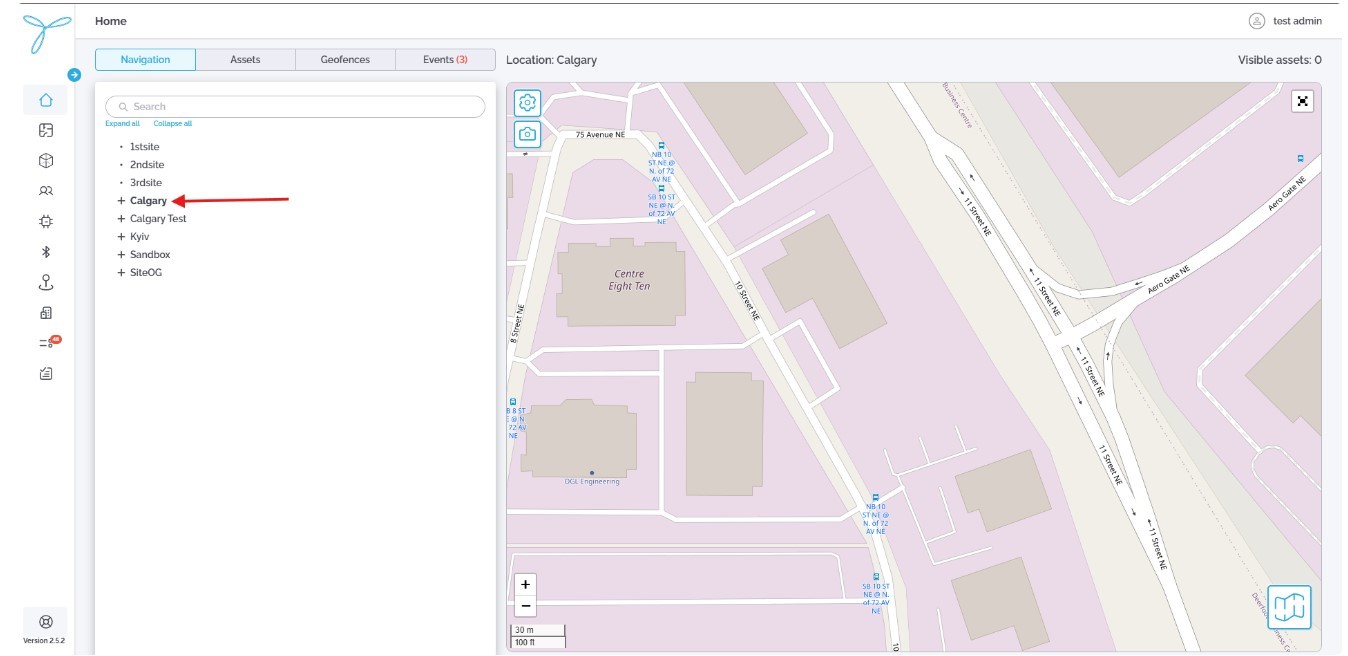
Navigate to Home menu and select Site.
-
Open “Geofences” section.
-
Follow the same steps, as for indoor geofence.
For more details on geofences, refer to the Locus User Documentation
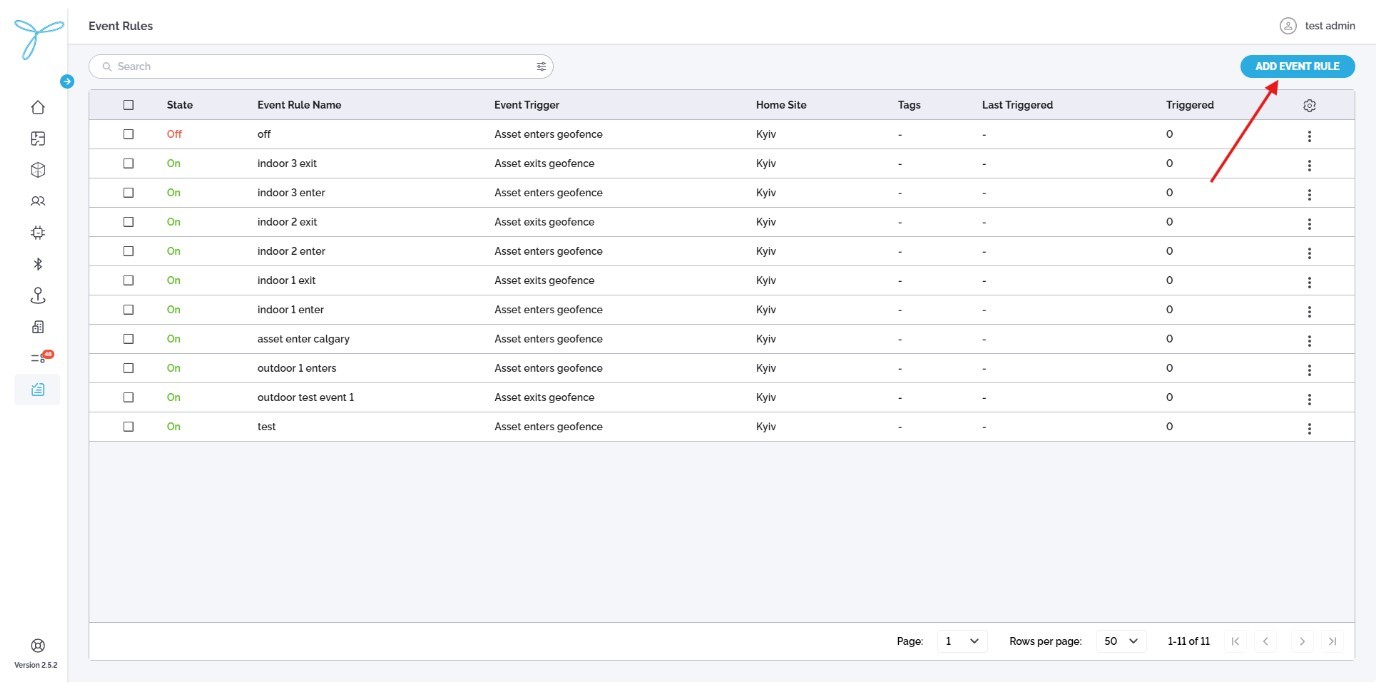
Overview
The Event Rules page lets you create and monitor rules that trigger events (e.g., assets entering/exiting geofences) across sites. Event rules are bounded with existing geofences.
Before You Start
Ensure you have:
- A list of event-rules provided by the customer.
Events without Webhook will be displayed only inside Locus. In case the external system should be notified e.g. Locus can send the event to Teams, please configure webhooks. Pls see section 8.2. Add new Event Rule (with Webhook)
-
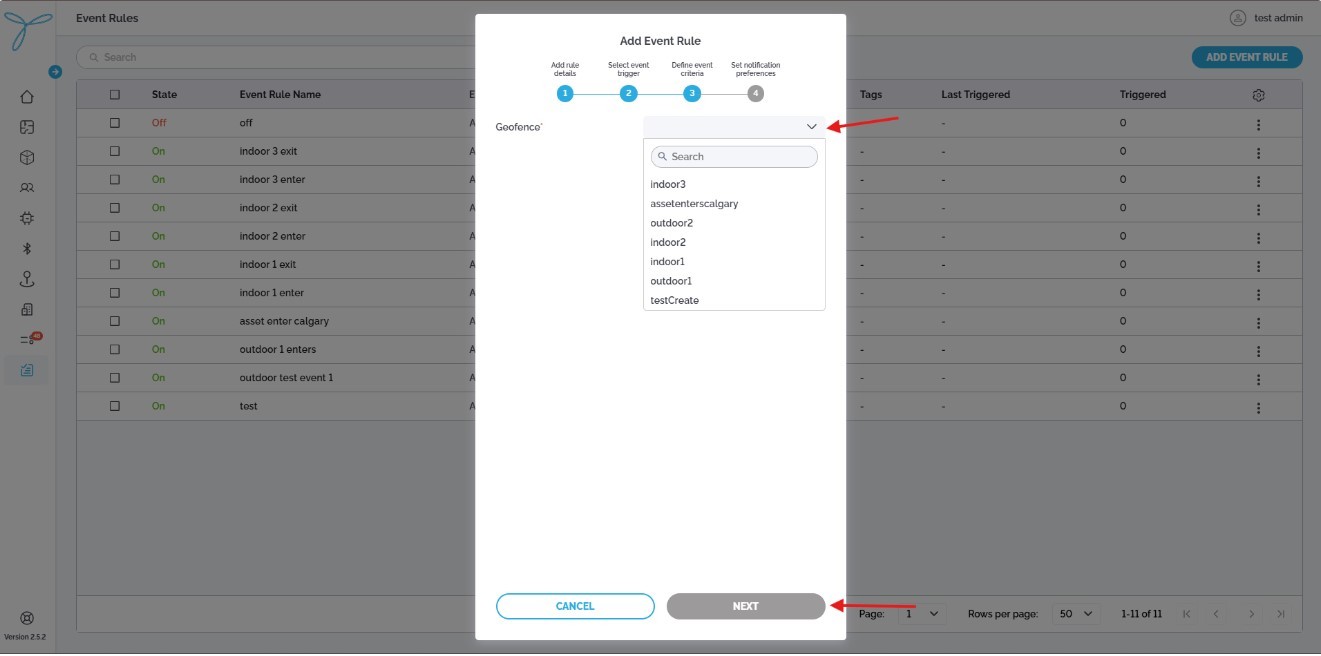
Navigate to Event rules menu and click “Add event rule”
-
Enter Name. Select Home Site.

-
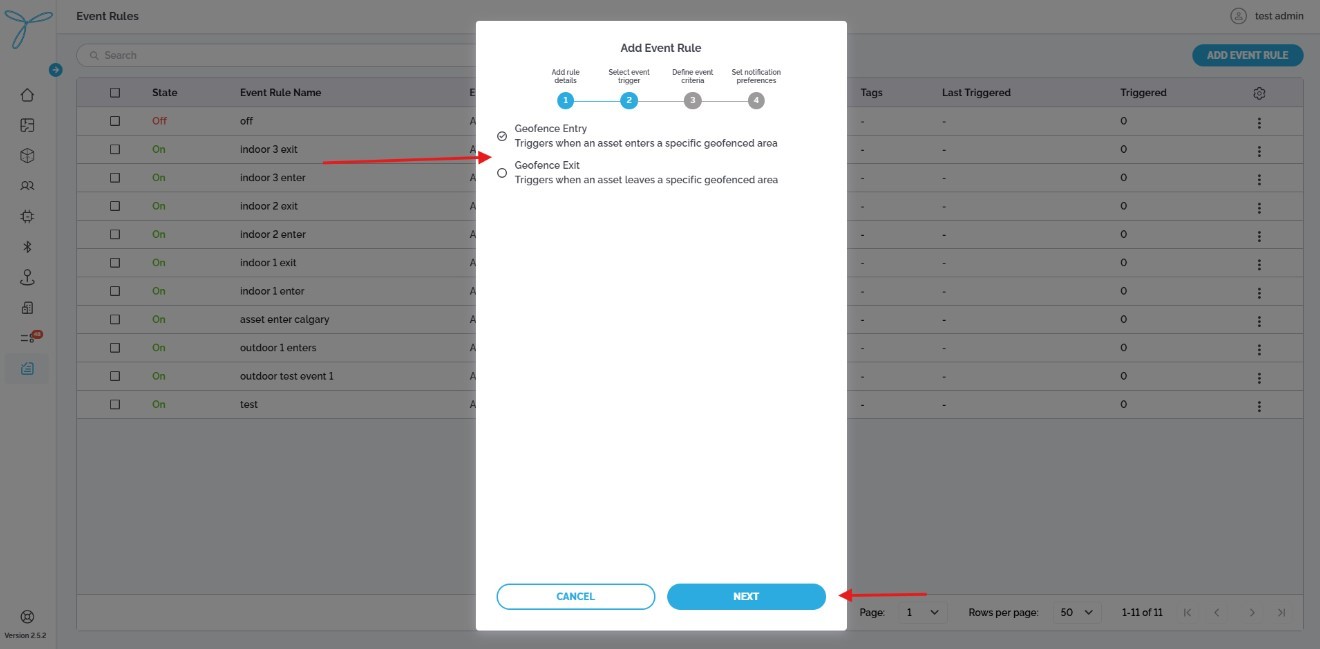
Select Event trigger. Click on “Next”

-
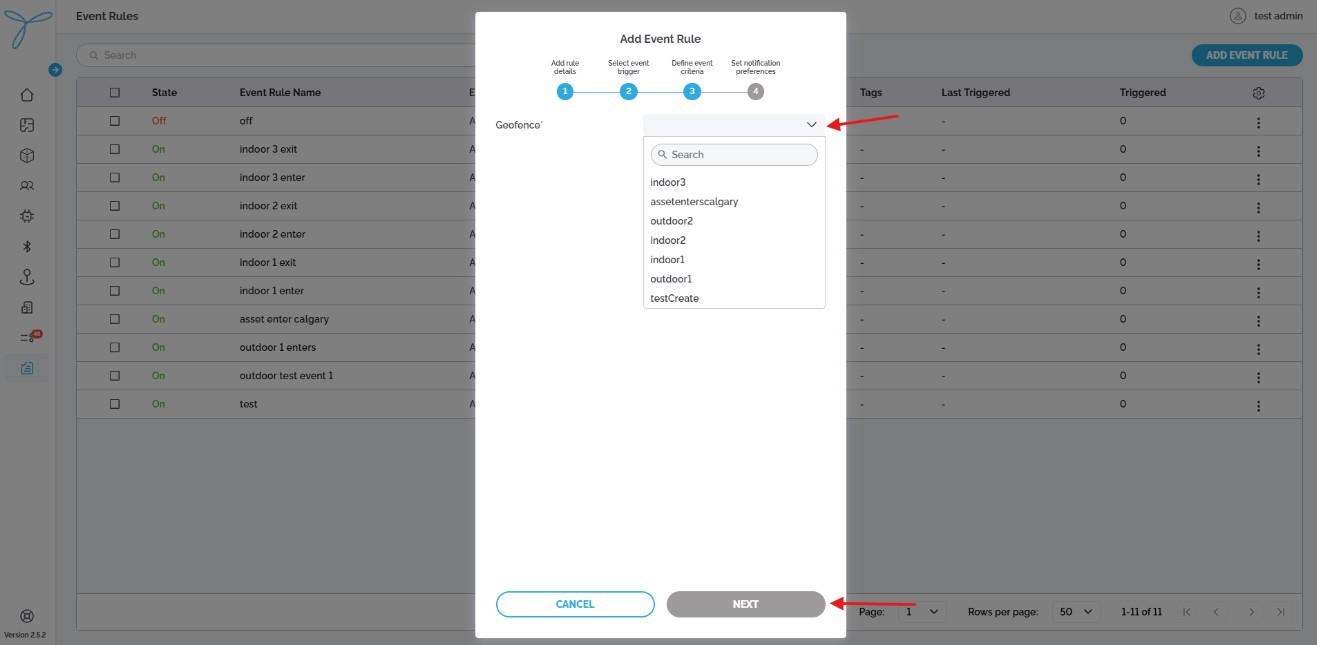
Select geofence to bound the event rule. Click on “Next”
-
Click on “Save” button.

-
Navigate to Event rules menu and click “Add event rule”
-
Enter Name. Select Home Site.

-
Select Event trigger. Click on “Next”
-
Select a geofence to bound the event rule. Click on “Next”
-
Enter URL. Enter Headers. Enter Body. Click on “Test webhook” to validate integration. Click on “Save” button.
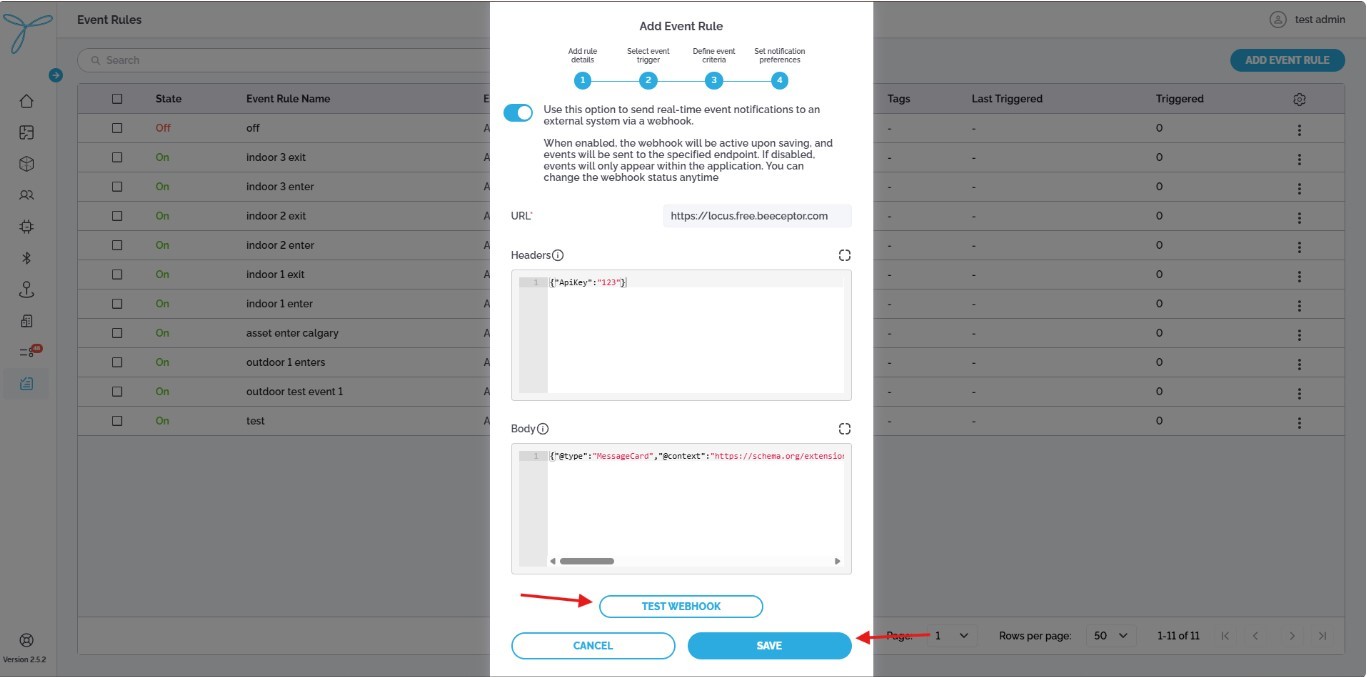
Example (in JavaScript):
URL: client`s HTTPS server.
Headers:
{
    "ApiKey": "123"
}
Body:
{
    "@type": "MessageCard",
    "@context": "https://schema.org/extensions",
    "summary": "{{eventRule.name}}",
    "themeColor": "0076D7",
    "title": "Device {{hit.last.device.eui}}",
    "text": "Event Type: {{eventType}}. Floor: {{hit.last.indoorLocation.indoorLocation.floor.id}}. Site: {{hit.last.indoorLocation.indoorLocation.site.id}}"
}
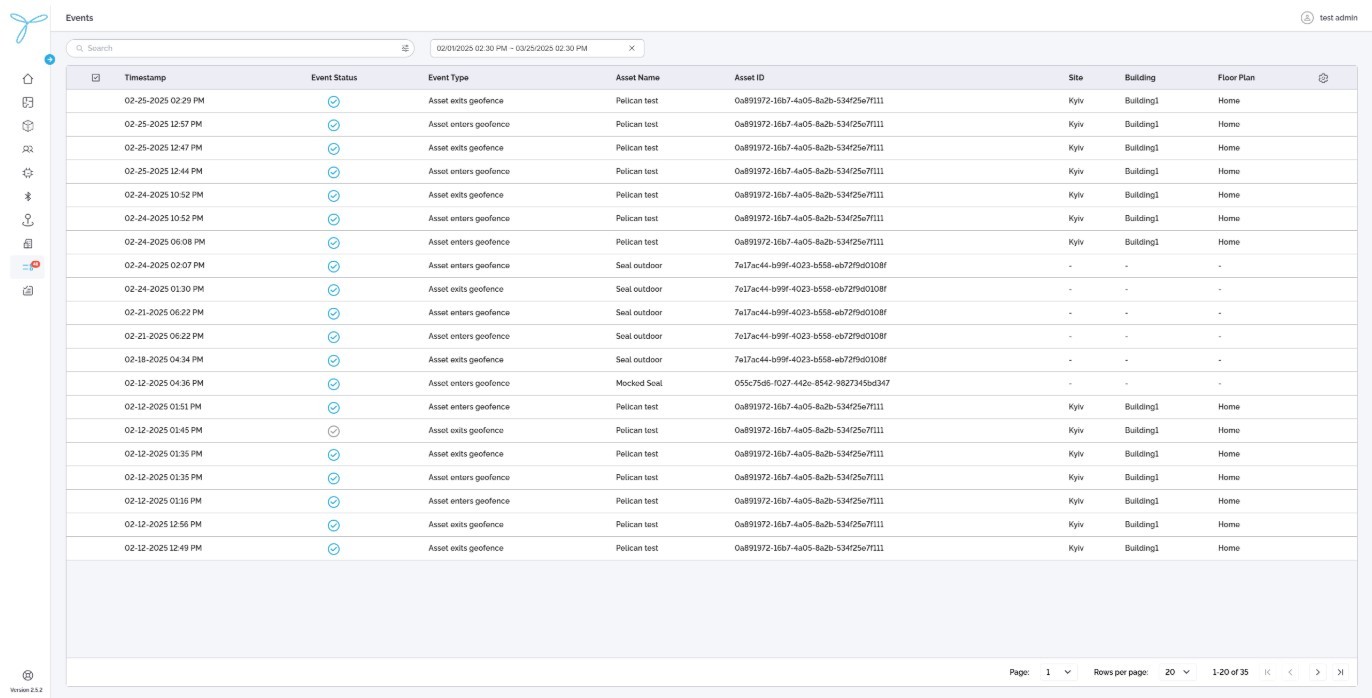
Overview
The Events page lets you monitor and analyze events related to assets, such as entering or exiting geofences, across sites, buildings, and floor plans.
Once the setup is completed, the Support Engineer must verify the solution:
- for indoor: Support Engineer needs to receive and verify with the client the position from the indoor device
- for indoor: Support Engineer needs to receive and verify with the client the position from the outdoor device
Clients need to physically place beacons accordingly to their placement on the Floor Plan for indoor tracking.
After than, we need to re-check workability of the complete solution. Position for indoor tracking will be recognized after 4 successfull BLE scan`s from the device, WITH valid existing beacon`s MAC addresses.
- Altitude - Height of an asset relative to sea level, measured in meters.
- Asset - An item, object, or person that a user wants to track, such as equipment, inventory, or personnel. In Locus, assets are linked to devices to monitor their location.
- Asset ID - Unique identifier automatically generated by the system for each asset.
- Asset Status - The current condition of an asset in LOCUS, shown as Online (actively tracked with intermittent updates), Offline (no current data from the device), or Not Available (not linked to a device). This reflects whether the asset’s position is being monitored.
- Asset Type - A category user creates in LOCUS to label your assets. It can be anything you need to track, like a van, cart, or road sign, helping you organize and identify assets easily.
- Battery Level - The most recent battery charge of a device or beacon (%).
- Beacon - Device from TEKTELIC or a third-party provider that uses BLE (Bluetooth Low Energy) to send signals. Beacons help devices locate assets indoors by acting as reference points for tracking.
- Beacon ID - Unique identifier automatically generated by the system for each beacon.
- BLE (Bluetooth Low Energy) - Wireless technology used by beacons for short-range communication.
- Beacon model - The specific type or version of a beacon used in LOCUS. For Tektelic beacons, the model is automatically pulled from the database. For third-party beacons, user will need to create and enter the model yourself.
- Building - A structure within a Site for indoor tracking. Contains floor plans. Linked to a Site.
- Device - A TEKTELIC IoT tracker that collects location data (via GPS, BLE, or WiFi). Devices must be assigned to an asset to display its position.
- Device model - Specific hardware model name of a tracking device (e.g., PELICAN).
- Event - Notification triggered by predefined conditions (e.g., low battery).
- Event ID - Unique identifier automatically generated by the system for each event.
- Event Rules - Custom conditions user set in LOCUS to trigger alerts about your assets. Examples include when an asset enters or exits a geofence, or when a device’s battery runs low.
- Device EUI – 64-bit globally-unique Extended Unique Identifier (EUI-64) is assigned by the manufacturer, or the owner, of the end device.
- Floor Plan - Internal layout map of a building, used for indoor tracking.
- Home Site - The logical location where entity belongs to, defined by the end user
- Geofence: A virtual boundary user creates in LOCUS to monitor assets indoors or outdoors. The user can set it up around a specific area (like a room or a site) and link it to event rules to trigger events, such as when an asset enters or exits the zone.
- Indoor Map – In LOCUS, this refers to a layout of a specific level within a building (e.g., an office floor or warehouse section). User will use indoor maps to place devices and beacons for precise indoor tracking. Same as “Floor plan”.
- Latitude – A geographic coordinate that shows an asset’s north-south position on Earth. In LOCUS, it’s used with GPS data from Tektelic devices to track assets outdoors.
- LoRa - Long-range wireless communication technology used by tracking devices
- Longitude – A geographic coordinate that shows an asset’s east-west position on Earth. Paired with longtitude in LOCUS, it pinpoints outdoor asset locations using GPS.
- MAC Address - 12-character unique network identifier for beacon devices.
- Outdoor Map – Global map showing the planet, focused on a specific Site. Tracks devices moving between Sites using GPS or WiFi.
- PSR (Packet Success Rate) - Percentage of successfully received data packets from a device within one hour.
- RSSI (Received Signal Strength Indicator): Signal strength received from devices or beacons, measured in dBm.
- SNR (Signal-to-Noise Ratio) - Measurement of signal quality compared to background noise, expressed in decibels (dB).
- Site – The physical location where an entity is located
- Tag – User-defined labels associated with an entity, used for categorization and management.
- Tenant – Organization or workspace within the LOCUS application.